A feature of CapturePost has been its ability to print small items, such as ID cards, directly on-site during the photography session, making the system particularly suitable for events such as registration days.
In the most basic sense, the user selects the desired ID template via the CapturePost setup menu, then prints the ID card once the subject has been photographed. Printing can begin automatically after each subject is photographed or manually via the F10 function key.
Increasingly, schools require different ID cards for staff and students. Often, even students will require different ID cards depending on their grade or other criteria. CapturePost accommodates this by automatically selecting the correct ID card template depending on changes in subject data.
Key points:
Instantly print ID cards as each subject is photographed
Select a ‘default’ template in the CapturePost setup
Dynamically change the template according to subject data
Selecting a Template
For an ID to be printed in CapturePost, a template must first be created using the Template Designer in NeoPack.
NOTE
Keep in mind that ID card templates must be created as fixed-size items set to the dimensions of the intended printed card. Meaning that for CR80 ID cards, the template size should be set to 2.13 × 3.38 inches or 54×86 mm.
Once the design is completed, the user can open CapturePost and select the desired template in the ID Card Printing section of the File>Setup menu.
Additional options are also available, such as designating a printer, or selecting if the ID card will print automatically after a specified number of seconds, or if printing should be triggered manually using ID Card>Print Now menu option or F10 key.
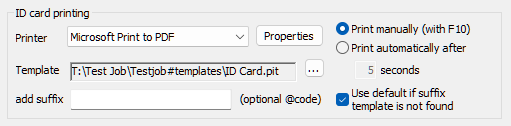
Figure 1: CapturePost ID Card Printing options in Setup
CAUTION
The templates and any associated graphics must be saved in a jobname#templates and jobname#graphics folder in the same directory as the TNJ file.
If the files are not stored alongside the tnj file in these folders CapturePost will not be able to locate the template(s) and any required graphics.
Making the Selected Template Variable
The key factor in enabling CapturePost to dynamically select the item template according to subject data is the ability to specify a suffix to the chosen template's filename. The suffix can include any characters, but notably supports @codes. Typically, the @code will refer to a subject field; therefore, for each subject, the value of this field is appended to the selected template's base filename. CapturePost will then use this template for printing.
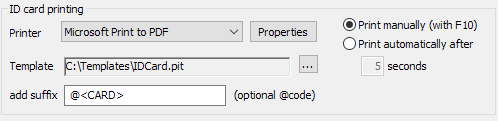
Figure 2: Specifying a suffix with an @code
Example 1 - Staff versus Students
Consider a common scenario where students at a school are to receive an ID card as they are photographed. The template for this card is simply named IDCard.pit. However, staff at the school are to receive a totally different ID card. Data unique to the staff can be used as a suffix to the template base filename in order to select a completely different template.
In our example, the job must have a subject field called CARD. For the students, the field is left blank with no data; however, the staff members may have the value STAFF in this field. This data shall be used by CapturePost to identify the staff members and select the appropriate ID template.
The user will have created two templates:
IDCard.pit — The default, base ID template that will be used for the students
IDCardStaff.pit — The ID template used for the Staff
In CapturePost, the base, default ID Card is selected in the normal way. The user then inputs the suffix @CARD in the Add Suffix field as seen in Figure 2 above.
How it works
For each subject, the software will look at the CARD field and append any value for that field to the base filename of the template. Where the Card field is blank, CapturePost will use the base-template IDCard.pit. This is the case for the students. Members of staff have the value STAFF in the Card field. For these subjects, CapturePost will append the string STAFF to the base template's filename, thereby resulting in IDCardSTAFF.pit. CapturePost will therefore use this template for staff members.
Example 2 - Different ID cards based on year level (Folder)
A high school requires a different ID card for different students depending on their year level. Furthermore, members of staff require a different card design, while volunteers and helpers require yet another card.
Subjects in the job have been arranged into folders as appropriate - folders 009 through to 012 for the students, a folder for Staff, and another for Volunteers - as per Figure 3 below.
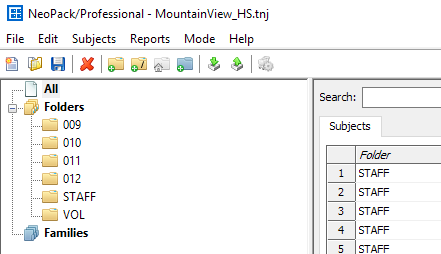
Figure 3: Folder structure for a typical high school
The user creates several templates:
IDCard.pit — The default, base ID template that will not be used in this case.
IDCard009.pit — The ID template used for the 9th Grade
IDCard010.pit — The ID template used for the 10th Grade
IDCard011.pit — The ID template used for the 11th Grade
IDCard012.pit — The ID template used for the 12th Grade
IDCardStaff.pit — The ID template used for the Staff
IDCardVol.pit — The ID template used for the Volunteers
In CapturePost, the base ID Card is selected in the normal way. The user then inputs the suffix @FOLDER in the Add Suffix field as seen in Figure 4.
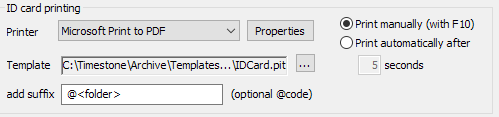
Figure 4: Using the @folder tag
How it works
For each subject, the software will grab their home folder name courtesy of the @folder suffix. The folder name is then appended to the base template filename, resulting in the appropriate template for the subject.
Variable Items on a Single ID Template
If the layout (position, size, etc.) of the elements of an ID does not change, the user can opt to use variable elements on a single template as opposed to creating a different template for every grade.
Variable elements can also be used in combination with variable templates to fill in information like bus routes or other opt-ins based on subject data.
Further Reading: Creating ID Templates
Creating ID cards plays an important role in a school photographer’s workflow. Like other print products, ID cards can take full advantage of the various design elements available in the Template Designer.