For CapturePost to automatically match images to subjects as the shots are taken, it stands to reason that each subject must be ‘found’ and selected before their photos are taken.
Finding a Specific Subject
Individual subjects can be found in four ways:
Scanning a subject barcode
Keyboard lookup
Selecting from a list of subjects
Photographing the subject QR Code
Scanning a Subject Barcode
Perhaps the most common method of finding a particular subject is by scanning their subject barcode.
The barcode is typically encoded with the subject's unique ID or, less commonly, their subject key
Further Reading: The Find Subject Barcode
Finding a subject by scanning a barcode is one of the fastest and safest ways to find a subject in all of the apps.
Apart from CapturePost it can also be used in multiple locations throughout the apps to quickly jump to and select a subject.
Keyboard Lookup
CapturePost provides a keyboard lookup via the 'Get' section, as shown in Figure 1. Subjects can be found via any of their fields, but most typically are found via [name] which searches by Last Name.

Figure 1: Finding Subject via a Keyboard lookup
Selecting a Subject from a List
CapturePost can optionally display a list of all the subjects in a given folder. From there, the photographer can simply select the desired subject.
The folder is selected, and the list is presented via Edit>Folder list or with Control+F3. The photographer can toggle between the folder view and the regular view with Shift+Control+F3.
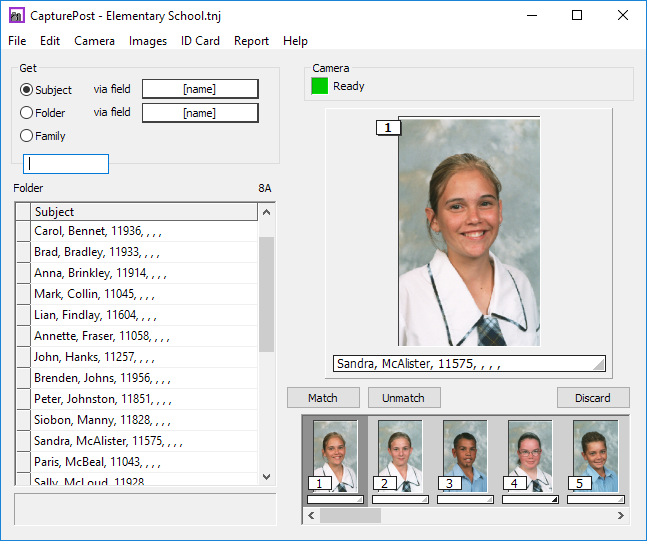
Figure 2: List of subjects in Folder 8A
Photographing a Subject QR Code
CapturePost can automatically find a subject and match their images by photographing the subject’s QR code. In doing so, CapturePost will:
Find the subject
Match the image to the subject
Match all subsequent images to the subject until the next QR code is photographed
This setting is accessed via the File> Setup menu and activated by checking the Use barcode information option. The photographer should capture an image of the QR code as the first image in the subject sequence; this will match all subsequent images to the subject until another QR code is photographed.
Additionally, there is an option to match or not match the barcode leading Image to the subject. This can be toggled by checking the box next to the match barcode image option
NOTE
The option to control the unmatching of the leading image is only available in Version 4.11.
Further Reading: Subject QR Codes
QR codes are a popular method of matching images to subjects.
The check images report
As each photograph is taken, CapturePost will, in the first instance, display a preview size image of 512K, indicating that the image has been matched to the currently selected subject. A short time later, the full size image is transferred to the CapturePost images folder.
On rare occasions, the transfer of the full image from the camera to the images folder may fail, as would occur with a pulled camera cable, for example. In these cases, the subject will be matched to their preview images, but the full size images will be missing.
The Check Images report (Report>Check images...) checks for any subjects that have been matched to images, but the images are missing from the images folder.
Recommended
It is recommended the Check images report be run at regular intervals and at the end of the shoot.
In the event where images may be missing, the photographer can rectify the situation before leaving.
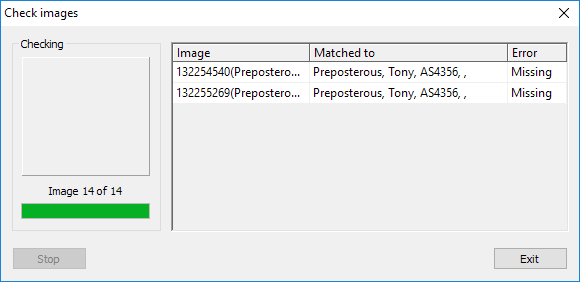
Figure 3: The check images report
Unphotographed subjects
A report is available listing any subjects who have not been matched to images. The report is useful for the photographer to ascertain who is yet to be photographed and whether they are still to come or are absent. The report may also be exported to a text file.
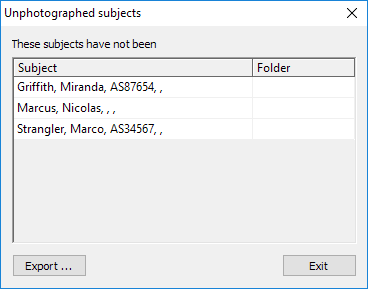
Figure 4: The Unmatched subjects report
Finding images with certain criteria
A very useful 'Find Images' function is available, which finds images and subjects in the film strip that match certain criteria.
The Find criteria are specified via Edit>Find Images>Setup or with Shift+Control+F8. Images are then found via the F8 key (searches backwards from the current subject) or with Shift+F8 (searches forwards from the current subject)
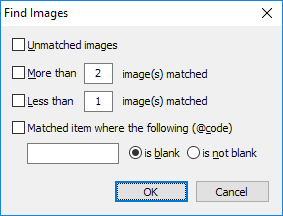
Figure 5: The Find criteria window
The user can search for the images/subjects by the following criteria:
Find any unmatched images
Subjects with more than a certain number of images matched
Subjects with less than a certain number of images matched
Subjects who have or do not have a value for a given field
Finding subjects with insufficient images taken
Consider a photographer who takes three different poses per subject. At the end of the day (or at any time during photography), they want to check for any subjects who inadvertently have fewer than the required number of shots.
The photographer sets the Find criteria to find any subjects who have LESS than three images matched. Then, selecting the last image in the film strip, they press the F8 key to search backward through the film strip. CapturePost will find any subjects with only one or two images.
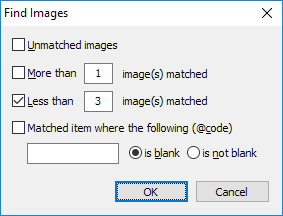
Figure 6: Finding subjects with only 1 or 2 images
Finding subjects with multiple images
Consider a photographer who is only required to end up with 'one good shot' for each subject, and at the end of the day, needs to export a set of images for the school.
Before exporting the images, the photographer could search the film strip for any "red triangles" - where subjects have multiple images. For these subjects, the photographer will select the best image and unmatch the unwanted images.
The photographer sets the Find criteria to find any subjects who have MORE than one image. Then, selecting the first image in the film strip, they press Shift+F8 to search forward through the film strip. CapturePost will find any subjects who have multiple images.
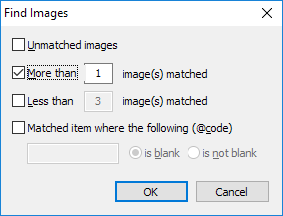
Figure 7: Finding subjects with multiple images
Finding subjects who have or do not have a value for a given field
In this example, the user is looking for subjects who do not have an ID. Invariably, school photographers will need to photograph new enrollments - students who are not yet in the job file. The photographer will add these students to the job by asking for and entering their names and home folder (class/grade/teacher), but it is unlikely the student will know his or her ID, and consequently, cannot yet print the student's ID card.
By the end of the day, the photographer has obtained the missing data and now wishes to find all the students who do not have a value for the ID field. They will add the missing data, then print the ID card
The photographer sets the Find criteria to find any subjects whose ID field is blank. He searches the film strip with the F8 (or Shift+F8) key, enters the ID for the found student, prints their ID card, and continues searching for the next student who satisfies the search criteria.
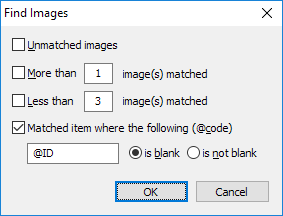
Figure 8: Finding subjects who do not have an ID
FAQ
What methods can I use to find a specific subject in CapturePost?
You can find a specific subject by scanning a subject barcode, using keyboard lookup, selecting from a list of subjects, or photographing the subject's QR code.
How can I check that all the full-size images have been successfully saved?
The Check Images report can be used to identify any subjects matched to their preview images but missing full-size images.
Can I find subjects who have not been photographed yet?
Yes, there is a report available that lists any subjects who have not been matched to images.
How can I search for images or subjects based on specific criteria?
You can use the 'Find Images' function to search for images and subjects that match certain criteria, such as unmatched images or subjects with a specific number of images matched.