WARNING
Whenever merging care must be taken to ensure unintended consequences such as overwriting important data or inadvertently resetting access keys.
It is strongly recommended the user becomes thoroughly familiar with the merge process by studying this document and testing their procedures before attempting merges on live jobs.
What is merging?
Merging is a process that allows users to combine two or more jobs. Merges can be performed with both TNJ files and SQL jobs.
TNJ → TNJ
TNJ → SQL (also referred to as importing a TNJ into SQL
SQL → SQL
Primarily, merging is designed to combine the following:
Fields and data
Images and match Information
Poses
Order Information
CAUTION
While other areas of the software such as print queues and composite pages may merge successfully, these are not inherently supported and may not always merge under some circumstances.
Examples
Below are some of the more common examples of merging.
By far the most common situation requiring merging is when TNJ files are imported/merged into the SQL database.
photographers using CapturePost and subsequently importing/merging their TNJ files into the appropriate SQL job
a lab accepting TNJ files from photographers
When merging TNJ files into a SQL job, the user has the option to merge into the associated job if present, or into a new job. An associated job is a SQL job that already contains keys (subject keys, job key, etc) present in the TNJ file.
The associated job is also commonly referred to as the parent job since the TNJ file being merged into it often originated from an export (File>Export TNJ file).
Predominantly used by photographers who work exclusively with TNJ files.
When merging multiple TNJ files into one, it is possible that the resultant TNJ file can become very large and therefore unstable. To avoid this, a small image preview size is recommended.
Where photographers have multiple TNJ files that will ultimately be imported into a SQL job, it is recommended that each TNJ file be merged into the SQL job separately, rather than merging the TNJ files together first. This is a common scenario for CapturePost photographers who may have several cameras and, therefore, several TNJ files at a shoot. Rather than merging the TNJ files into each other and then importing one big TNJ into SQL, it is better to import each TNJ file into SQL separately.
The least common merging situation, a SQL → SQL merge is sometimes used to make a copy of a SQL job.
Since keys (job keys, subject keys, etc) are unique across the entire SQL database, merging a SQL job into another SQL job will necessarily need to regenerate the incoming keys. This needs to be considered if the merged job is to be used in IOS.
Understanding how merge works
Let us consider the most common merging scenario, merging or importing a TNJ file into a SQL job, as an example. The TNJ file is imported/merged with either of the two menu actions:
File > Import TNJ file …
File > Merge >TNJ file ..
Initial considerations
Upon selecting a TNJ file to import, the user is presented with a variety of options:
Merge into the associated job if exists
Merge into the currently open job
Import as new, independent job while preserving keys
Import as a new, independent job and reset all keys
The system first checks if any keys from the incoming job already exist in the database and presents the options above as appropriate.
If an associated job already exists (keys from the TNJ are found in SQL), option 1 is available, and the user will most commonly import the TNJ file into its associated job. However, they may instead elect to import the TNJ file as a new independent job with new keys (option 4). They will not be able to import as a new job and preserve keys since those keys already exist in another job - the associated job.
If the keys from the incoming TNJ file do not exist in SQL, as would be the case when a lab receives a job’s TNJ file from a photographer, option 1 will not be presented, as there is no associated job. However, both options 3 and 4 will be available, and the user will therefore be able to import the TNJ as a new job while deciding to preserve the TNJ’s keys (3) or reset them (4).
Option 2 - Merge into the currently open job is only presented if a job is currently open and it is not the associated job for the incoming TNJ file.
These options are discussed in further detail later in this document
Matching subjects, folders, and families
The merge always flows data in one direction: the currently open job, the target job, will receive data from the job being merged, the incoming job.
It is important to understand what criteria are used to determine whether a subject, folder of family from the incoming job, already exists in the target job and, therefore, whether the incoming data should be merged with an existing entity or added to the target job as a new entity.
Entity | Matching criteria |
|---|---|
Subjects | the subject’s unique field or the subject’s key if a unique field is not present |
Folders | the folder’s name or key |
Family | the family’s key |
Where subjects do exist, Merge Options, discussed below, are available pertaining to how to handle their details (data), images and orders
Merge Options
Where the same subjects exist in both the incoming and target jobs, options are available regarding the handling of their data (details), primary image, and orders.
The options are available in the Merge setup window after clicking the Merge Options button.
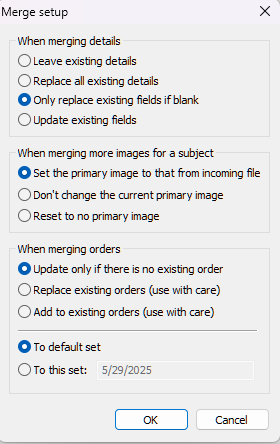
Figure 1: Merge Options
TIP
Regardless of the merge being performed, SQL→SQL, TNJ → SQL, or TNJ → TNJ, the options are the same.
Options for merging data allow the user to decide whether existing data for a given subject is preserved, replaced, or updated.
These options also apply to data in Folder and Family fields, but do not affect Folder and Family names.
Option | Description |
|---|---|
Leave existing details | Data in the open job will be preserved |
Replace all existing details | Data in the open job is replaced by data from the incoming job, even if the incoming data is blank |
Only replace the existing if Blank | Data in the open job will only be replaced if it is blank |
Update existing details | Data in the open job will be replaced, but not if the incoming data is blank |
When merging subjects with images, it is possible to decide how to handle the primary image.
Option | Description |
|---|---|
Set the Primary image to that of the incoming file | The primary image from the incoming job will be set as the primary image in the merged job |
Don’t change the current primary image | The primary image in the open job will be preserved after merging |
Reset to no Primary image | Images will be reset to no explicitly marked primary image |
..Care should be taken when merging orders to ensure orders in the open job are not inadvertently replaced.
Option | Description |
|---|---|
Update only if there is no existing orders | Orders from the incoming job will be added only if there are no orders in the open job |
Replace existing orders | Orders in the open job will be replaced by orders in the incoming job |
Add to existing orders | Orders in the incoming job will be added to the orders in the open job |
A further option allows the user to select if orders are merged into the default set or if a new order set is created.
The Importance of the Subject Key and the Unique ID
When Merging Subjects across jobs, it is important that the user understands that the match of subjects is made based on the Unique ID, NOT the subject key. Though knowledge of the subject key is essential to fully understand the merge feature, particularly when merging with SQL jobs.
Essentially, every subject is given an 8-character subject key unique across all jobs in the database. A single subject with one Unique ID can therefore never be in more than one SQL job with the same subject key. At the same time, regardless of job type, subjects cannot have the same Unique ID within the same job.
For example, John Smith may have a Unique ID field value of 12345 (school ID number) across multiple jobs, but he will have a different subject key in each job. At the same time, there cannot be another subject with the Unique ID 12345 in any job with John Smith.
Further Reading: The Subject Key
The Subject Key is an 8-character code that is automatically generated and uniquely identifies each subject across the database.
Merging a TNJ file into another TNJ file
Unlike SQL jobs, TNJ files exist independently of the MySQL database. This means all aspects of the job, data, image previews, orders, and more are saved inside the TNJ file. While this makes them portable, they require special consideration, especially with respect to their size. These considerations are particularly relevant when merging multiple TNJ files together.
To merge one TNJ file into another TNJ file:
Open the job that will receive the data
Go to File > Merge > TNJ File. This will open a Merge file viewer, Figure 2, where the user will find the job they wish to merge with.
Select the desired file
Use the Setup button to adjust Merge options, as discussed above (Figure 1)
Click Open to initiate the merge
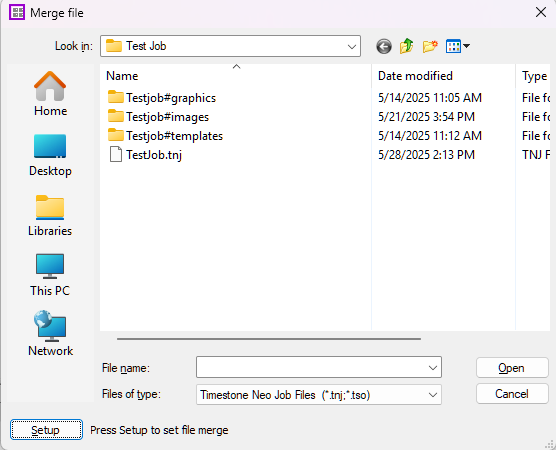
Figure 2: The Merge File Window
Avoiding the TNJ ‘Bloat’
The most common issue pertaining to merging TNJ files relates to the size of the resultant TNJ file, which in turn is directly related to the image previews - their number and their size. As the merge progresses, more and more resources are required to keep the increasingly bloated job open in memory. In some cases, the process can become very unstable and ultimately fail.
Should this TNJ ‘bloat’ become an issue, the suggestions in the drop-down below may help.
Steps to avoid bloated TNJ files
Reduce the preview size
The image preview size in TNJ files is controlled in File>Options>Bitmap sizes>Stored size of bitmap used for previewing. The default size is 512K. For very large jobs with lots of images, consider lowering this value substantially. If images have already been imported, select and refresh them in Images Mode, then perform a File>Close and compact.
Purge images that are not needed
Purge any superfluous images from the TNJ file with the Images > Purge menu option. Perform a File > Close and Compact command after the purge to shrink the TNJ file as much as possible.
Multiple TNJ files that will ultimately be imported into SQL
If multiple TNJ files are all from one job and will ultimately end up being merged into a SQL job, it is better to import each TNJ into the SQL, one at a time, rather than merging the individual files first.
Importing (merging) a TNJ File into a SQL Job
A TNJ file can be merged into an SQL job. The two most common examples are:
Importing a TNJ that was used with CapturePost
A lab importing a job from an independent photographer
Where to create the job, import data and create subjects
When creating subjects in a TNJ file, they will be assigned Subject Keys however it is impossible for the software to know if the keys already exist elsewhere in another job somewhere in the database.
It is therefore recommended the user begin a job as a SQL job and import data into it before exporting the job as a TNJ file. This will generate keys (notably subject keys) that are guaranteed to be unique.
To merge a TNJ file into an SQL job:
Navigate to File>Merge>TNJ File … or File>Import TNJ file …
Browse to and select the TNJ file to be imported.
The Import TNJ File window will appear, where the user can make appropriate selections:
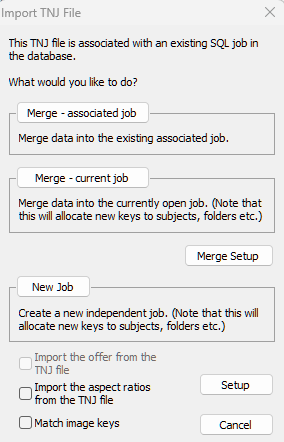
Figure 3: The Import TNJ File window presented when a TNJ is associated with an existing job within the database.
As discussed earlier in the section Initial Considerations, the selections available will depend on whether the incoming job is already associated with an existing SQL job.
Data will be merged into the SQL job that is associated with it.
This is the most common merging scenario, where a job was started in SQL, exported to TNJ for use in CapturePost, then merged back into SQL after photography into the original, associated job.
If the associated job is already open, the merge will proceed directly.
If the associated job is not open, the system will use the keys in the TNJ file to find and open the associated SQL job, then merge the TNJ file into it.
In both cases, the subject keys remain consistent between the SQL and the TNJ.
Example
Consider Figure 4 below. On the left is the original SQL job for a school with data imported. The job was then exported to TNJ for use with CapturePost. On the right is the TNJ file that now contains images.
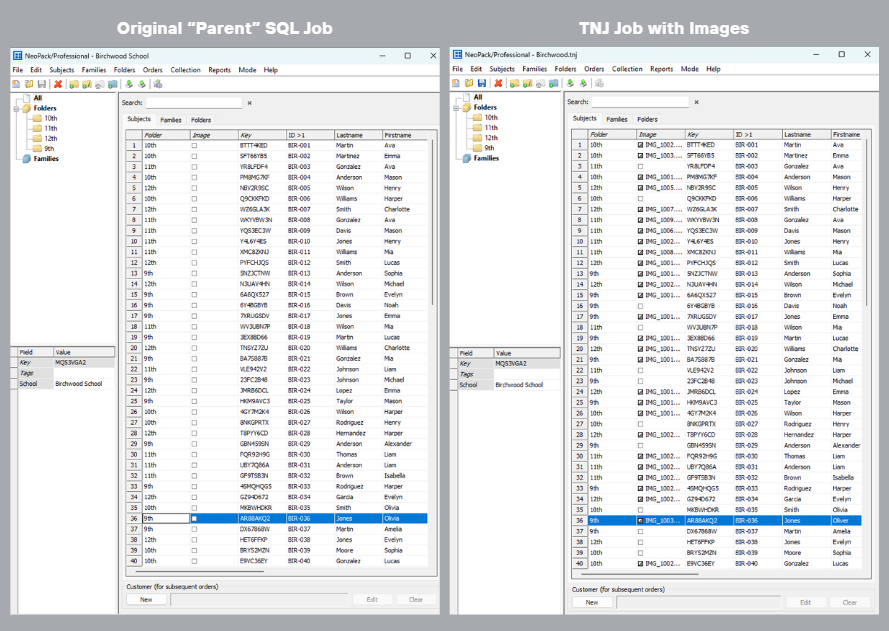
Figure 4: The Parent SQL file and the incoming TNJ job with images
The photographer now wishes to merge the TNJ file back into the original, parent SQL job - the associated job.
Navigate to File > Merge > TNJ…
Select the desired TNJ in the file browser and click Open.
In the Import TNJ File window, adjust any Merge Setup options as needed.
Click Merge – Associated Job to import the images and any updated data back into the SQL job..
If a job is open, this option merges the TNJ’s data into the currently open job.
If any incoming data has keys that already exist elsewhere, they will be reset with the merge. Any keys that do not exist in other jobs will be preserved.
Example
A lab receives a new TNJ file from a photographer and imports it as a new job with New Job - Preserve Keys. Later the lab receives more TNJ files from the photographer that need to be merged with the same job as before. The lab opens the SQL job and merges the new TNJ files into it.
Creates a new SQL job where the keys from the TNJ file are preserved in the SQL job.
This option will not be available if any keys from the TNJ already exist in another SQL job.
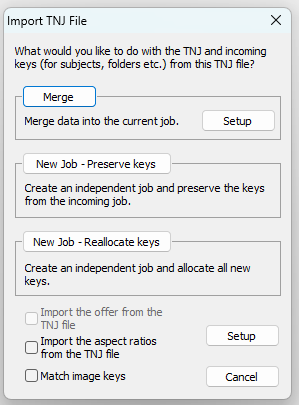
Figure 5: Import TNJ File window when there is no associated job
Example
Commonly used by labs that are receiving jobs from photographers who have created their own TNJ files, imported their data and possibly distributed keys to parents for use in IOS. The lab will therefore need to preserve these keys
Creates a new SQL job where the keys from the TNJ file are reset.
This option will always be available - It is always possible to import a TNJ file and reallocate keys. Take care when using this option if the job is to be uploaded to IOS.
Example
Where keys are not important, this option allows multiple copies of the same job to be made. All data, with the notable exception of keys, will be identical
Merging SQL jobs
It is possible to merge a SQL job into another SQL job.
To merge two SQL jobs:
Open the target job or create a new one
Navigate to File> Merge> SQL Job …
From the Merge job window, click the Setup button to set Merge Options
Select the job to be merged and click OK
Data and key considerations
As always, consideration needs to be given as to how the merge process handles data and keys.
Subjects between the two jobs are matched according to their unique fields (ID)
If the incoming job contains subjects, families, and folders that are not in the target job, they will be added and assigned new keys.
Using merge to duplicate a job
Perhaps the most common use of merging SQL jobs is to create a duplicate, ‘clone’, of a job. This can be considered equivalent to performing a File > Save As... action with a TNJ file. It should be stressed, however, that all keys in the duplicate job will be reset/
To duplicate the job:
Start a new job, setting the name season, and other parameters as normal
Select File> Merge> SQL job …
From the Merge Job window, click the Setup button and set the desired merge options.
Select the job to be duplicated
Click OK
Merging Families and Folders
The behaviour of folders and families is handled differently when merging jobs. Simply put:
When merging folders, folders with the same name are always merged.
When merging folders, folders with the same key are merged even if the name is different. The name of the open Job will remain the name of the folder.
When merging families, the names of the families are irrelevant. Families with the same Family Key are merged, and those with different keys are added.
This can best be explained through the examples below.
Example: Merging Folders
Folders of the same name will always be merged.
Take the two jobs below. Job A, the original job, contains a small number of subjects in the folder “2 B” and does not contain the Staff folder. Job B contains more subjects in the folder “2 B” as well as a Staff folder.
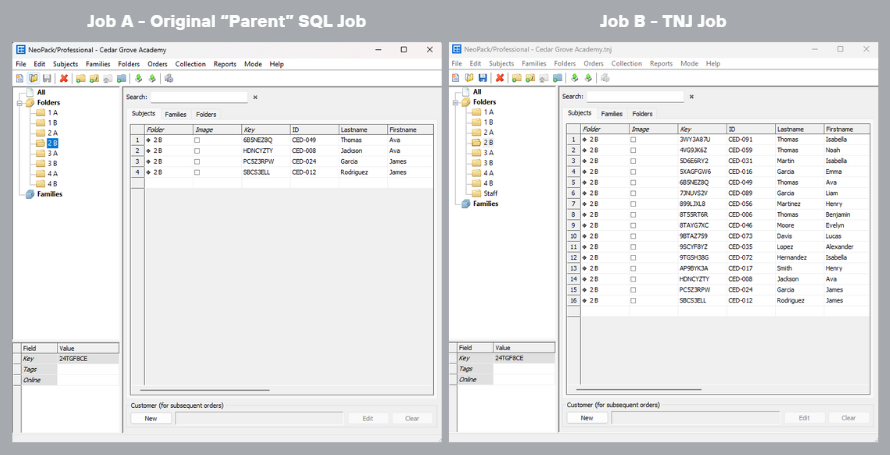
Figure 13: The two Jobs before the merge
Once the merge is complete, the subjects are added to the 2 B folder, and the Staff folder has been added.
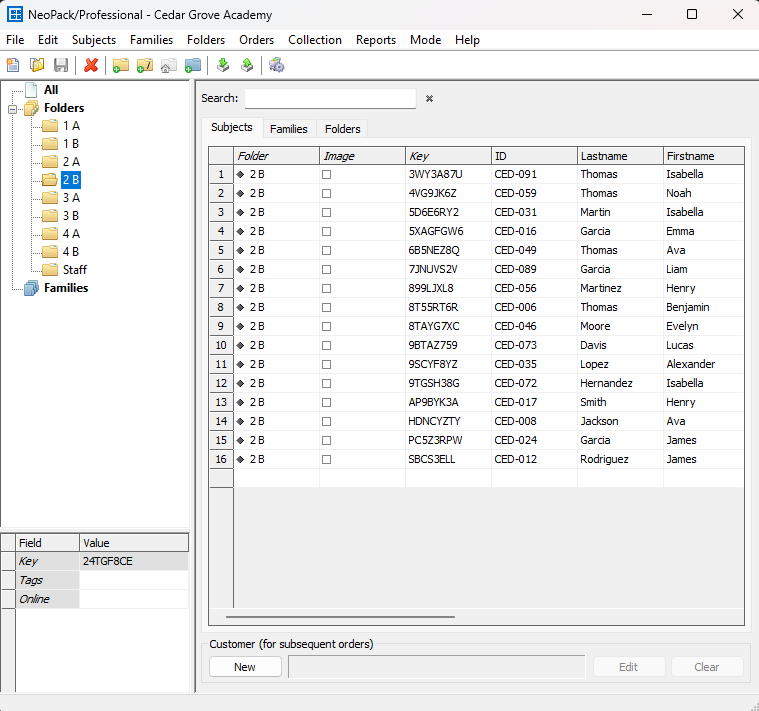
Figure 14: The merged job
.
Example 1 - Families with the same key
In cases where the Families being merged have the same key, they will be merged. This situation will arise when the jobs to be merged have the same origin. Consider the following workflow, where a TNJ file is exported for CapturePost and then is merged back into the SQL job.
An SQL job is created, and since the families to be photographed are known beforehand, they are added to the job. Figure 15 shows the family information in Details mode.
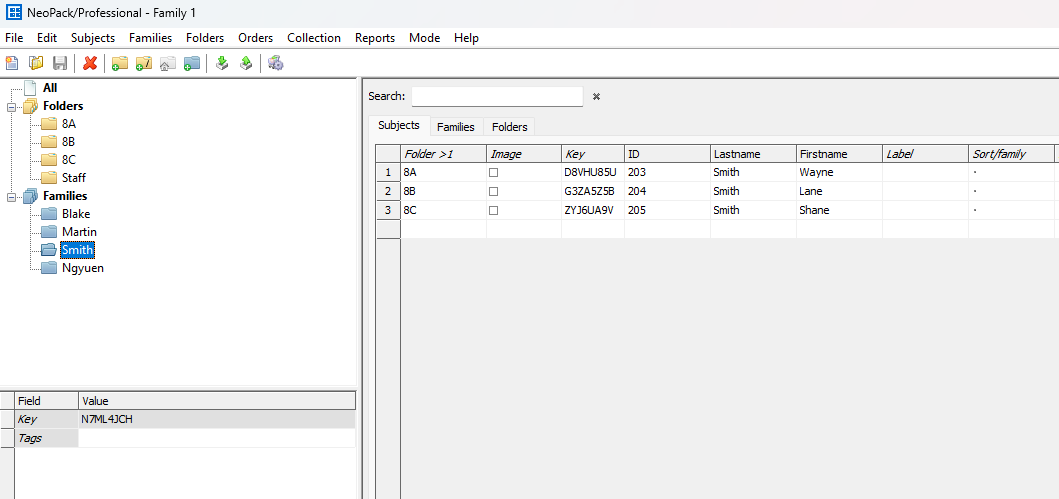
Figure 15: The original SQL job before exporting to TNJ.
Note the Smith family and its key
The job is then exported to TNJ for use with CapturePost. The screen grab below shows the Smith family in the TNJ files.
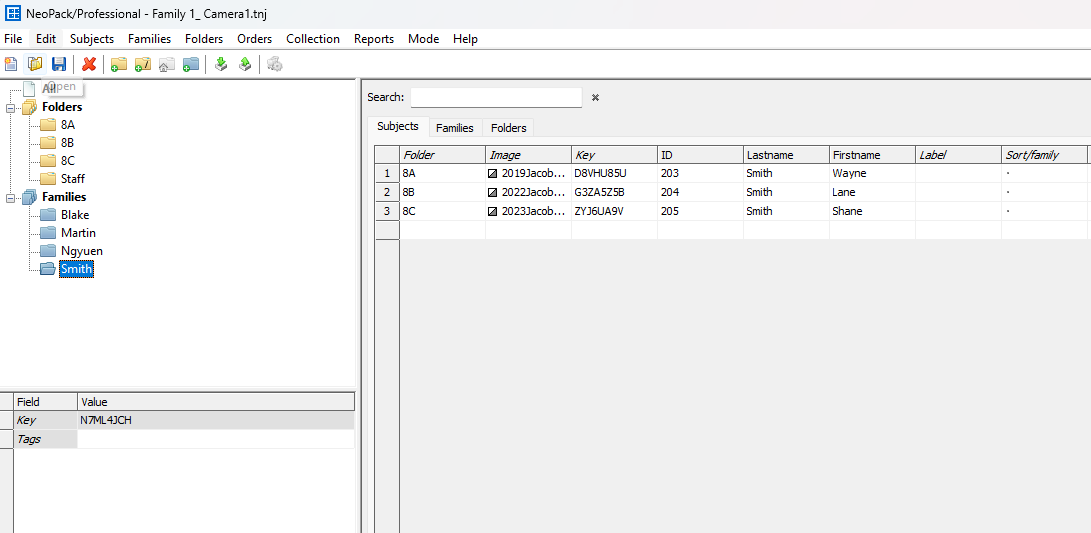
Figure 16: The TNJ file after photography.
Importing (merging) the TNJ file into the original SQL job will merge the Smith family.
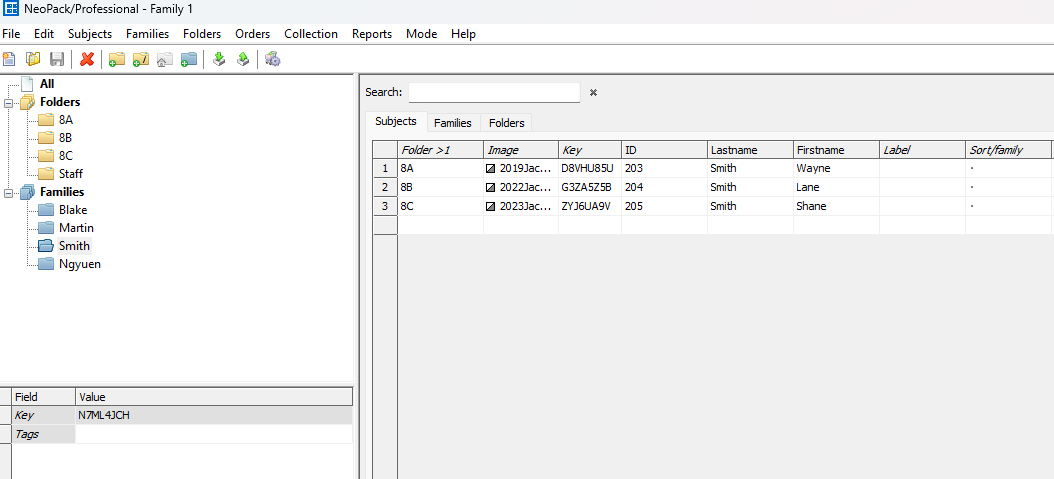
Figure 17:The SQL job after merging.
Example 2 - Families with the same name but different keys
There will be occasions where families in two different jobs (be they SQL jobs or TNJ files) have the same name but different keys. In this case, the families will not merge but will instead be added.
This approach caters to situations where different families may legitimately have the same name. In these cases, families should not be merged.
The following screen grabs show the folders and families for two jobs and the result of merging one into the other.
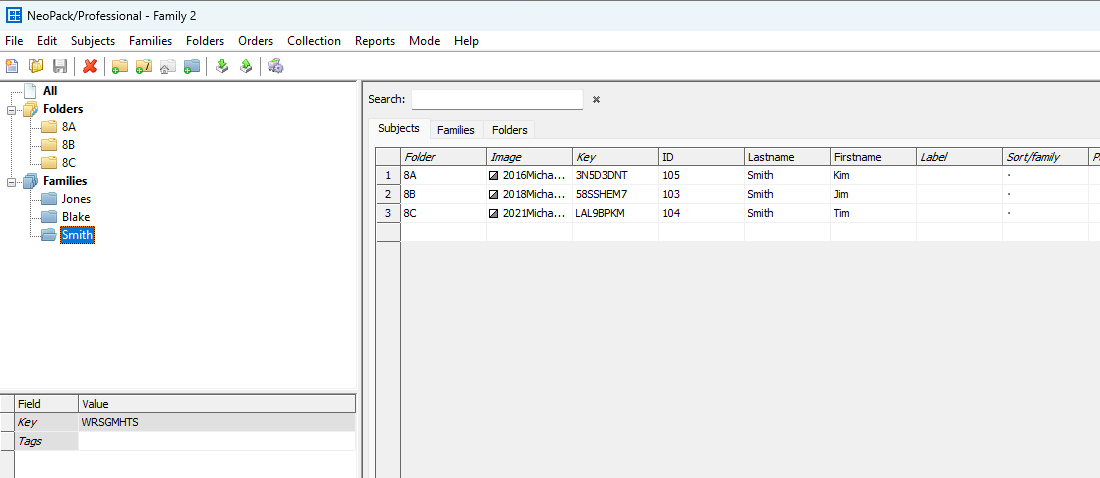
Figure 18: Job 1 showing folders and families

Figure 19: Job 2 showing folders and families
Note the Smith families in the two preceding screen grabs. Despite having the same name, they are different families (different keys). As a result, a merger of these two jobs will result in two different Smith families, as shown in the final screen grab below.
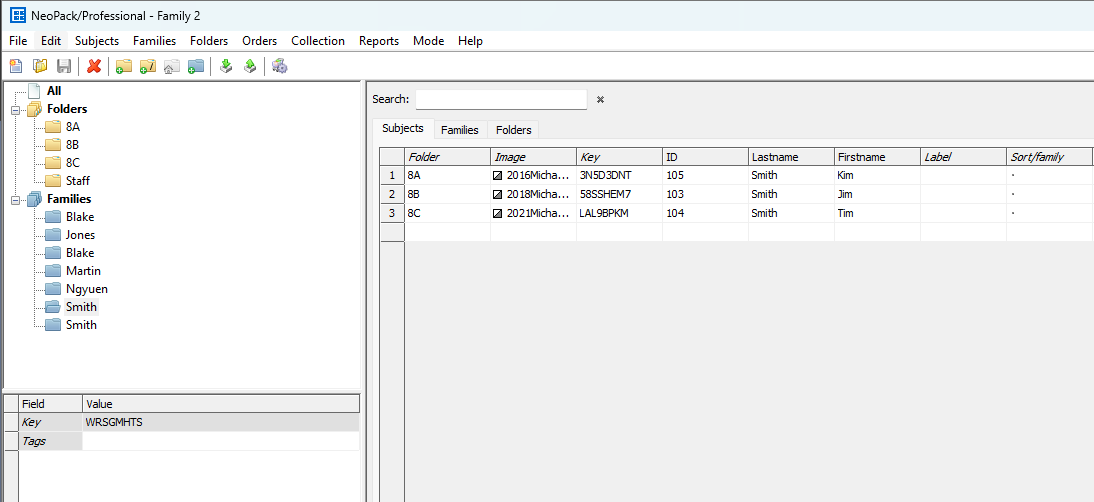
Figure 20: The result of merging job 2 into job 1. Note two different Smith families
NOTE
Comparing Figures 18 & 19 and the following in the Merged Job (Figure 20):
Folders with the same name have been merged
Folders (staff) not in the first job have been added
Families with the same name but different keys have not been merged, but have instead been added
FAQ
What’s the safest way to practice merging before doing it on a live job?
The best way to get comfortable with how keys, subjects, and orders behave during a merge, make a copy of a small test job, then try different merge options there— allowing practice without risking your real data.
What happens if I accidentally merge into the wrong job?
Unfortunately, merges can not be undone. Contact us and we can discuss some options.
Does merging affect my access keys or online ordering setup?
It can. If keys get reset, it can break links on IOS. Always double-check which key option you’re using before merging, especially for jobs that parents already have keys for.
What’s the difference between “Merge into Associated Job” and “Merge into Current Job”?
“Merge into Associated Job” means the system found a matching SQL job based on keys — that’s usually where your TNJ came from originally, so merging there keeps everything linked. “Current Job” just means whatever job you currently have open, regardless of the association with another job. This option will reassign keys and can be used to duplicate data with new keys for additional jobs, for example, using school day data, duplicate records with new keys to be used with a holiday offer.
When should I choose to preserve keys versus reset them during a merge?
Preserve keys if the job was created in SQL and the TNJ came from that job, if the keys are used for online orders, or — that keeps everything linked correctly. Reset keys only when you’re creating a completely new job or copying a job where you don’t need to keep the original associations (like for testing or backups).