---
title: "Package Categories"
slug: "package-categories-1"
description: "Organize your photography packages with Timestone's Package Categories for easy browsing, styling options, and conditional displays to enhance customer experience."
updated: 2025-08-28T17:47:58Z
published: 2025-08-28T17:47:58Z
canonical: "help.timestone.com.au/package-categories-1"
---
> ## Documentation Index
> Fetch the complete documentation index at: https://help.timestone.com.au/llms.txt
> Use this file to discover all available pages before exploring further.
# Package Categories
Package Categories allow the photographer to organize their online Packages into logical groupings, thereby making it easier for the online customer to browse the packages offered.
****Examples****
Several jobs on the Timestone Software IOS demo site use Package Categories
[Multi-colored buttons that match package template designs](https://demo.timestone.com.au/ordering/with?key=MYMZXLZM&options=emptycart)
[Blue buttons used for all categories](https://demo.timestone.com.au/ordering/with?key=QBPZYQZD&options=emptycart)
## Defining categories
Categories are defined in the Timestone Administrator (tsAdmin) in the Package Categories object.
The user creates a **Package Category Set** before adding categories to the set.
> [!NOTE]
> Recommended
>
> Although Package Category Sets can be created with respect to Seasons, Workspaces and Accounts, it is recommended they be defined globally in **.*.**
### Category properties
A category is defined with the following four properties:
| Property | Explanation |
| --- | --- |
| Code | A short code for the users’ benefit |
| Description | A description of the category |
| Heading | The text that appears in the category button on the site |
| Conditions | Optional conditions to be applied to the category |
### Creating a simple category set
To create a new category set:
1. In tsAdmin, select the Package Categories object
2. Click the green + icon to start a new category set
3. Enter a name for the set
4. Click the green Add new category icon to add a category to the set
5. Enter a code, description, and heading
6. Repeat steps 4 and 5 for each category
7. Click Submit changes
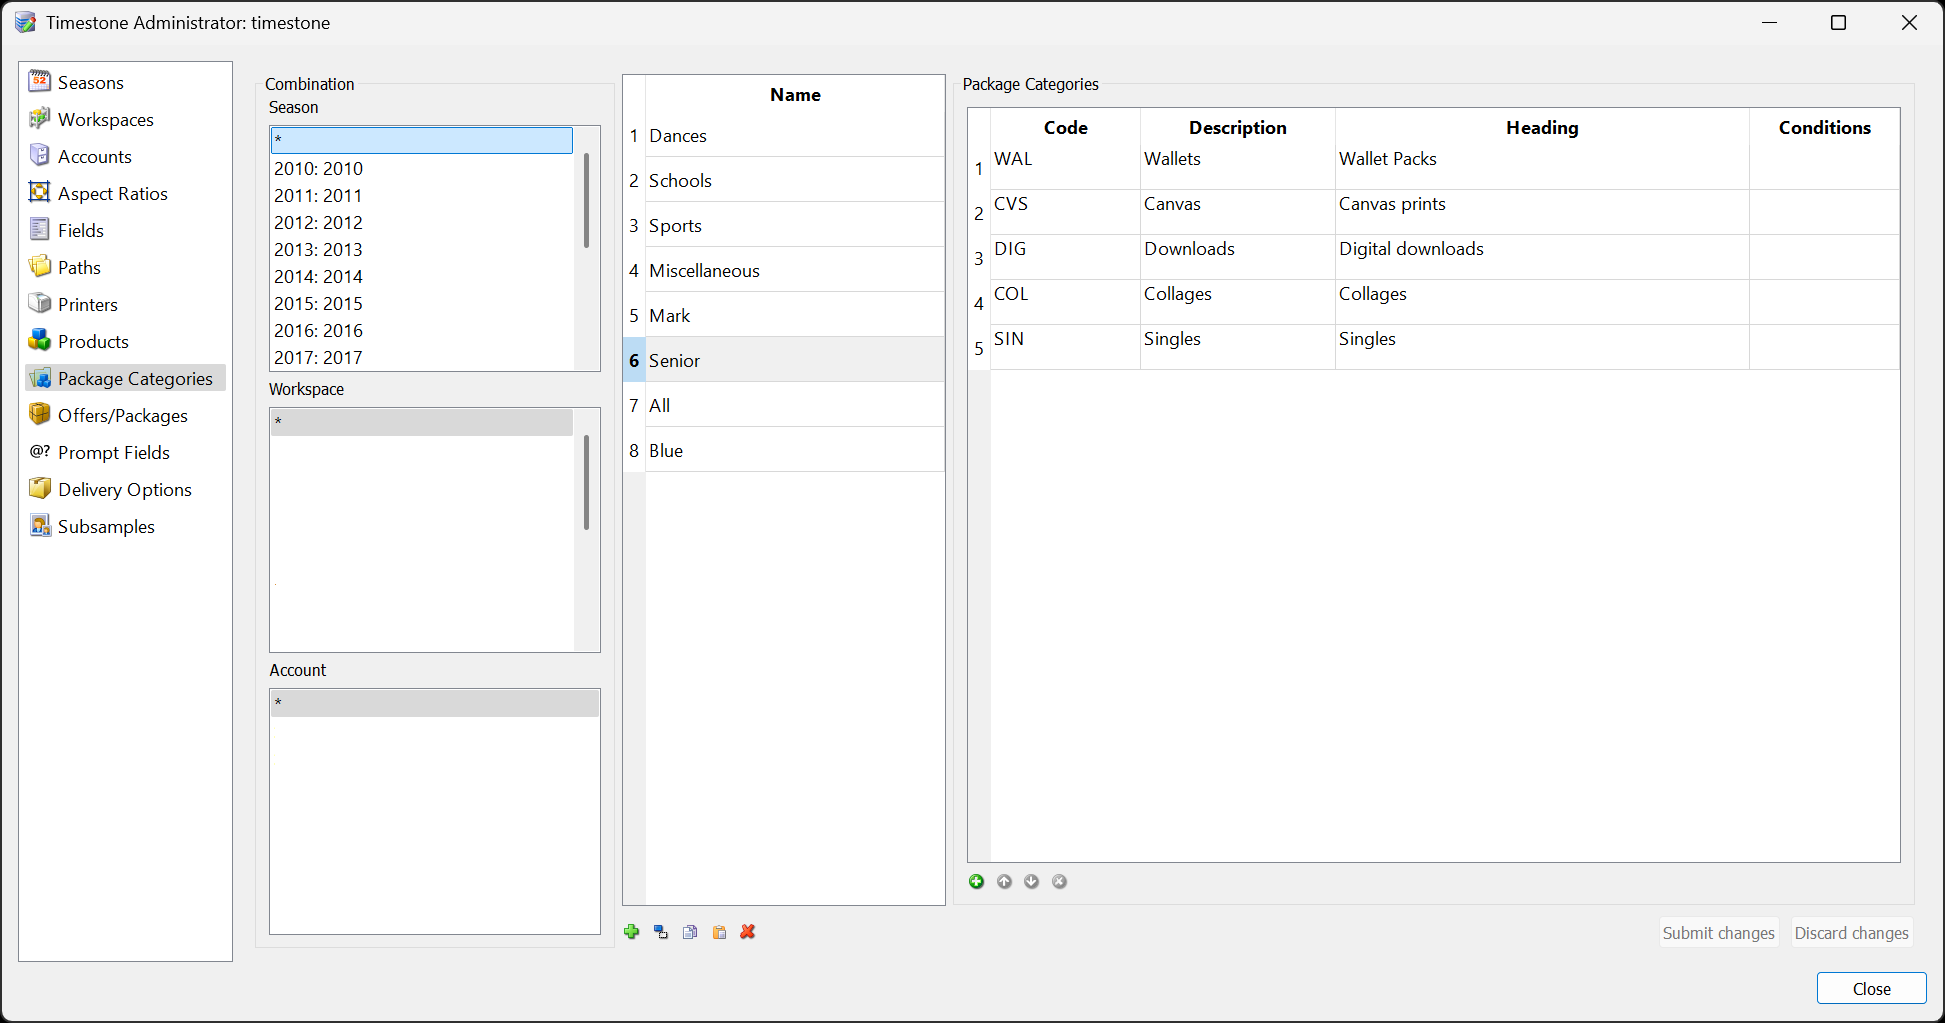
Figure 1: A simple Category Set (Senior) in tsAdmin
> [!NOTE]
> The Heading
>
> It should be emphasized that it is the **Heading** *not* the **Description** that is displayed online.
## Assigning categories to packages
Having defined categories, the user then assigns them to packages in the Offer.
#### To assign a package to a category:
1. In tsAdmin, select the Offer and the Packages tab
2. Select the desired Category set from the dropdown list
3. Select the first package
4. Double click the Category window
5. Select the desired category from the list
6. Repeat for all packages
7. Submit changes
> [!NOTE]
> Good to know
>
> A package with no assigned category will appear in every category.
>
> Furthermore, a package can be assigned to multiple categories. Simply select multiple categories for the package as needed.
>
> Finally, the user is free to switch categories set at any time to select different categories if needed. There is no restriction that limits all the categories to a single set.
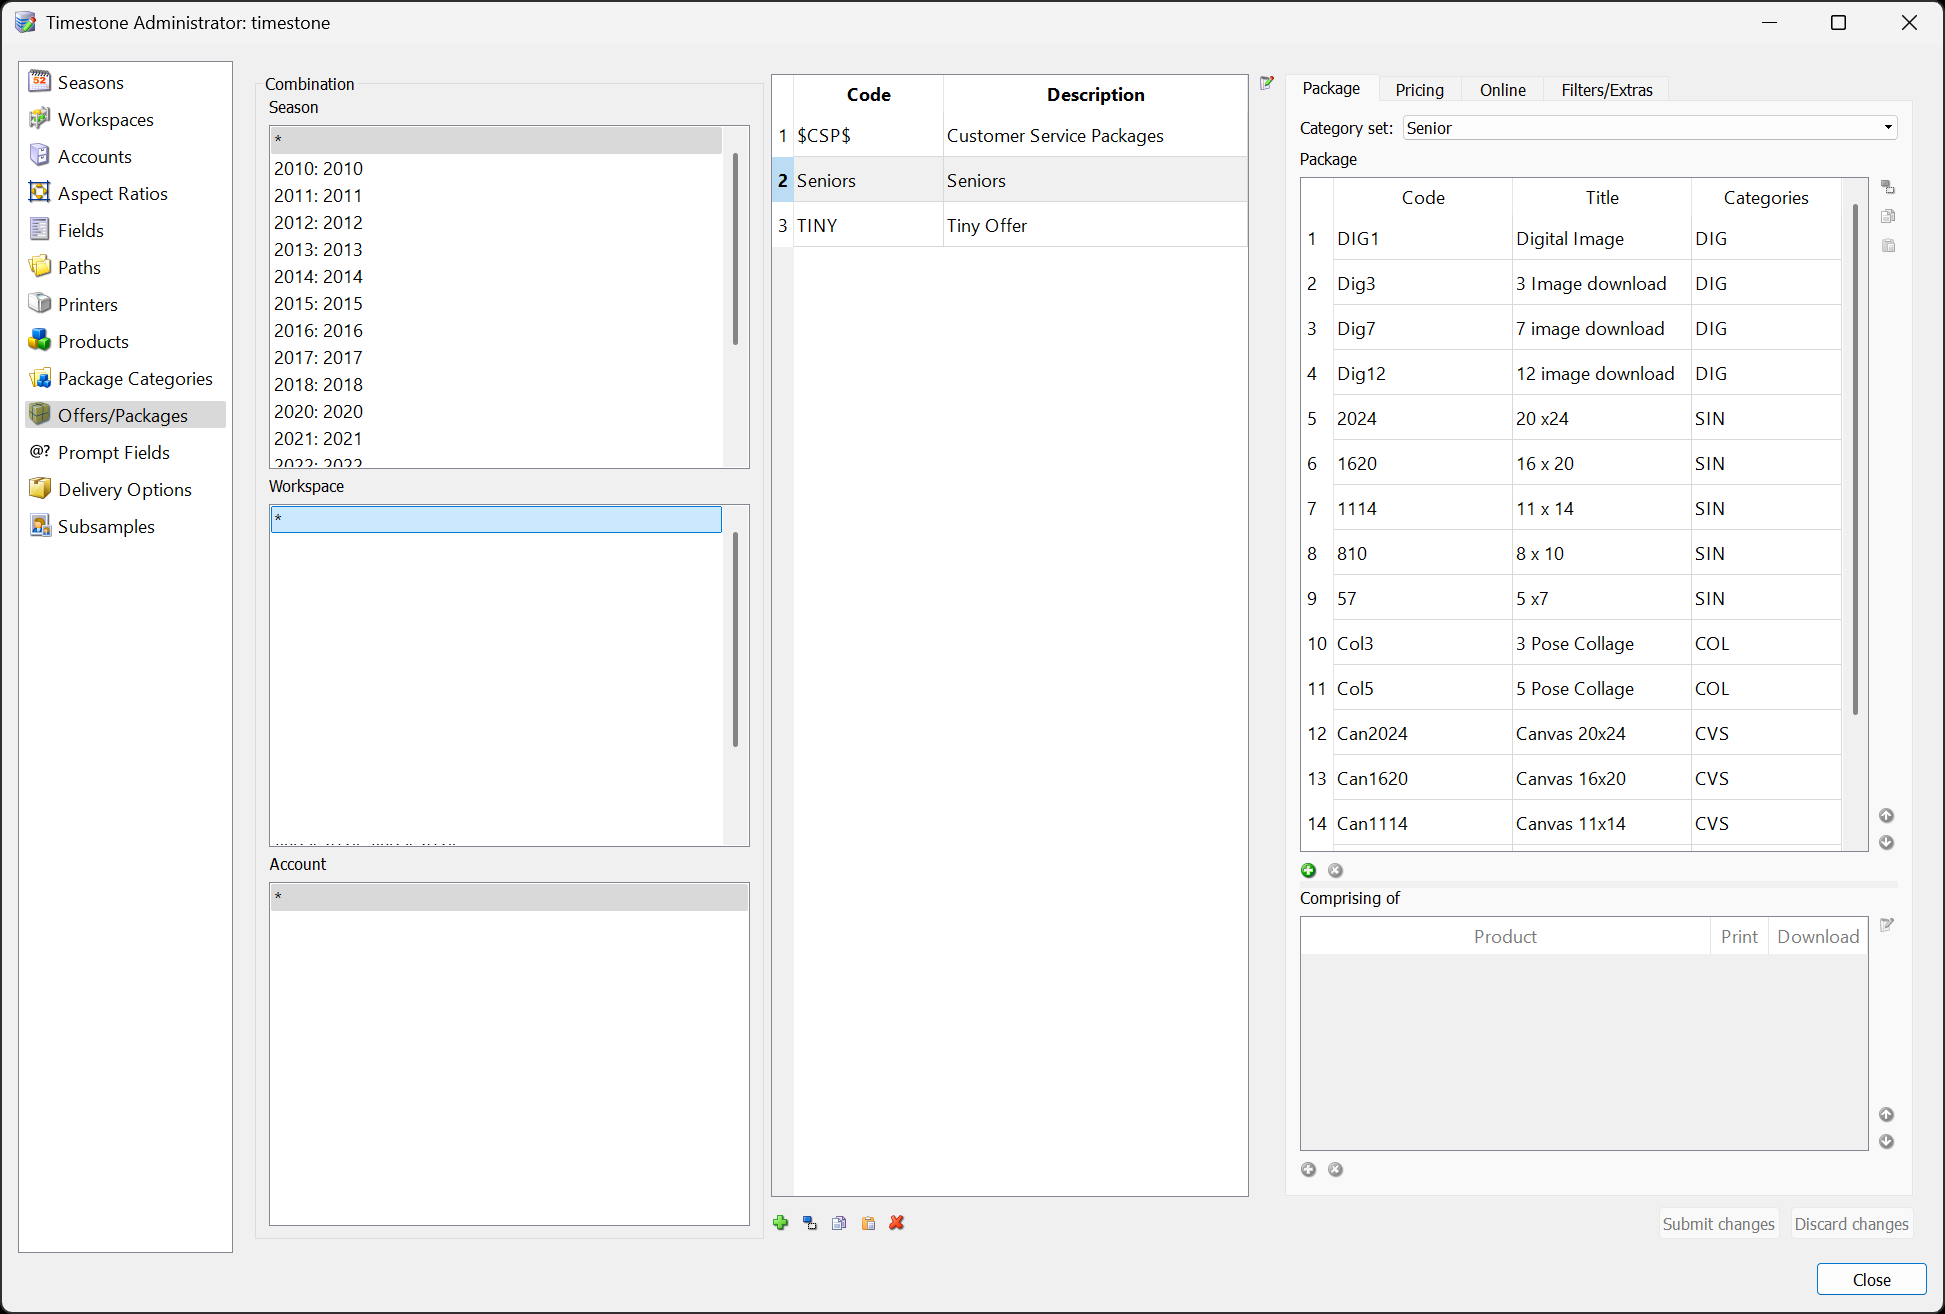
Figure 2: Packages in an offer have been assigned categories.
## The default heading appearance
When the **Heading** for a category is simple text, the category buttons appear as light grey boxes with black text, as in the screen grab below.
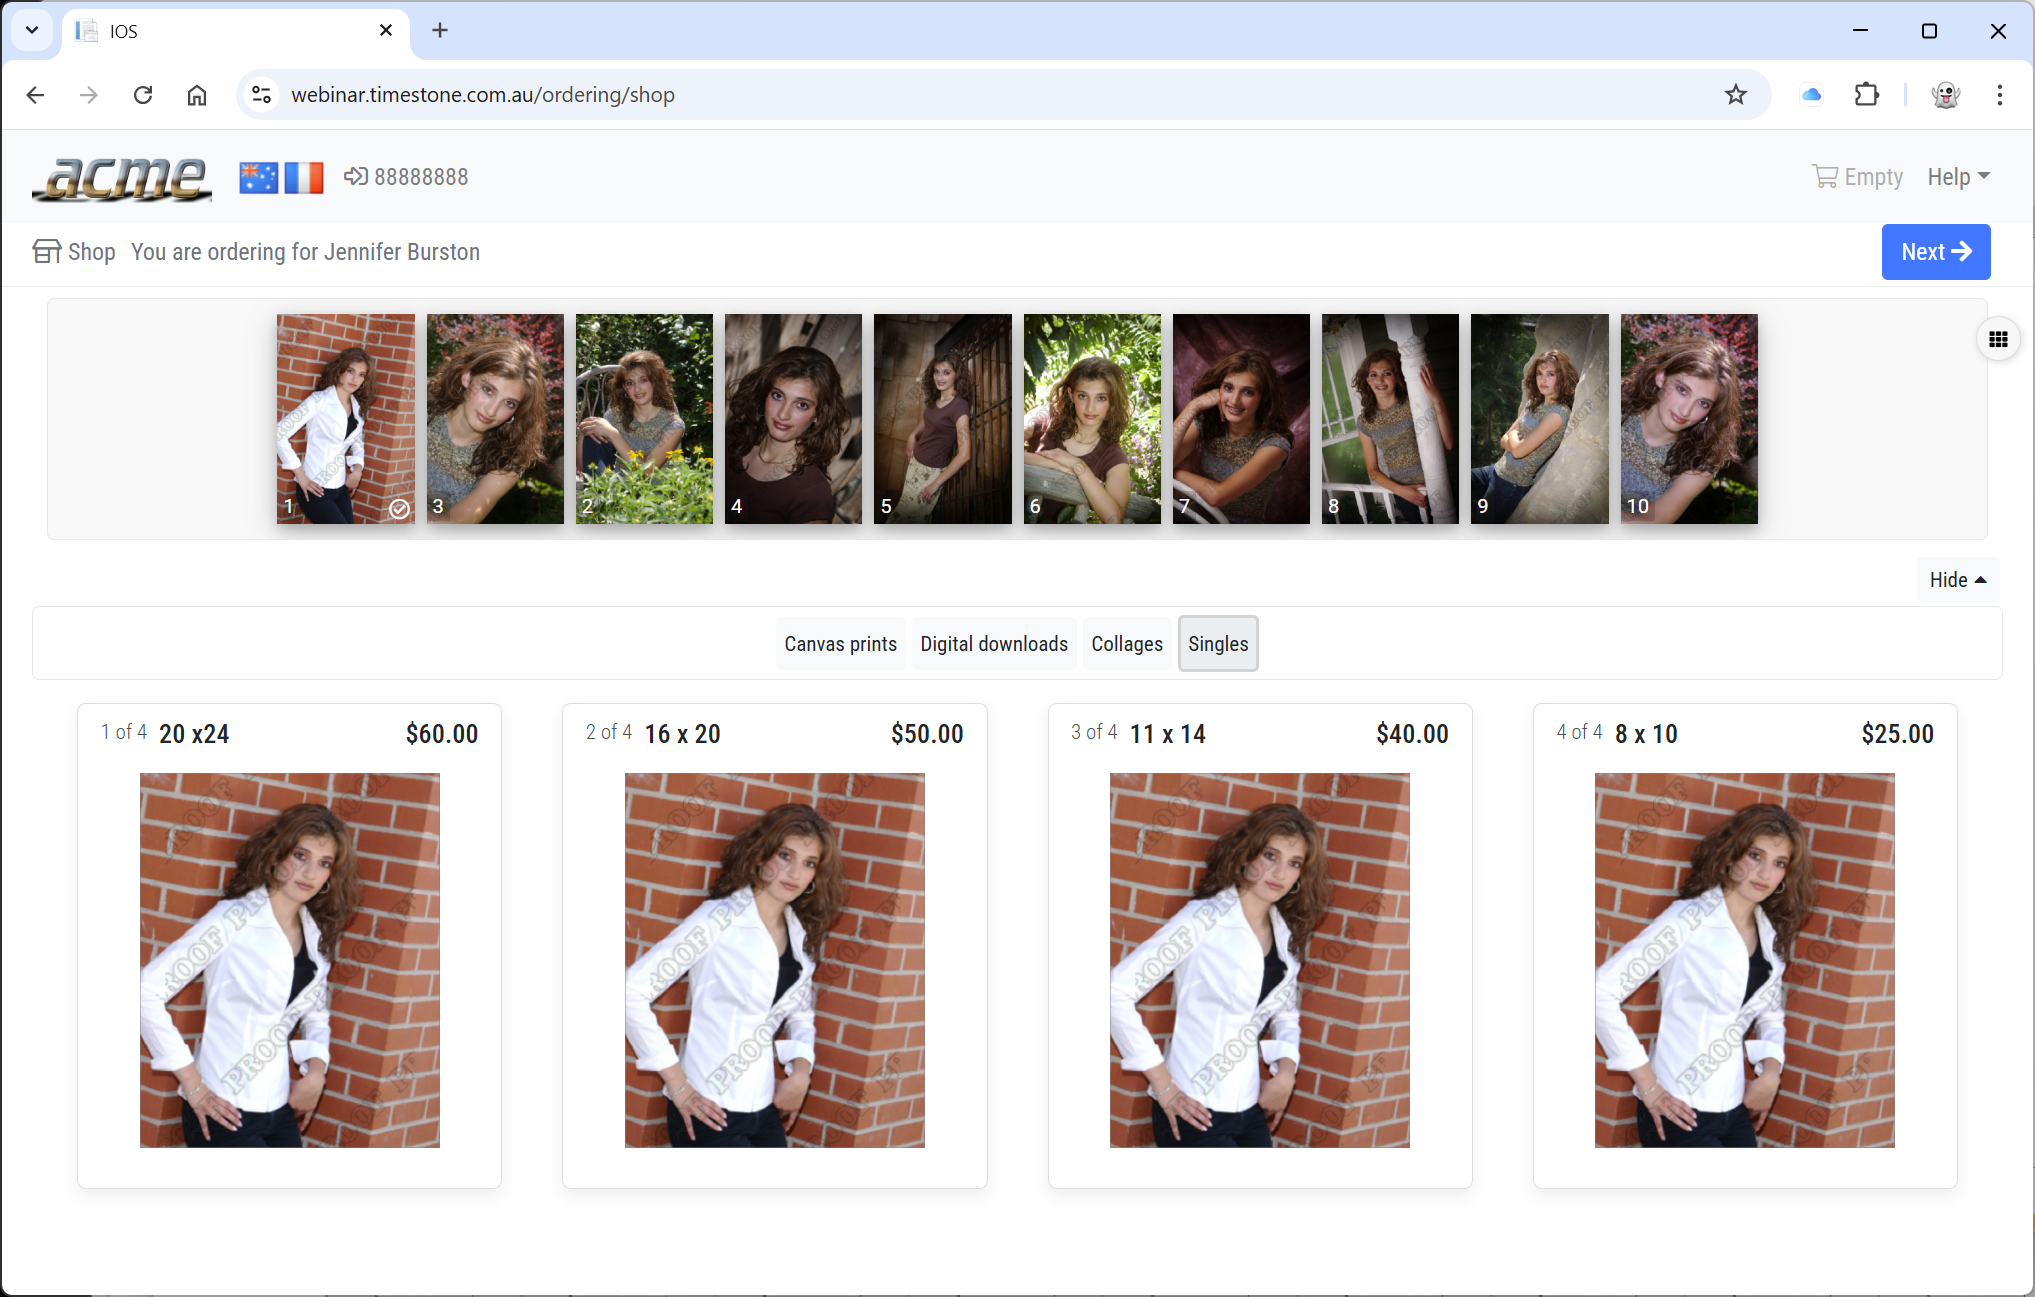
Figure 3: The default appearance of category buttons
## Styling the category buttons
The Heading window accepts basic HTML, meaning the user can stylize the text with simple HTML tags.
Although a full HTML tutorial is beyond the scope of this document, some examples of using HTML are below.
In all cases, replace the {{Heading}} placeholder with the desired Heading as per the examples.
| Style | HTML | Example |
| --- | --- | --- |
| Italics | {{Heading}} | Packages |
| Bold | {{Heading}} | Downloads |
| Blue text | {{Heading}} | Groups |
| image |  |
### Colored category buttons
A very popular approach is to use colored buttons for each category.
Some users will prefer to use the same color for each button, while others may choose to use a different color per category - often matching the color theme on Package Templates, for example.
As with the HTML examples above, the colors are called by some simple encoding in the Heading window, as shown below.
#### The general format
Color the buttons using this general formatting in the **Heading** window:
> [!TIP]
>
{{Heading}}
>
> where **{{color}}** is the desired color and **{{Heading}}** is the button text.
IOS supports 10 different colors as per the examples below. In all cases, the text will be white on the colored background
| Color | Heading |
| --- | --- |
| burgundy | Packages
|
| blue | Build your own
|
| gold | Downloads
|
| pink | Singles
|
| green | Memory mates
|
| purple | Trader Cards
|
| navy blue | Swappers
|
| red | Statuettes
|
| royal blue | Specialty items
|
| black | All Packages
|
The examples above result in the following.

Figure 4: Colored category buttons
## Categories and conditions
Package categories can be conditional, meaning they are displayed only if the condition assigned to them is true. The condition is entered into the **Conditions** window when defining the category.
****Example****
With the following example, a condition called **Hot** has been defined and has been applied to a category **Hot Deals** in tsAdmin. The condition is true only when the value of the cart reaches $100. At that point, the Hot Deals category, along with its packages, is displayed in IOS.
[Hot Deals Conditional Category](https://demo.timestone.com.au/ordering/with?key=98M2M8W5&options=emptycart)
Using the link above, add $100 worth of products to the cart. The Hot Deals category will appear.
It should be noted that a category will not appear if there are no packages in it. This means the condition could instead be applied to each package in the category. Until the condition is true, no packages will be displayed, and therefore, the category button also will not be presented.
---
### FAQ
#### What are Package Categories?
Package Categories allow photographers to organize their online packages into logical groupings, making it easier for customers to browse the offerings.
#### How do I define categories in Timestone?
Categories are defined in the Timestone Administrator (tsAdmin) within the Package Categories object, where you create a Package Category Set before adding categories.
#### What properties define a category?
A category is defined by four properties: Code, Description, Heading, and Conditions.
#### Can a package belong to multiple categories?
Yes, a package can be assigned to multiple categories.
#### How can I style the category buttons?
You can style the category buttons using basic HTML tags in the Heading window.
#### Are there specific colors available for category buttons?
Yes, there are 10 different colors available for category buttons, such as burgundy, blue, gold, and more.
#### What happens if a package has no assigned category?
A package with no assigned category will appear in every category.
#### Can I set conditions for categories?
Yes, package categories can be conditional and will only display if the assigned condition is true.
#### Is it possible to change the category set after it has been created?
Yes, you can switch category sets at any time to select different categories.
#### What happens if a category has no packages in it?
Category buttons will only display if there are packages in it.
Packages are defined in an Offer and comprise one or more Products.
Packages are the basis of all ordering methods. When customers place an order, when they buy something, they are ordering a package even if that package only contains a single product.
tsAdmin also referred to as Timestone Administrator is a utility that allows the user to create working environments for the software.
An Offer is composed of one or more Packages.
It is useful to think of an offer as an order sheet from which customers choose what they wish to order. "Here are the packages I offer you".