Scope
TIP
It is recommended you work through the Quick Start in conjunction with reading the more detailed Beginners Guide
Welcome to the QuickStart guide for Timestone Software’s NeoPack application. This article guides new users or those seeking a quick refresher through the fundamental tasks and features necessary for a successful start.
To make the process more relatable, the guide follows the role of a school photographer preparing for a school photography day.
Although the guide uses NeoPack, the steps and features covered are broadly applicable to other Timestone applications, thanks to the shared functionality and interface. No matter which app you're using, you'll find this guide a practical starting point.
Download the folder below and use the issued demo key to follow along. Please place the downloaded folder, uncompressed, onto the desktop of the computer being worked on.
Setting Up
Before creating a job, there are a few key pieces that need to be set in place using the Timestone Administrator app (tsAdmin). These are usually one-time or seasonal setup tasks—think of them as the groundwork laid at the start of a new season or when launching a new Offer.
One of the most important concepts to understand early on is how everything connects. For example, how Products are assigned to Packages and how packages are combined into Offers. Or, how seasons, jobs and paths are related to make sure the software can find the right assets (images, templates, graphics) when it needs them.
The following sections will walk through that setup process, step by step:
Creating a Season
Setting Paths
Creating Templates
Creating Products
Building Offers and Packages
Logging in to the Apps
When you open NeoPack, the Timestone Administrator (tsAdmin) or another Timestone application, you will be prompted to log in and connect you to the database. You will need to enter the IP address of the MySQL server, the database name (defaults to timestone) and the credentials provided with your demo keys.
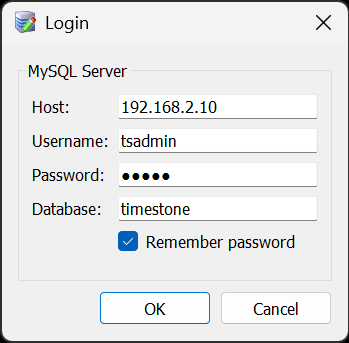
Figure 1: The tsAdmin Connect window.
TIP
The credentials are remembered for future logins. You also have the option to remember the password.
Creating a Season
Seasons are a way to group jobs, typically based on the calendar. For this example, let’s assume that the calendar year is the desired season: 2025. Seasons have parameters that can be set for them, while other aspects of the software, such as offers, can be created with respect to seasons.
To create a season, open the Timestone Administrator, tsAdmin, and navigate to the Seasons section — it’s the first ’object’ in the list on the left. Next, click the Add New Season Icon, a green Plus (+). Only the Code is required, although the Description should also be entered because the software often displays the season’s description rather than the code in certain places. The other fields can be left blank or at their default.
For now, add a season with the following parameters.
Code- 2025
Description- 2025 — This will display in other places within the apps.
Is Active- True
is Default- false

Figure 2: The Season management screen in tsAdmin
Click Submit Changes to save the created season.
Setting paths to the included folders
Having downloaded some assets at the start of this guide, you now need to ‘tell’ the software where they are. You do this by setting paths in the Paths object of tsAdmin.
To set the paths:
Open the Timestone Administrator app (tsAdmin)
Navigate to the Paths section of tsAdmin
Select the * icon to apply the path to all subsequent seasons
Select the tab for images or templates (you will need to do both)
Click the Add New Path icon
Use the blue folder icon to use the file browser to set the path to the appropriate tab/folder combination from the downloaded quick start assets.
For Templates:
Navigate to the unzipped quick start folder and select the Common Templates folder
Click Select folder to designate the path in tsAdmin
Leave the used setting to its default “All”
For images:
Navigate to the unzipped quick start folder and select the images folder. (There is currently nothing inside this folder. That is as intended and will be addressed later in the guide.)
Click Select folder to designate the path in tsAdmin
Once the main path is entered, double-click and add “/@+” to indicate that the system should look for a job name subfolder.
Click Submit Changes to save the new paths
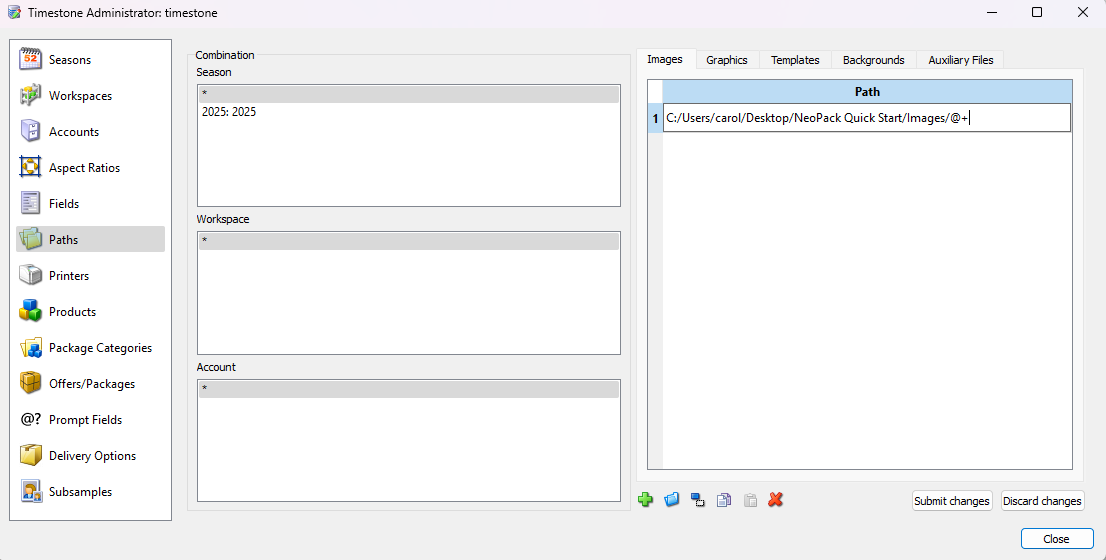
Figure 3: The Paths management area in tsAdmin showing the path to the images folder
NOTE
The @+ indicator at the end of the images path is the job name wildcard. The system will replace the @+ with the name of whatever job is open so your images need to placed in a folder that exactly matches the name of the job.
Creating Print Templates
For this next step, open NeoPack and enter the Template Designer using the Mode menu. Included in the template folder are several common templates, with two notable exceptions that you will create - the 8×10“ and 5×7” templates.
Use the following steps to create the 8×10 template:
Create a new Template
Click the new template icon and select the Pack layout option.
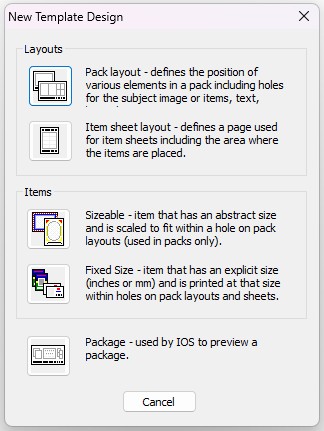
Figure 4: The new template design window
Set the Design canvas size
Set the canvas size to 8×10 inches by clicking on the canvas and setting the size options to 8 wide and 10 tall on the size toolbar.
Click Apply when complete
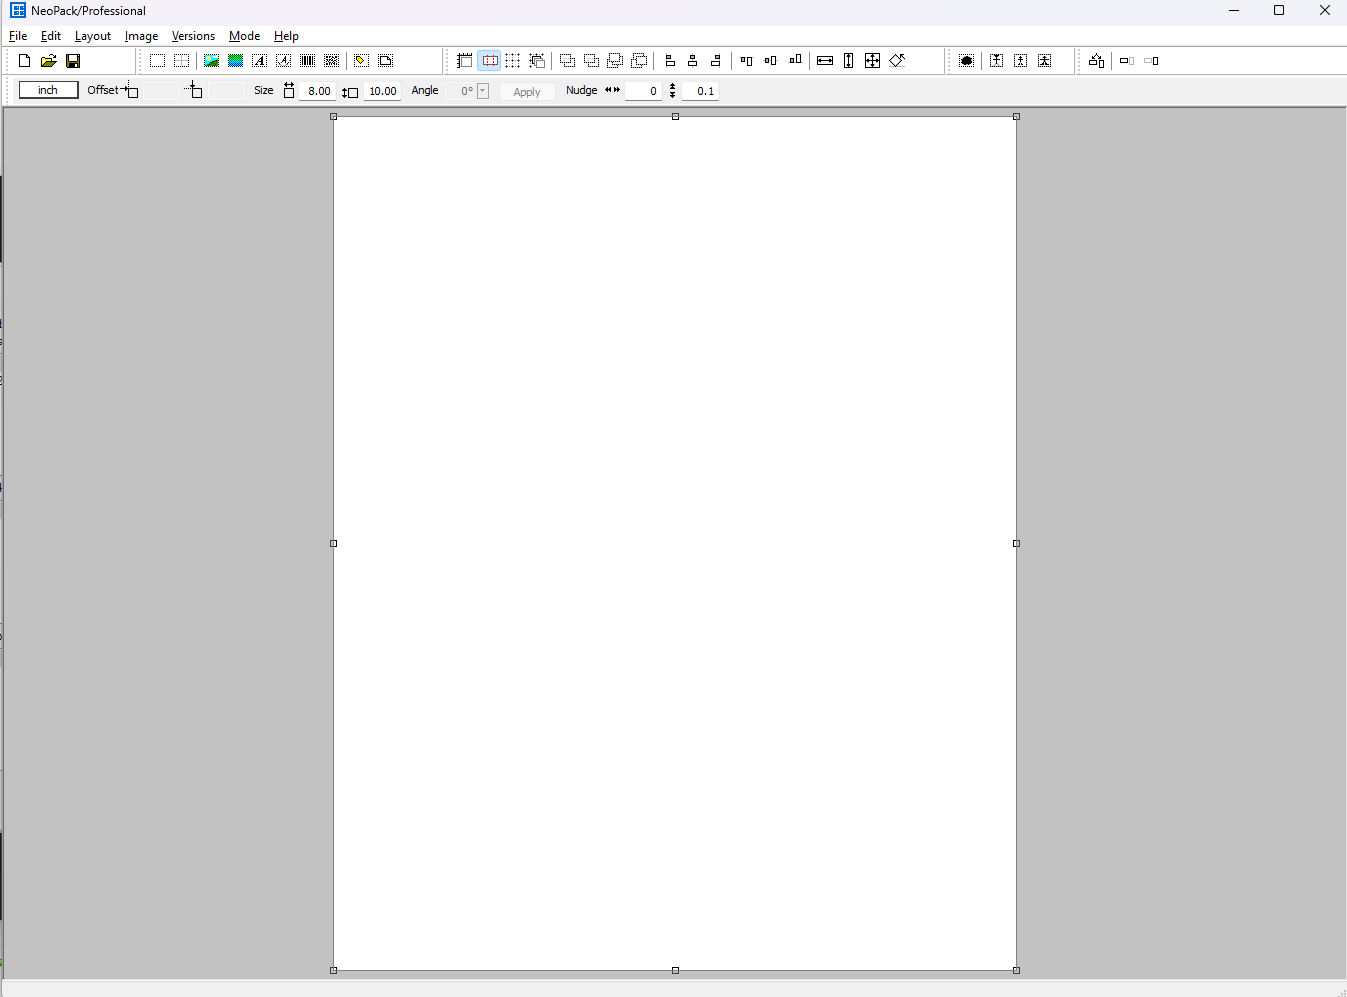
Figure 5: The newly created design canvas in the Template designer.
Place the Image hole
Click the Add Hole icon in the toolbar, represented by a dashed square.
Click and drag the mouse to draw the intended shape; do not worry about being precise, you can make alterations later.
Once you release the mouse, the Hole options dialog window will appear.
Select the first radio button option, Selected Item design (or image if no design is selected), and click OK.
With the image hole selected, you can now use the size toolbar (the same as step 2) to precisely size and place the hole on the design canvas. Click Apply to accept the size and position changes.
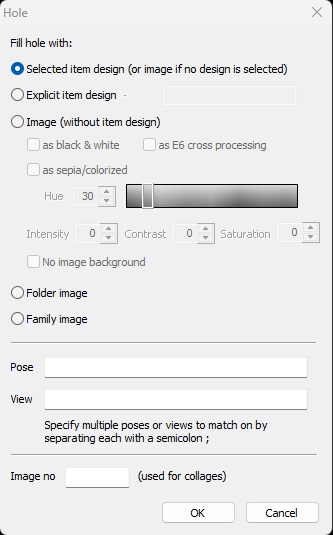
Figure 6: The Hole options window.
Set the Properties and Save the Template
Now that all the elements have been placed on the template, navigate to File> Properties and add a key and description. For the 8×10 template, use the following:
Key- 810
Description: 1- 8×10
Click OK to accept the changes.
The Key will be used to map the template to a product in the next step. Included in the folder with the premade templates is a text file that has the keys for the existing templates.
Remember to save the template in the template folder pathed in the previous step.
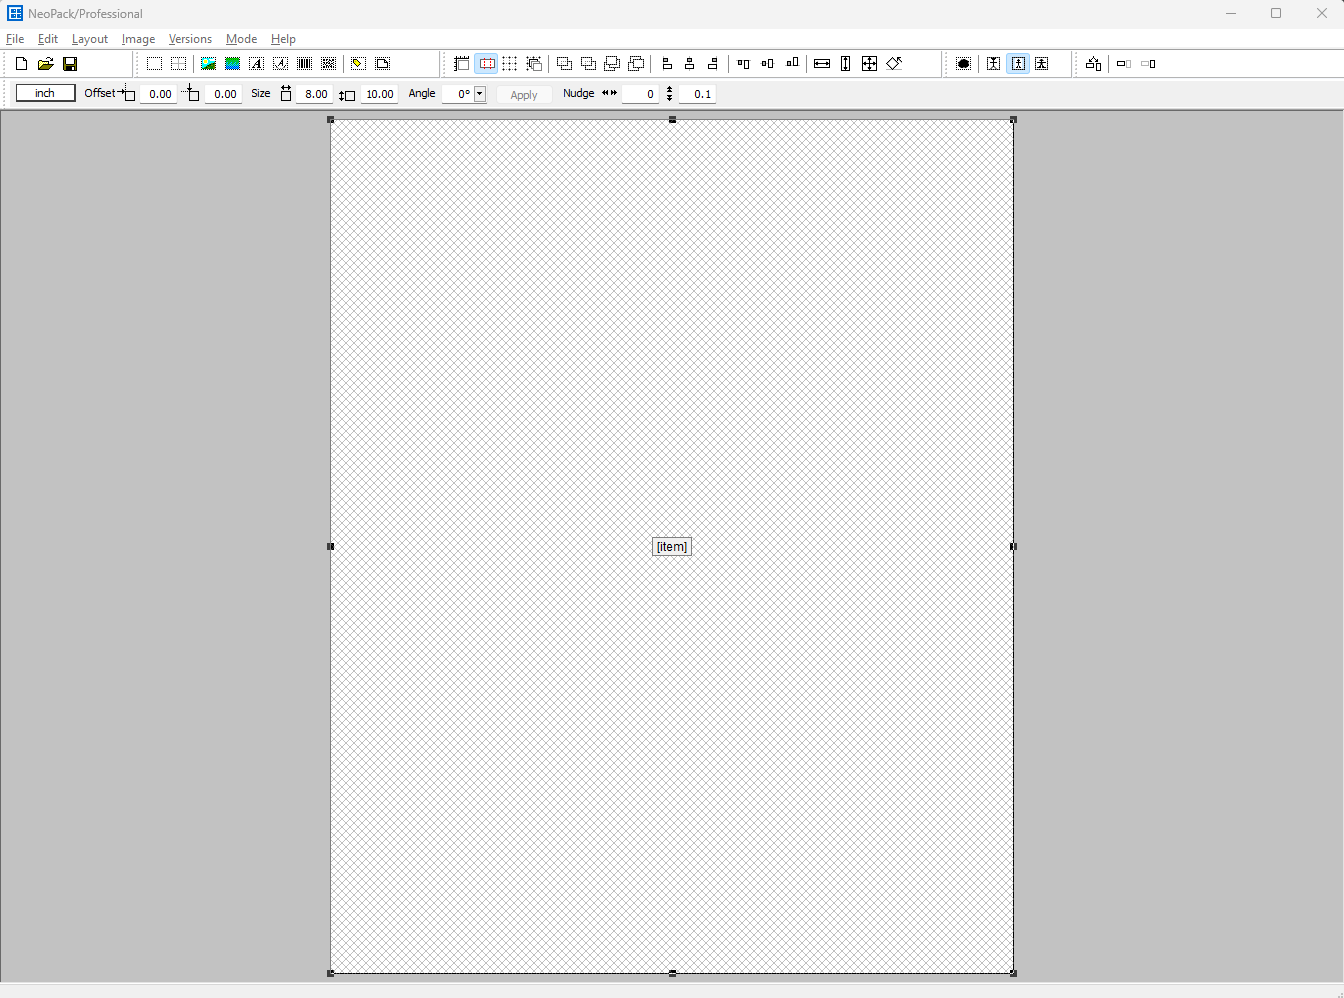
Figure 7: The completed 8×10 template
Now that you have created the 8×10 with the guide, create the 5×7 template on your own.
Creating the Products
Now that the templates are all created, the next step is to create Products that use those templates.
Open tsAdmin and navigate to the Products area using the left navigation tabs. You will then add all the templates from the common template folder (except the QR 6up sheet. pst and the Standard Camera Card. pit files) as products. This will allow products to be added to the packages in the next step.
To add a new product:
Click the add product icon in the lower left
Enter the following product information for each template:
Code — The product code could be the same as the Template Key or a shortened version of the product description
Description — A description of the product; this will be displayed in other portions of the software
Type — For these templates, choose Portrait from the dropdown
Template/Version— This must match the product key entered for the previous step. Included in the template folder is a text file that lists all the preexisting template keys.
There are additional options, but they do not apply to this guide.
Click Submit changes to save the created products.
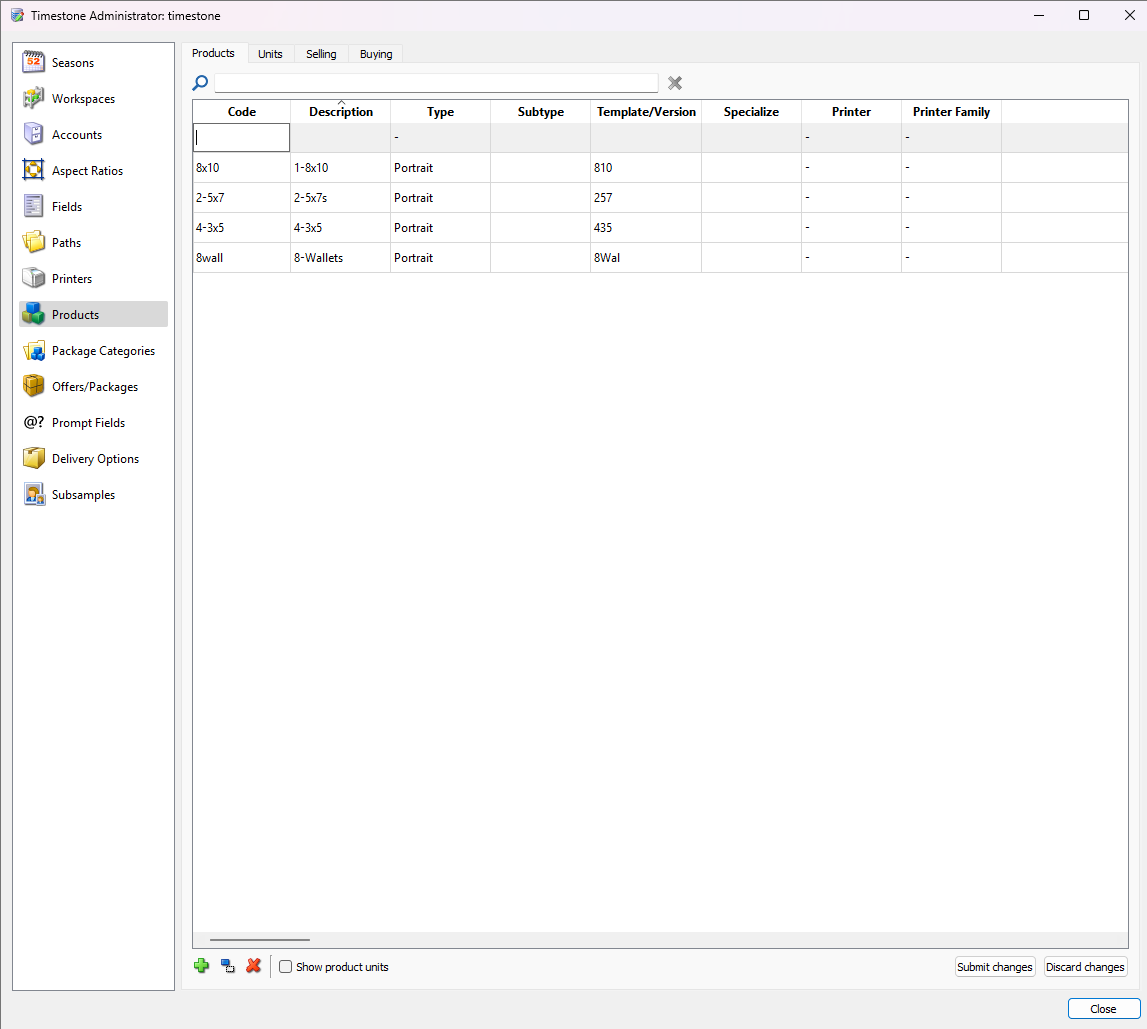
Figure 8: The Product management screen in tsAdmin.
Creating the offer and packages
Now that the products are created, let’s set up an offer and packages. These are needed by the various systems of ordering in Timestone Software.
Offers and packages are both managed on the same screen in tsAdmin.
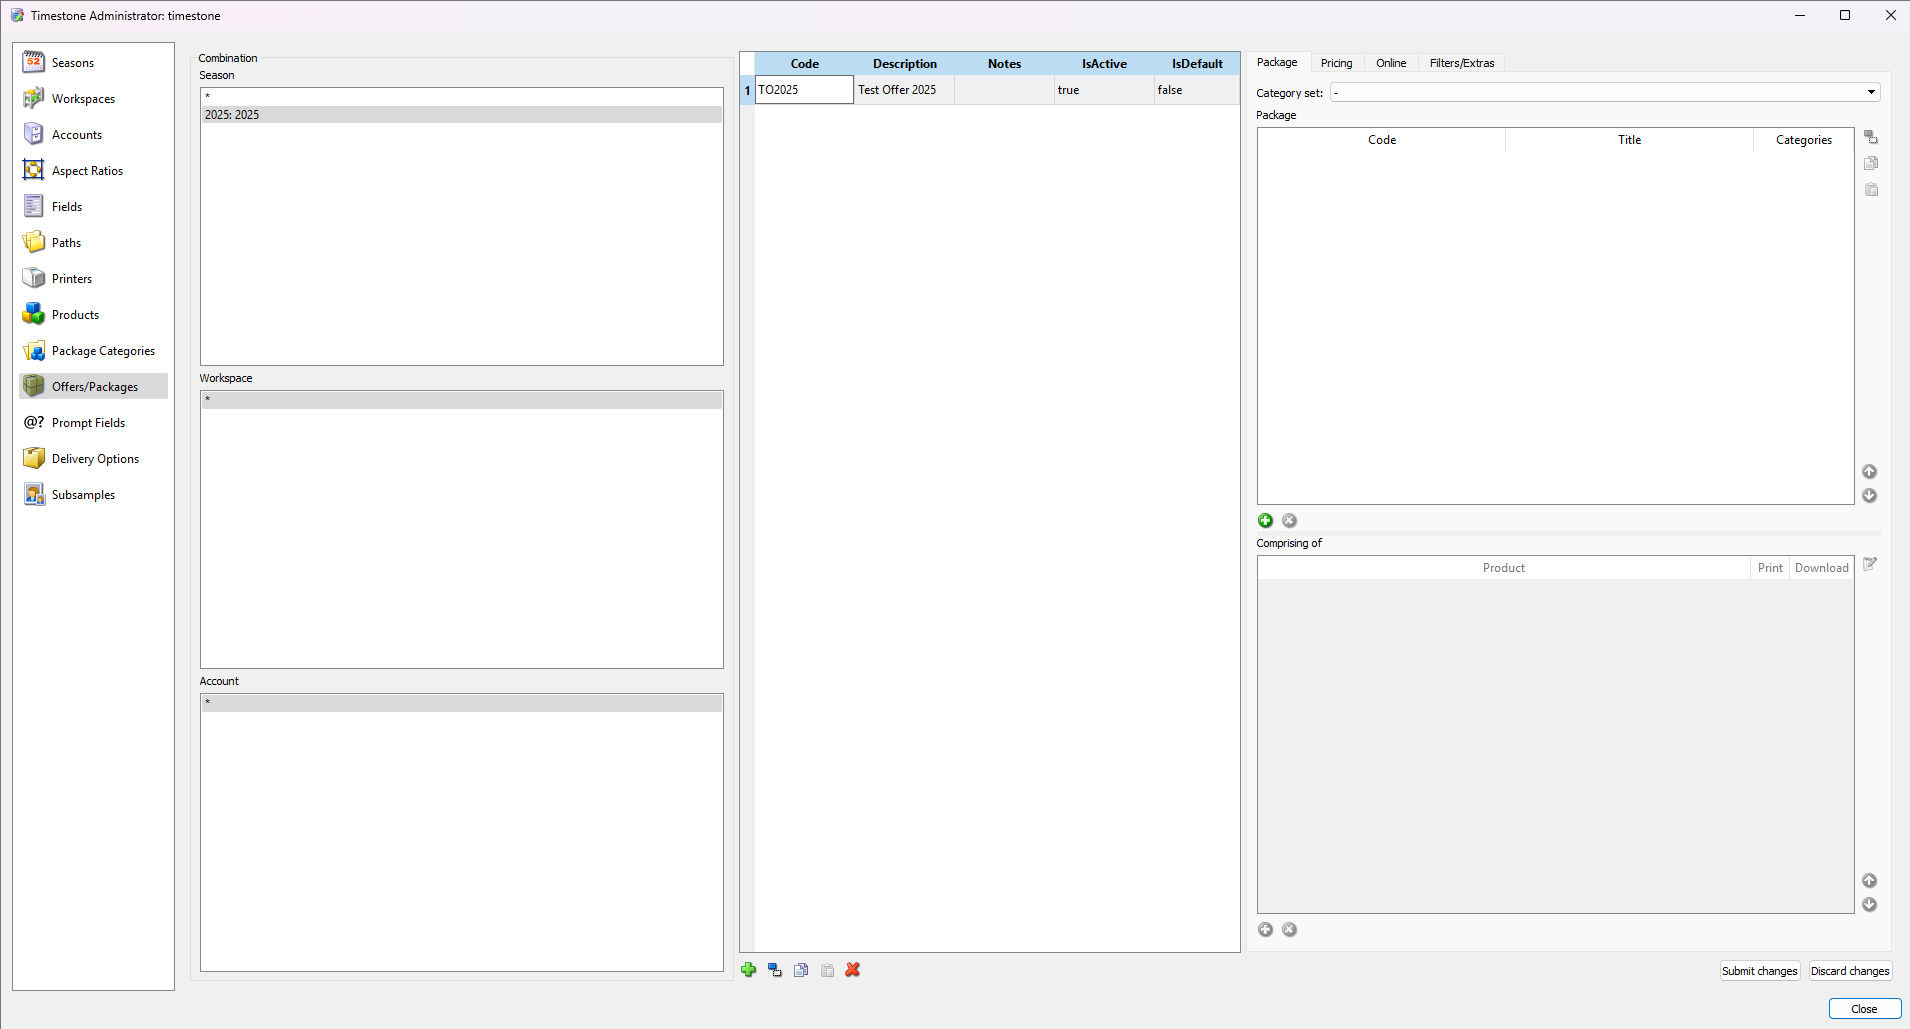
Figure 9: The Offer and Package management screen in tsAdmin with a Test offer created.
To create an offer:
Select the 2025 Season from the Combination area on the left. This will make the offer accessible only to the current season. The other Combination options should default to the *, or all, option.
Click the New Offer icon (green plus) at the bottom of the next entry area, to create the offer.
Enter the following information into the fields by double-clicking in the area:
Code — TO2025 — typically corresponds with the description or the existing code on a printed brochure, if one exists
Description — Test offer 2025 — a full name of the offer, which will display elsewhere in the software.
IsActive — true
IsDefault — false
Click the Submit Changes button to save the offer.
Using the sample offers in Figure 9 and the steps below, create the following packages.
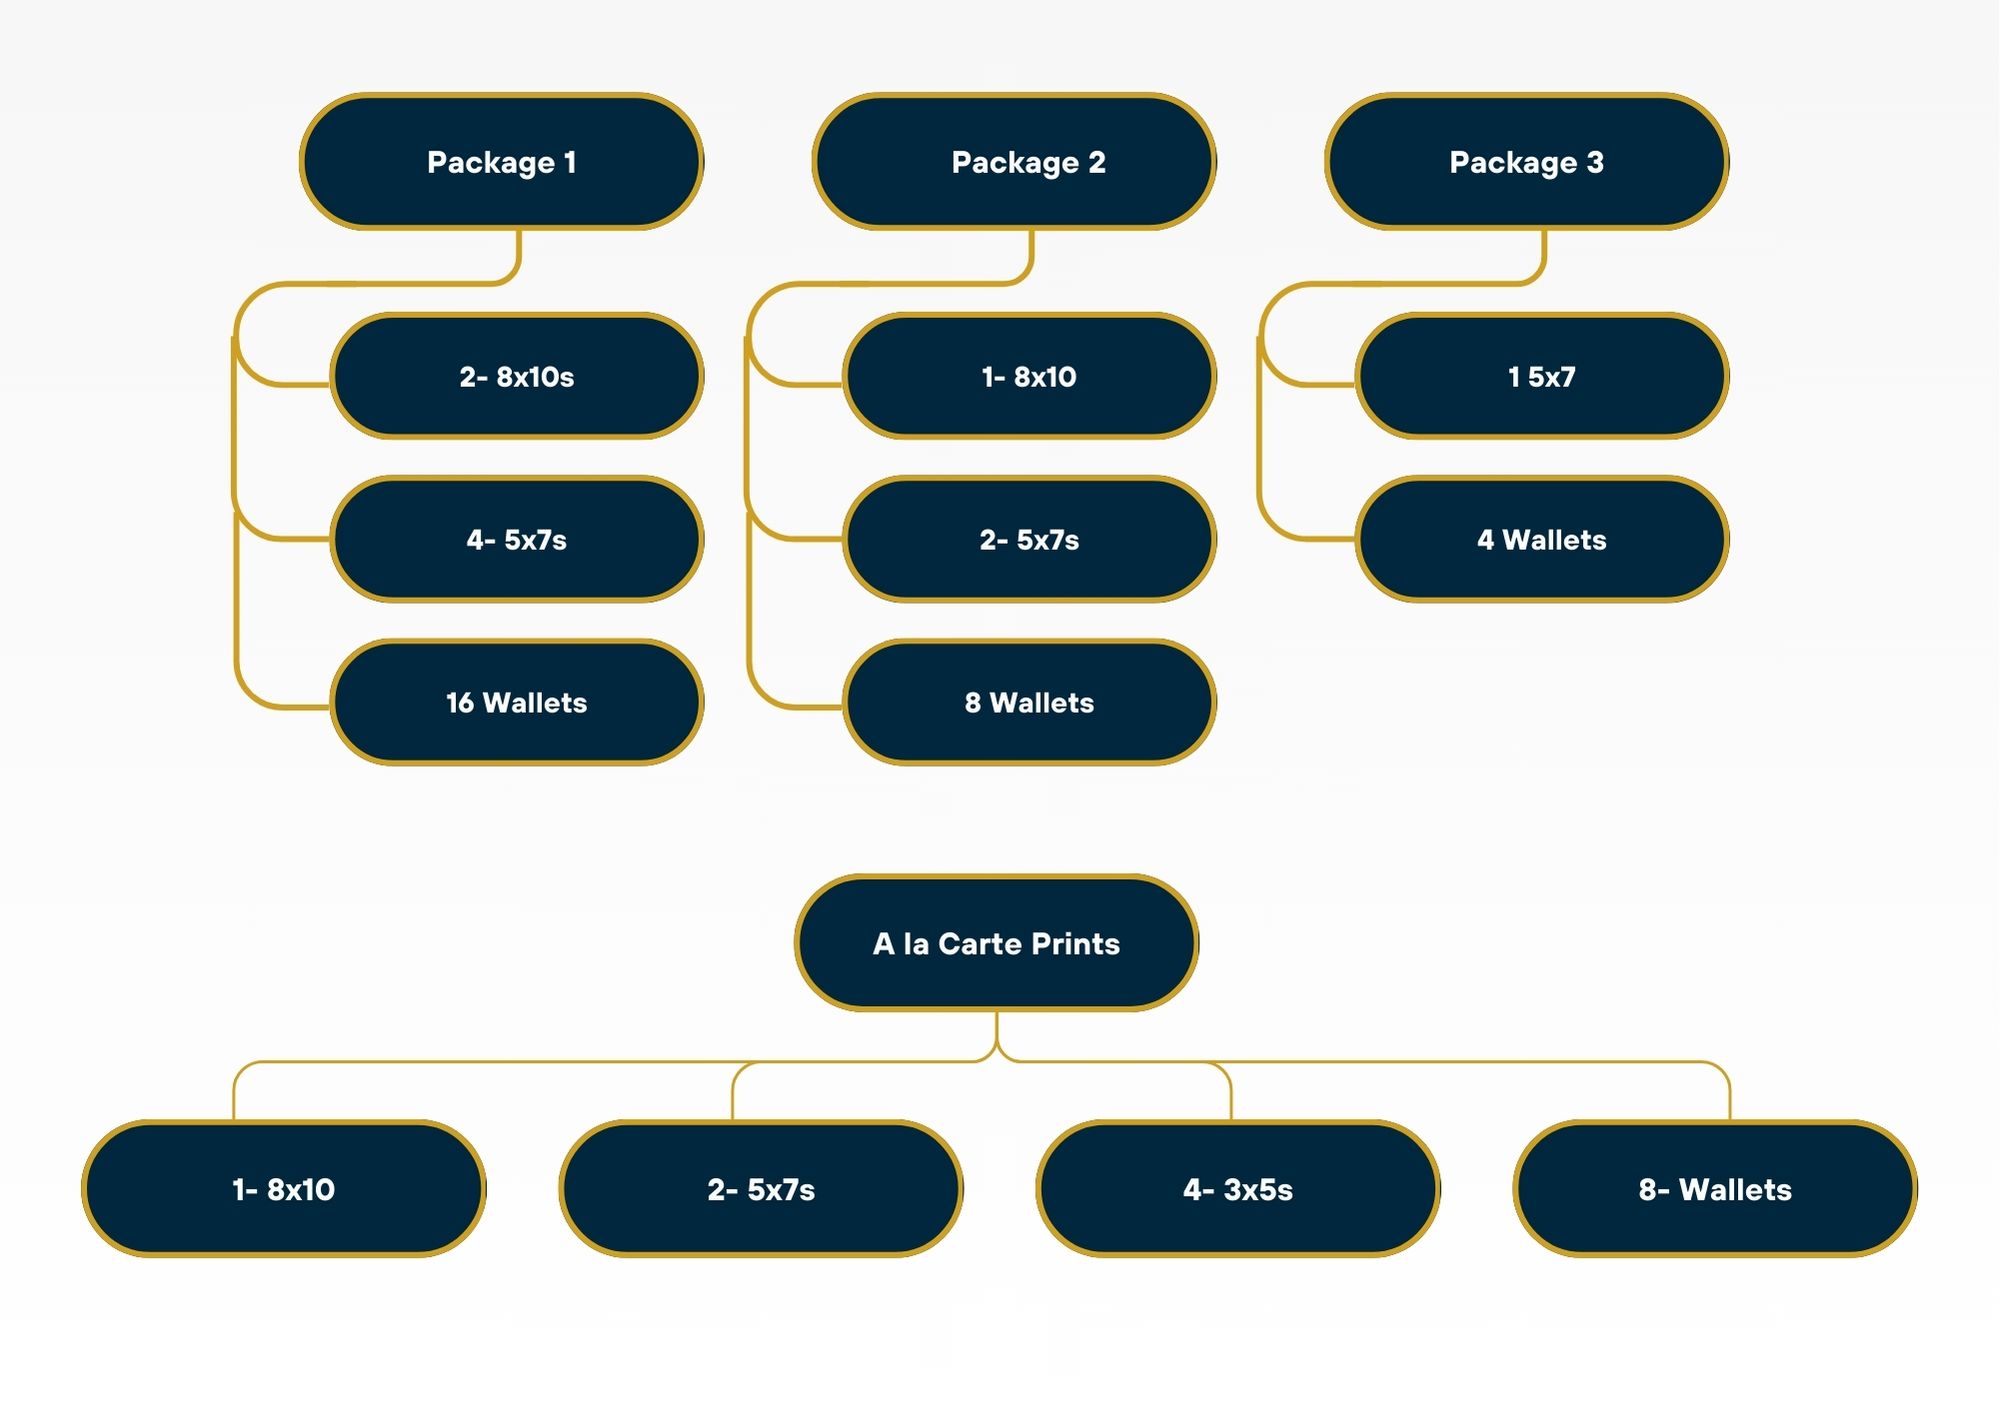
Figure 10: Sample Packages and a la carte prints
Creating a Package:
Ensure that the offer TO2025 is selected.
Click the New Package icon, a green circle with a white plus located in the bottom left of the package area.
Enter the package code— typically a simple number or letter. This will be the code entered in the ordering step and should match the printed brochure, if there is one.
Enter the package title— this will display to the customer if you choose to make use of the Timestone online ordering system.
With the new package selected, navigate to the Comprising of area below and click the Add New product icon, also represented by a green circle with a white plus.
From the Product dropdown list, select the intended product. In the case of Package 1, select the first 8×10 print.
Repeat steps 4 and 5 until all the products that make up package one are included. Refer to Figure 10 below to see the completed package.
Click Submit changes when the package is complete.
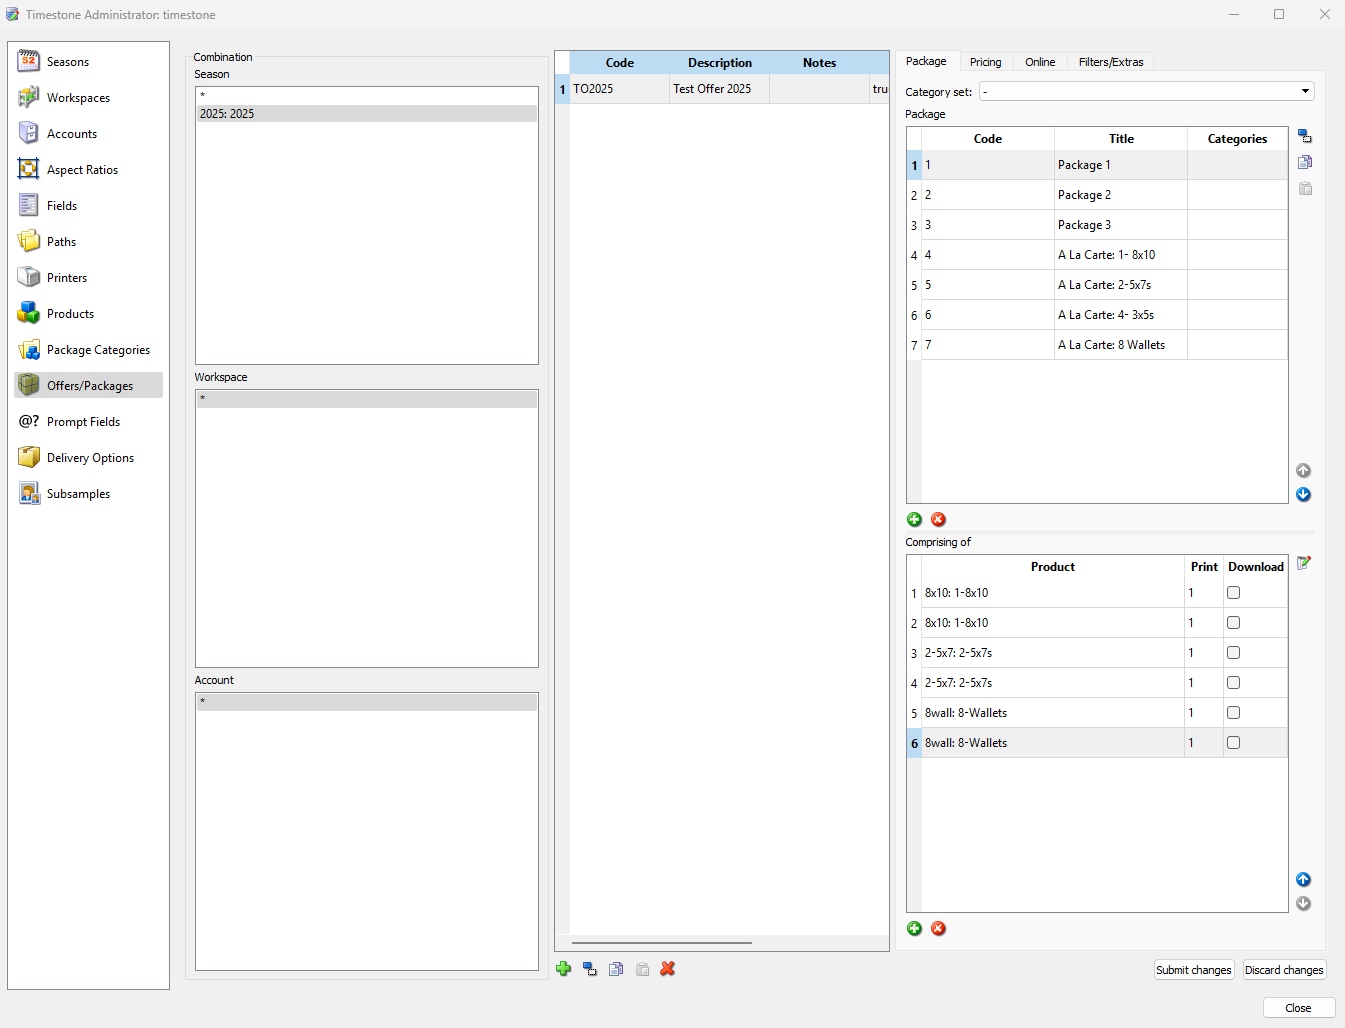
Figure 11: The offer and package management screen showing a completed package 1.
Continue to add packages and the products that comprise them until all packages are made. Remember to click Submit Changes to Save. If you need to remove a package or product, use the remove selected icon, represented by the red circle with a white x.
NOTE
Packages 1 and 2 consist of multiple “basic” print products and, therefore, will have multiple products added to the package. Package 3 and the three A la Carte packages all consist of single template layouts, with Package 3 using a template that has multiple image holes of different sizes (1- 5×7 and 4 wallets).
Congratulations, the Offer set up is complete!
The Job
You are now ready to create a job. Jobs are where data is stored, Images are matched to subjects, and orders can be entered and printed.
Creating the Job
To create a job, open NeoPack in any mode except Template Designer and navigate to File>New or use the New Job icon on the toolbar.
This will launch the New Job dialog window. You must then enter the following information:
Name the job — Timestone School House SD 2025
Select the newly created season — 2025
Select the new offer —Test Offer 2025
Once all selections are made, clicking OK will finalise the creation of the new Job.
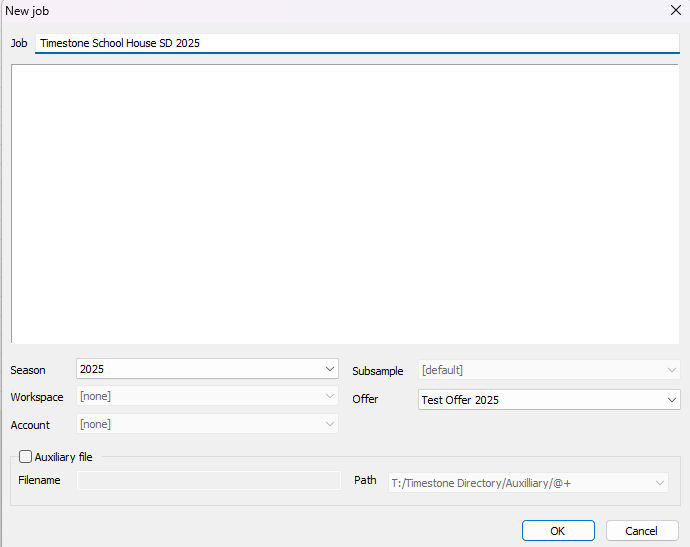
Figure 12: The New Job Creation Window
Importing Subject Data
Now that a job has been created and opened in Details Mode, the subject data should be imported. Included in the Zipped folder is a CSV file called TimestoneSchoolHouseData.csv; this is a pre-prepared subject Data file containing the following fields:
First name
Last name
ID #
Teacher
Grade - this column is duplicated to import the information into the subject data and place the subject in a folder based on this information simultaneously
Parent Phone Number
To import the subject data file:
Navigate to File> Import Text File…
Find and select the data file. This will launch the import file details menu.
Map the data columns to fields in NeoPack
For the first three columns of data: First, Last, and ID number, select the To Subject Data radio button, and the appropriate default label in the To Subject Field Dropdown.
While mapping the ID number, check the box for Column Uniquely Identifies the Subject. This indicates that the ID numbers are unique to each subject and will not repeat.
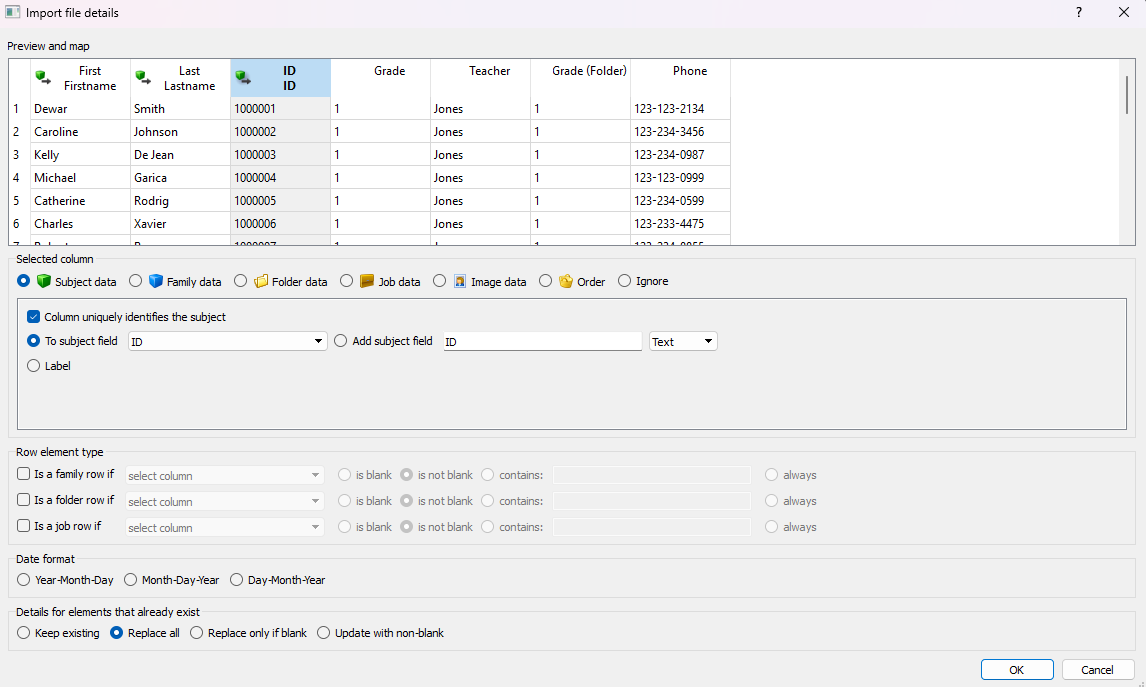
Figure 13: Importing subject data window showing the unique ID import settings
When matching the Grade, Teacher, and phone columns, select the To Subject Data radio button, then select the Add Subject fields radio button, and type the name of the column and leave the default text type option.
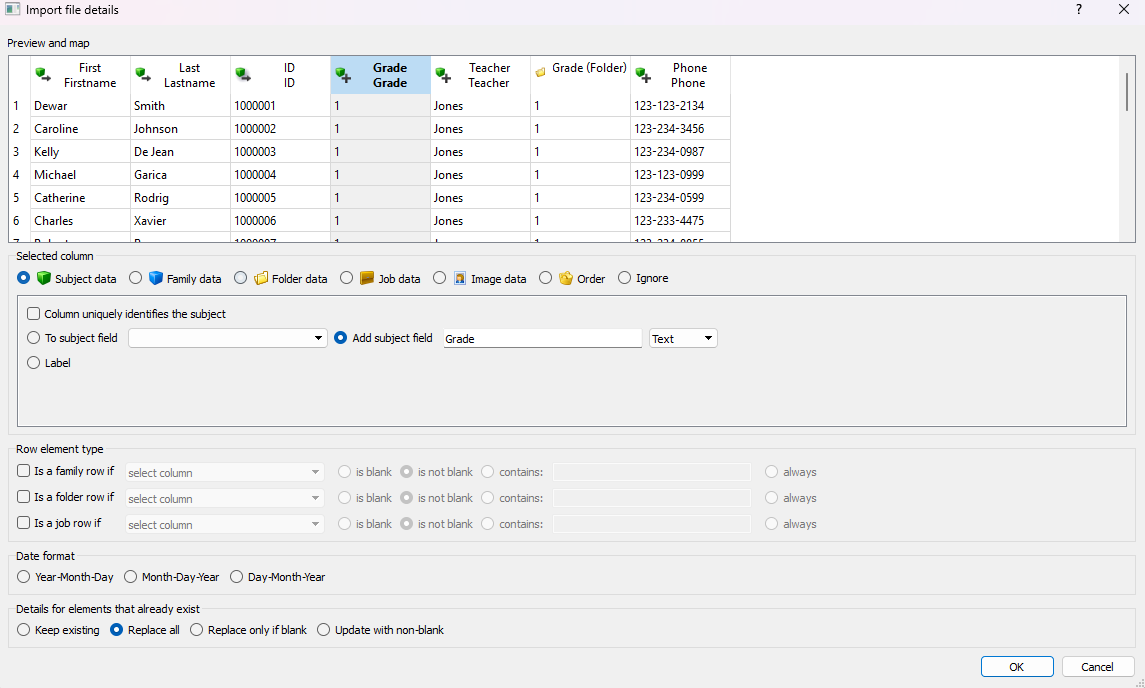
Figure 14: Importing subject data window showing the settings to create a field based on the column heading
To map the Grade(Folder), select the Folder data radio button, check the box for Column uniquely identifies the folder, and select the radio button next to Is the folder name.
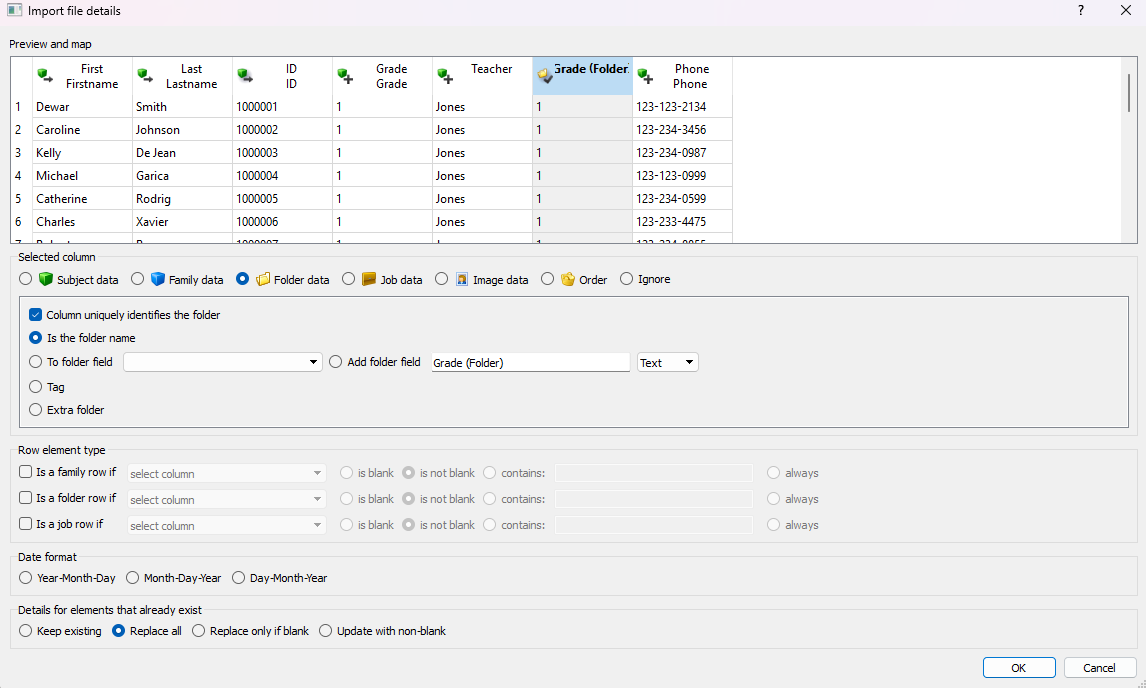
Figure 15: Creating folders based on a column in the subject data
Select OK when mapping is complete to import the data.
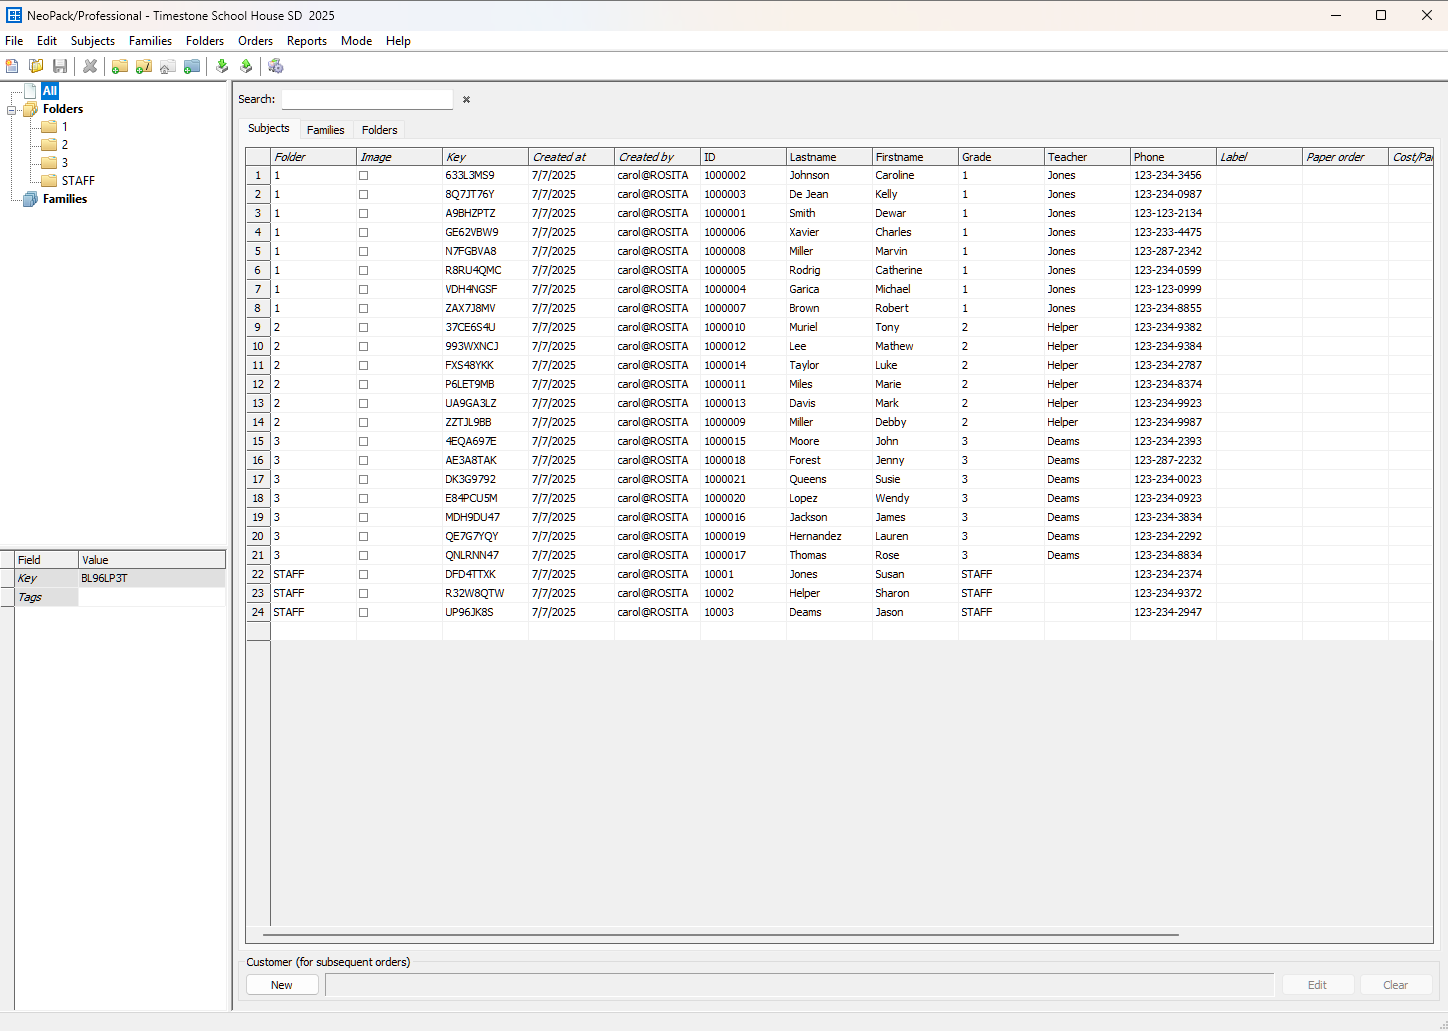
Figure 16: The imported subject data and folder information in Details Mode
TIP
Once the text file has imported, you will see the list of folders with the subjects therein. If it doesn’t look correct (like in the screen grab) you can delete all the data and re-import the text file taking careful note of the mapping.
Creating and Populating a Field
It is possible to add a data field to existing subject data in NeoPack. For this example, let’s add a school column so that you can incorporate that data into the next step.
To add a new field (and column) of data:
Navigate to Edit>Fields…
In the Data fields dialog window, click Add and type the School into the Name area. This will be used as the column header.
To reorder the column between the teacher and phone columns, use the arrow buttons on the side of the dialog box.
Click OK when complete.
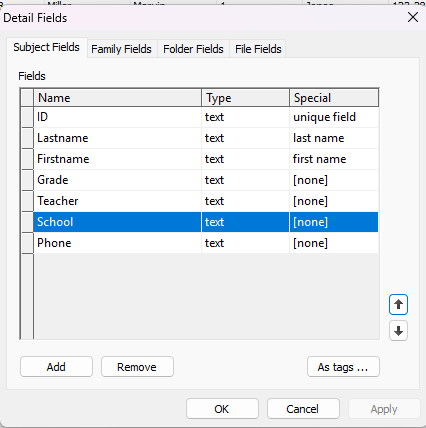
Figure 17: The Detail Fields window with a newly created “School” field selected.
To populate the new School field for all subjects:
Navigate to Subjects> Populate field…. This will launch the Populate Subject Field Dialog window.
Select School from the Populate this Field drop-down list
Select the Fixed Text radio button, and type “Timestone School House” into the text area.
Ensure that the additional check box options are not selected.
Click OK to fill the field.
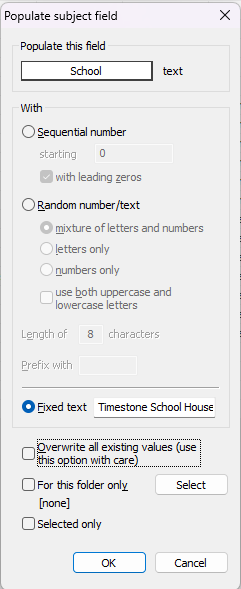
Figure 18: The Populate Subject fields menu showing the settings to populate the “School” field with the text “Timestone School House”.
Render Camera Cards
Once all subject data has been imported, you can generate QR code camera cards. These cards are used in the field by photographers to indicate that the images that follow are for a particular subject. You can then have the system automatically match the images to the subject on import — saving time and reducing errors during post-processing.
Included in the template folder are two key files:
StandardCameraCard.pit
QR6UpSheet.pst
These files will be used in combination to create the item sheet that can then be printed and cut into individual cards per subject.
To render the Camera cards:
In NeoPack, navigate to the Item Sheets Mode
Click the New Item sheet Icon on the toolbar, Reptested by two pieces of paper with an orange burst. This will launch a pop-up dialog window
On the Subject to include window:
-Select all folders to be included
-Type Camera cards_ ALL into the description area
-Click Next to advance to the next set of options
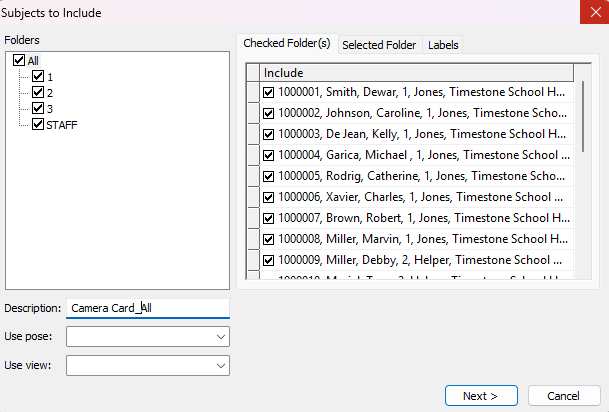
Figure 19: The Subject to include window showing all subjects and folders selected.
On the Templates/Arrangement window:
-Select the Standard Camera Card from the Item area
-Select the Layout Background Radio button and the QR 6 Up sheet from that area
-Set the Flow options to Across the page and Stacked
-Click Next to advance
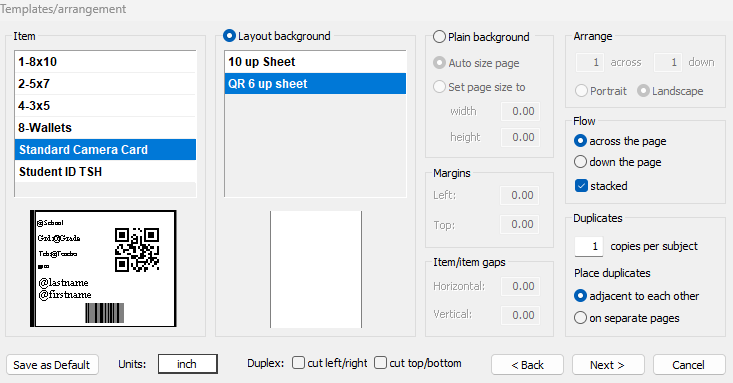
Figure 20: The templates and arrangement window
On the Sheet page settings:
-Set the sort order to
1st: Folder > Name > Ascending
2nd: Subject >Teacher> Ascending
3rd: Subject> Last Name> Ascending
This will cause the cards to be rendered by the folder, teacher, and then in alphabetical order by last name.
-Select the Folder Radio button in the Break on Change of area to have a blank card inserted into the document when the folder changes.
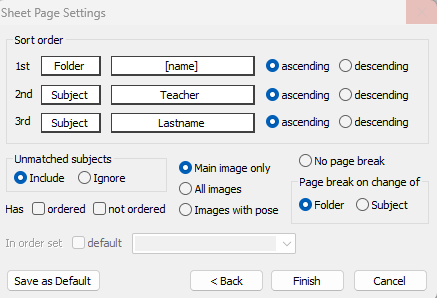
Figure 21: The sheet page settings window
Click Finish to Render the Camera Cards Item Sheet
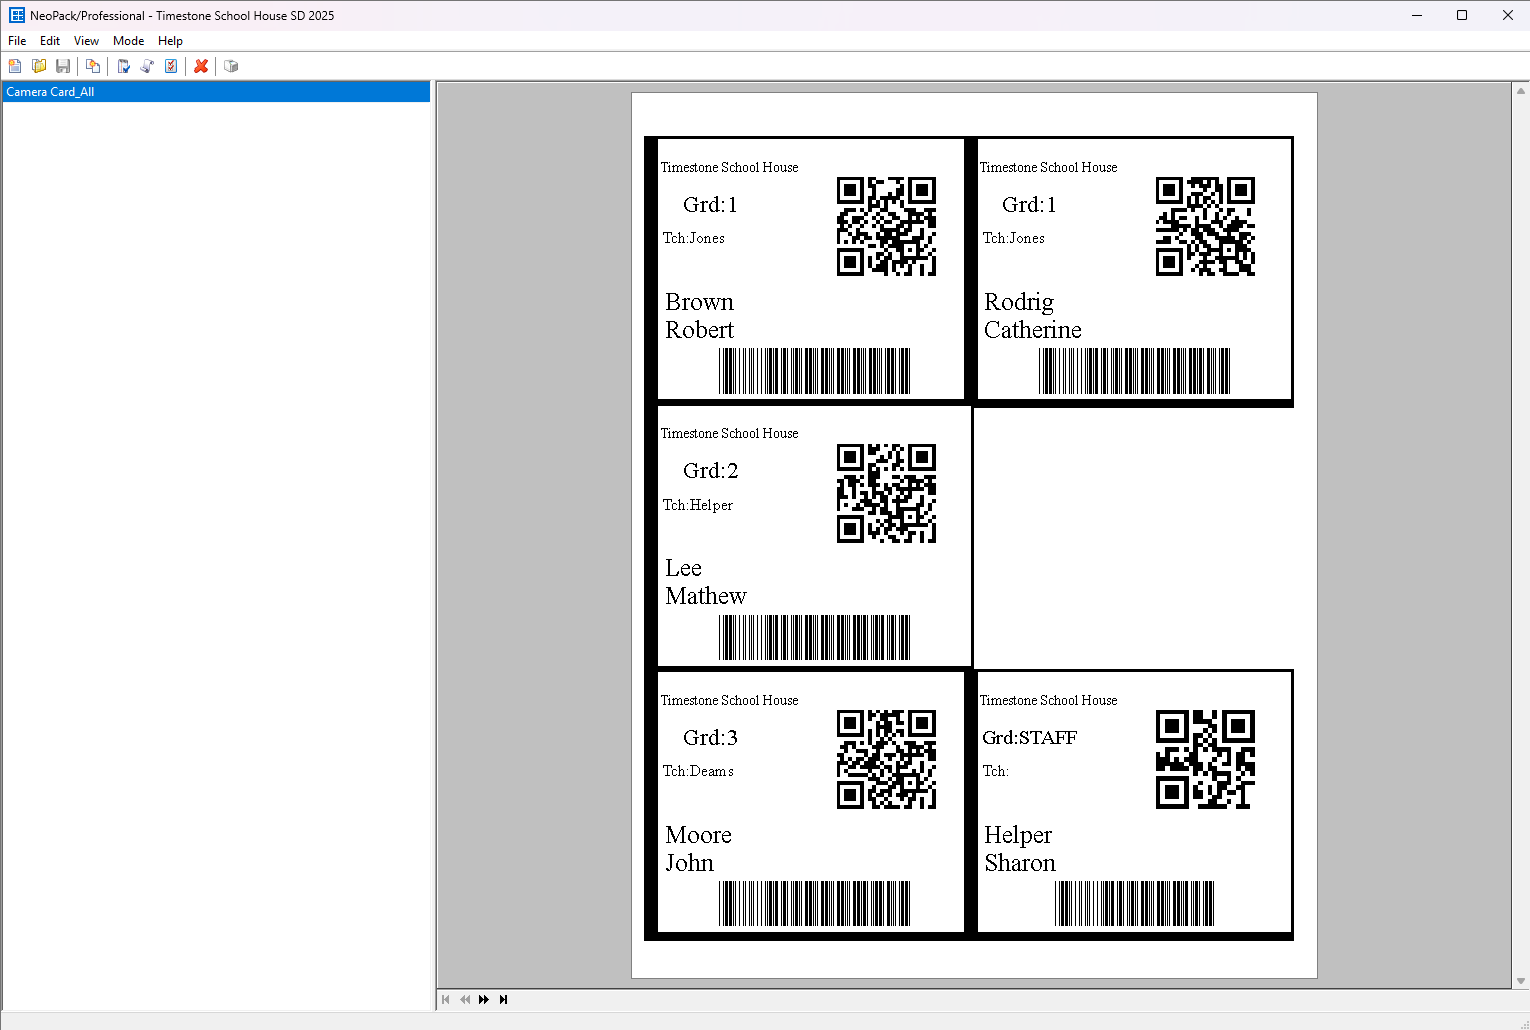
Figure 22: The rendered Camera Cards with subject-specific QR codes and relevant student information
The item sheet can then be printed and cut so that individual cards can be distributed to subjects before they approach the photographer. Each subject receives a card with their name, information, and a unique QR code.
In the field, the process is simple: the subject hands the card to the photographer, who photographs it before capturing the subject’s portrait. This ensures the QR code is the first image in the sequence, allowing the system to automatically match the photos to the correct subject during import, the next step.
Import Images Via QR code
Included in the download is a folder called Photographer QR Images. This contains a sample set of Subject images with their camera card Lead Image.
To import images, open the Job in NeoPack and navigate to Images mode> Image menu> import from disk… . This will open the Import form disk dialog menu. Then follow the steps below:
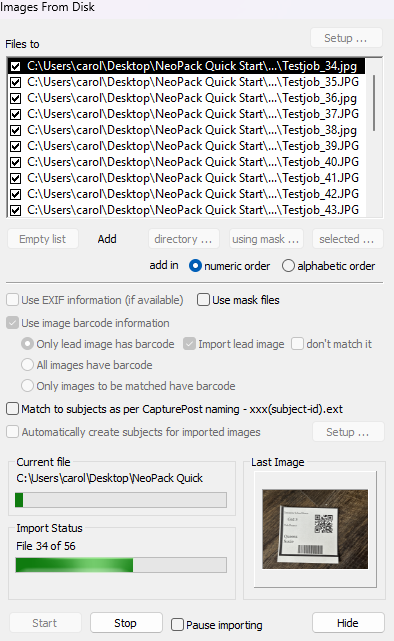
Figure 23: The Import images from Disk window
To select images for import, click the selected… button under the Files to area. This will launch a file viewer window.
Navigate to the Photographer QR Images folder and select all the contained images, and click Open.
Then make the following selection:
-Check the box next to Use image barcode information
-Select the radio button next to Only lead image has barcode
-Check the box next to import lead image
Click the Start button to import the images
This will import and match all the images to their respective subjects.
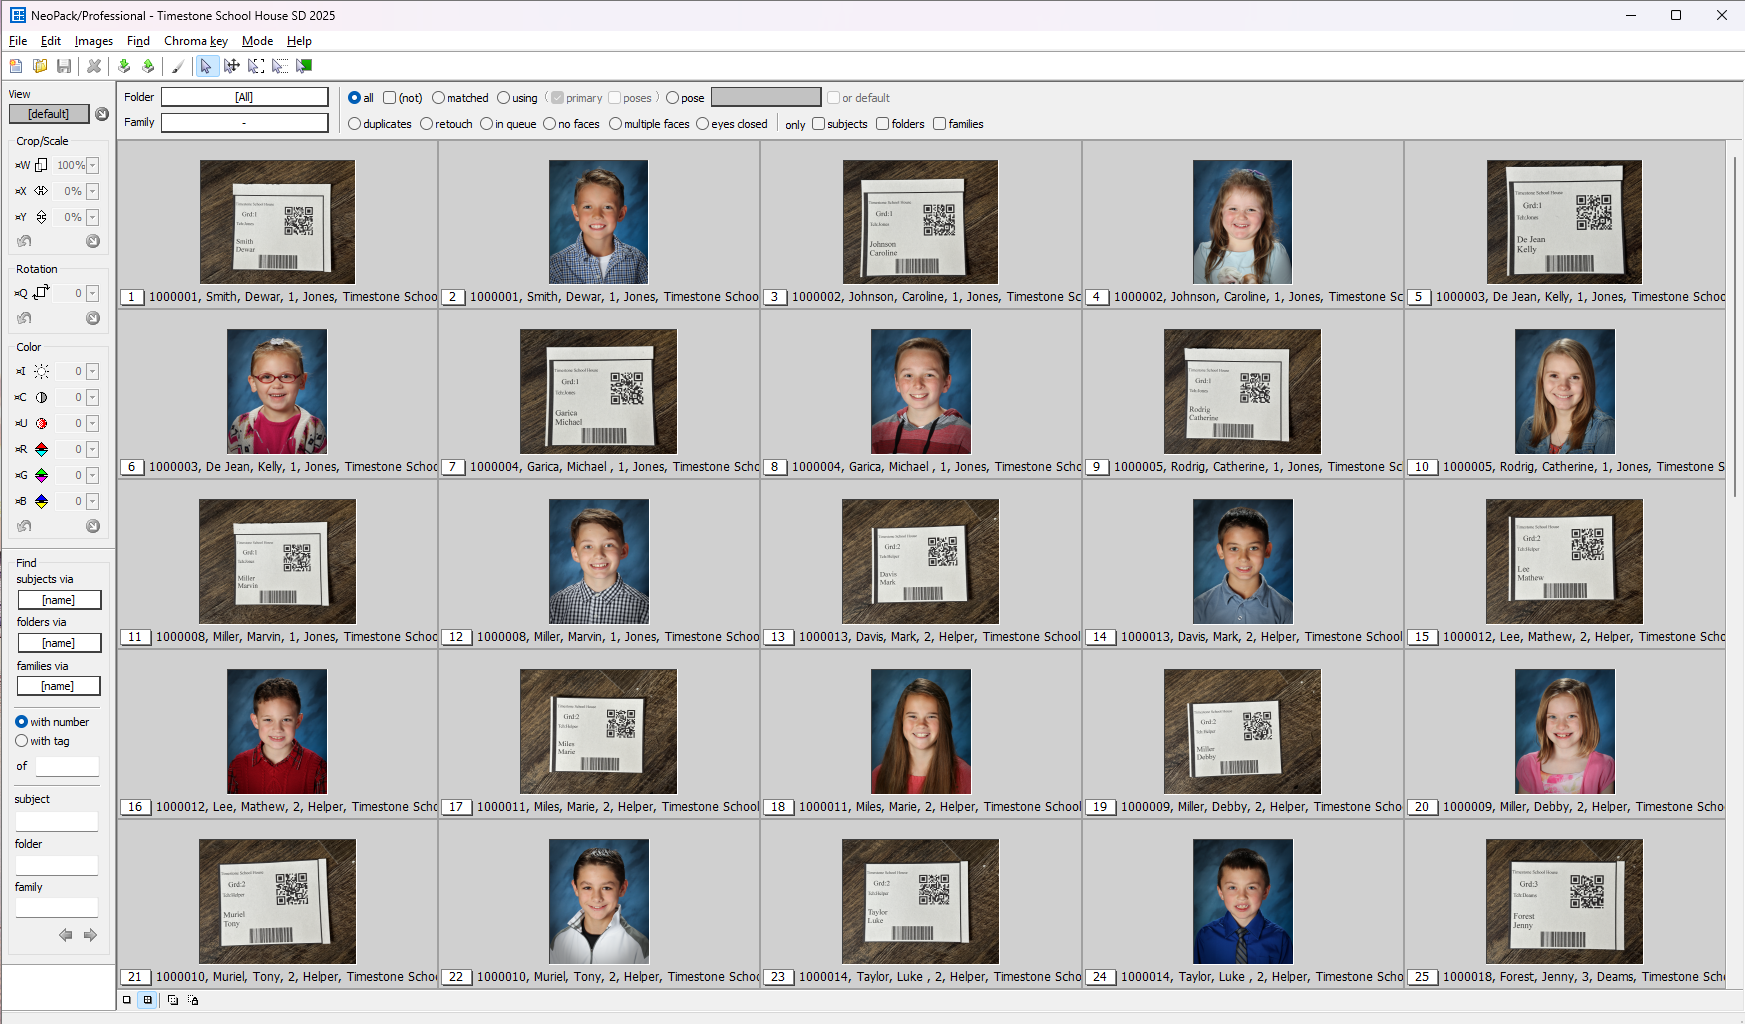
Figure 24: Images mode showing imported and matched images
Placing the images into the images folder
Once the images are imported, they must also be placed in the image directory folders set in tsAdmin. In the case of this example, the @+ wildcard was used. This means the application is looking for a subfolder that exactly matches the job name.
In the Windows file viewer, navigate to the pathed images folder that was created during the setup portion, and create a new subfolder that has the exact name of the job, “Timestone School House SD 2025.“
Then copy the images you just imported into the newly created folder.
WARNING
If this step is skipped you will be unable to print or export the images. As the application only has access to the internal thumbnail.
Checking Matches and Assigning Poses
To ensure that all the images are properly matched to their respective subjects and select their primary image (if more than one image was taken), navigate to Poses mode. This will allow you to look at one record at a time and view only the images associated with that record.
Setting a Primary image
The software will automatically assume that the last image in a subject’s sequence is the primary, but you can manually select a different primary image in poses mode by Ctrl + Clicking the desired image to select it as the primary image.

Figure 25: Images in Pose mode with no primary image selected.
If there are multiple images under a record, as is the case with Susan Jones and Shanon Helper, you will see Red carrots on the corner of the image to indicate that no primary image has been selected by a person. Once you select a primary image, that carrot will turn black, and the alternate images’ carrots will turn gray.
Note
This Red Carrot will appear when no primary image has been selected in several modes.
In Details mode, it will appear in the image column with the assumed primary image’s file name.
In Match mode, it will apear next to the matched subkect infomation below the image.
In Pose mode, it will appear on the corner of the images.

Figure 26: Images in pose mode with a primary image selected.
Correcting a Mismatched Subject
It is also possible to look for any mismatched subjects or check multiple subjects under one record in Match mode.
NOTE
You may need to download Facetools from the Timestone website to gain access to the Facial recognition features.
Finding a Mismatched Subject
At the top of the Image Preview area is a feature that allows you to only display images that meet certain parameters: All, Matched, Unmatched, No Primary, Mismatched, and Eyes Closed.
Using the Mismatched filter, find the record that contains 2 different subject images.
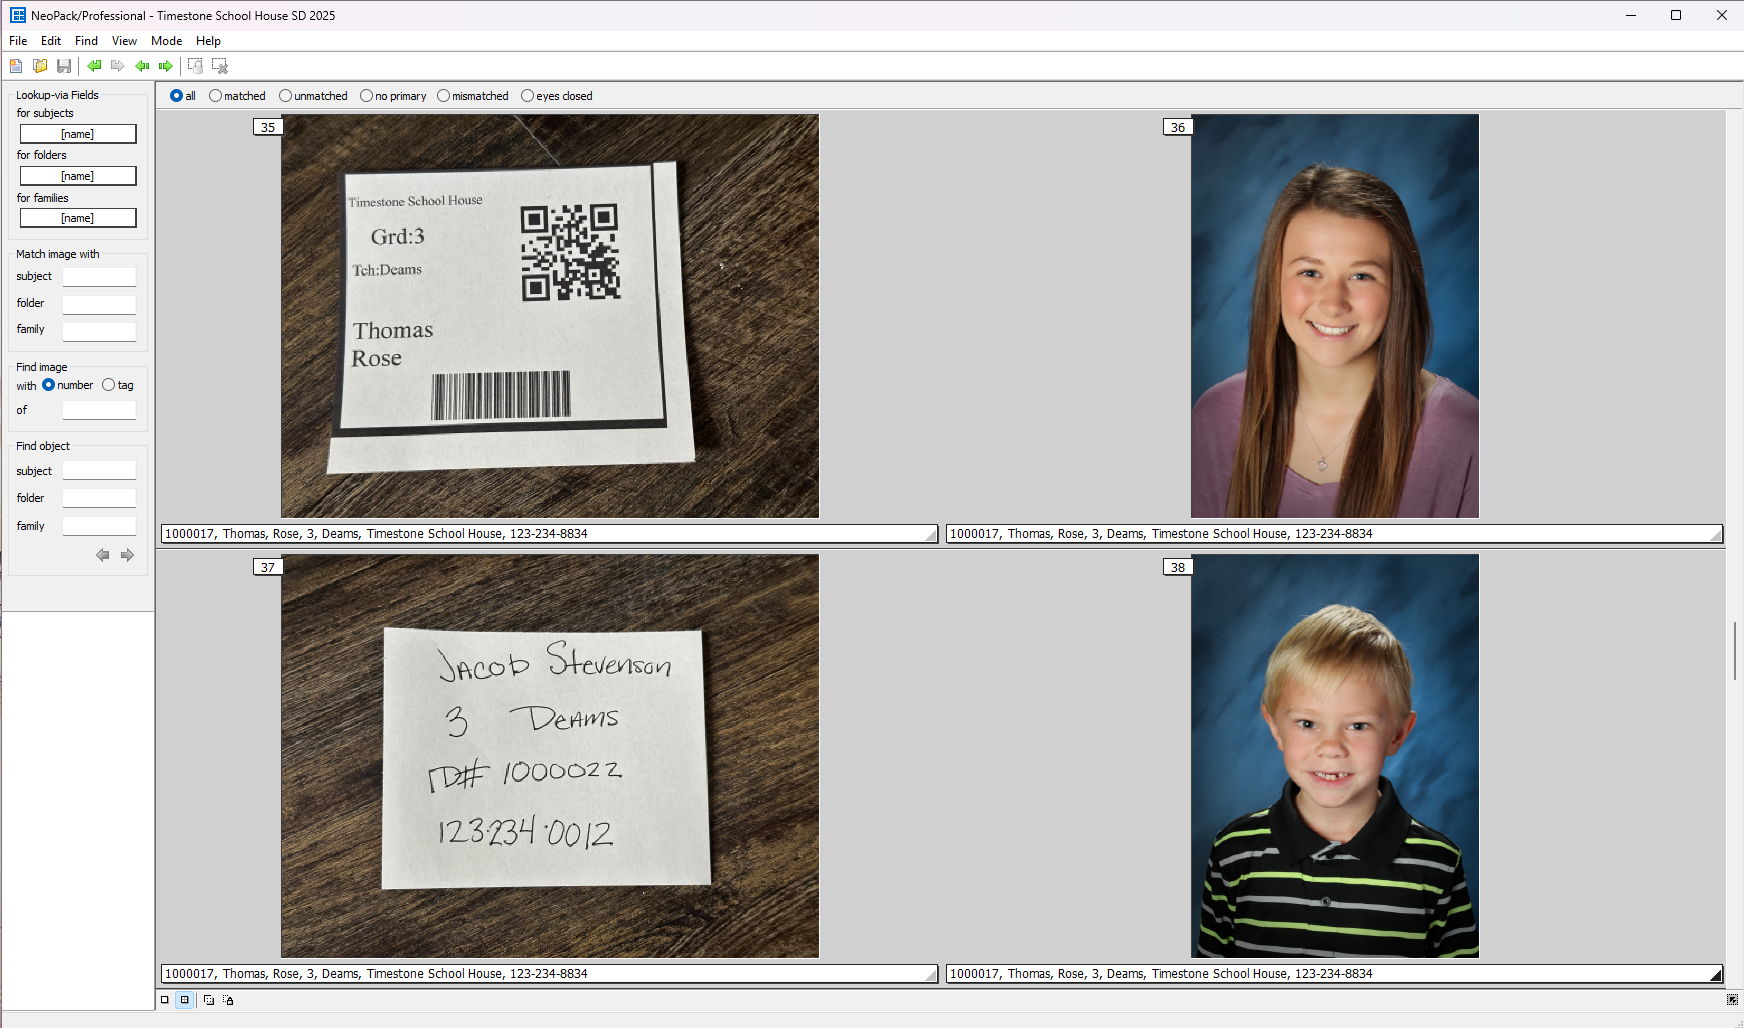
Figure 27: A record in Match mode showing two subjects under one record.
In this example, note that there are 2 students under Rose Thomas’s record, because there was a newly enrolled student who was not included in the original data and therefore did not have a QR card.
A Data Card was handwritten by the photographer, but since it did not contain a QR code, it was included with the previous subject’s images. To match this student, a new record must be created.
To create a new record:
Return to details mode
Select the 3rd grade folder
Locate the empty row at the bottom of the list of subjects in this folder
Click on the respective fields and type in the associated data as shown on the handwritten data card for Jacob Stevenson:
Field | Subject Information |
|---|---|
ID | 1000022 |
Lastname | Stevenson |
Firstname | Jacob |
Grade | 3 |
Teacher | Deams |
School | Timestone School House |
Phone | 123-234-0012 |
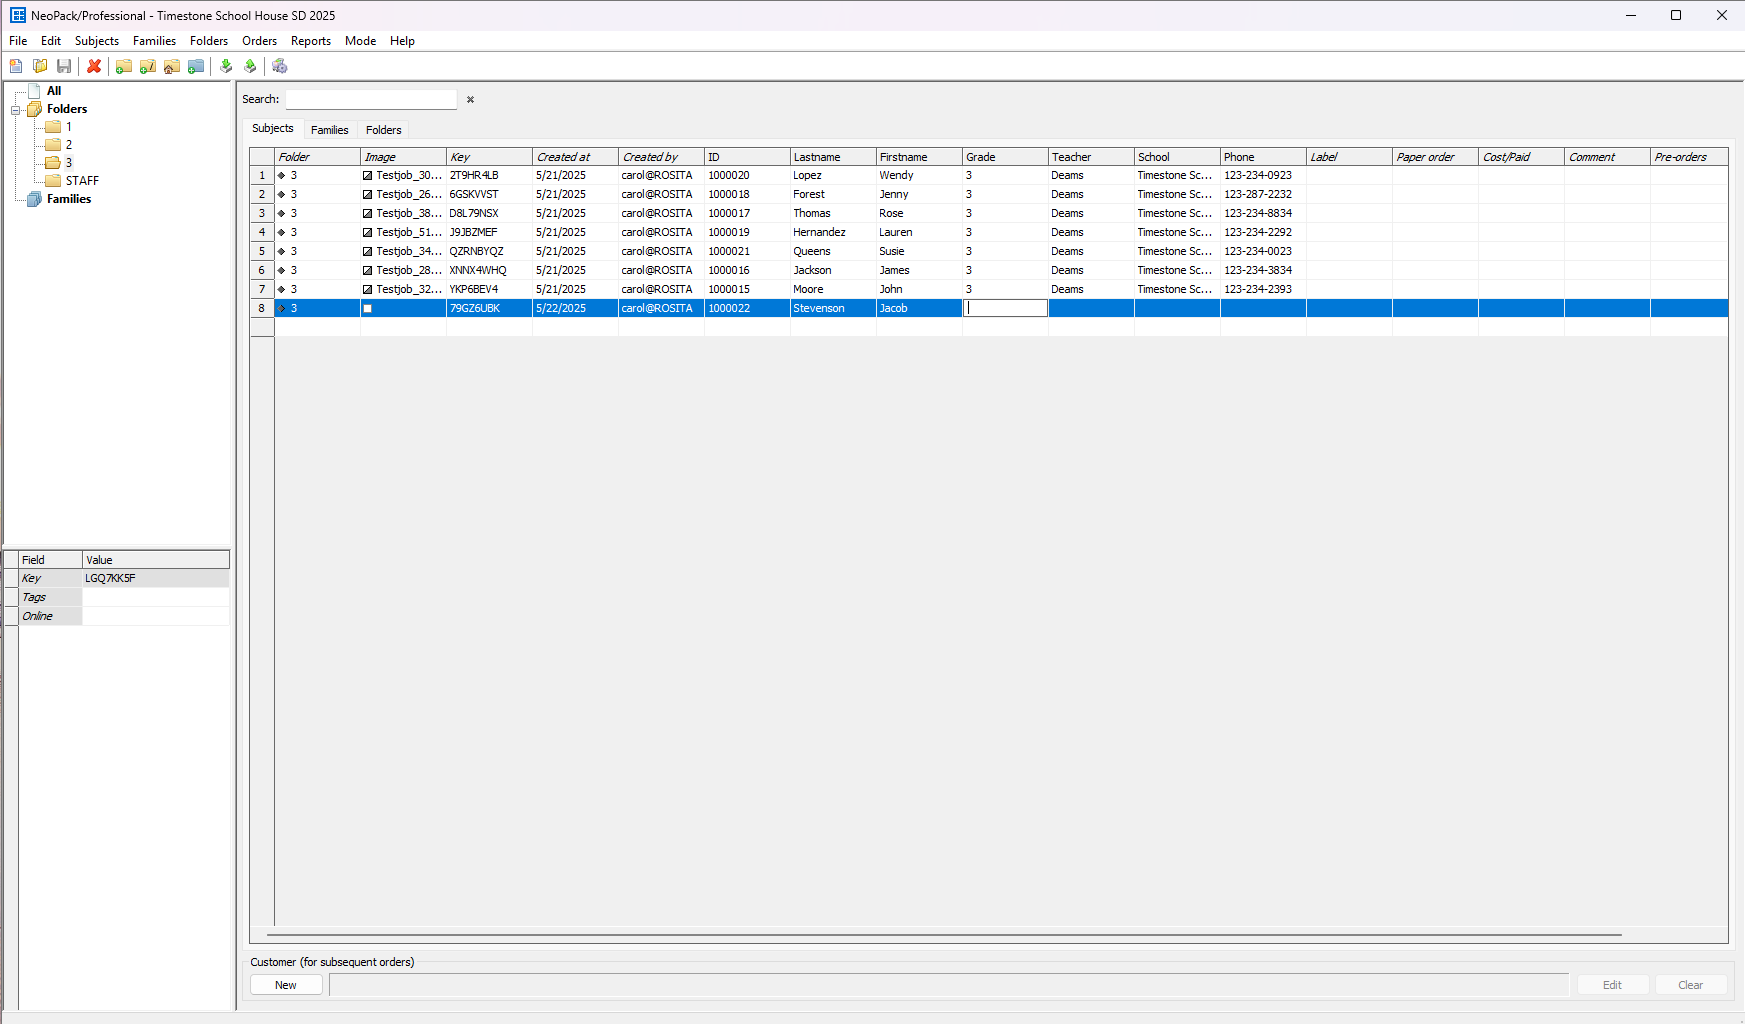
Figure 28: Creating a new subject in details mode.
Matching a subject to the correct record
Once the record is created, return to match mode and locate the record that the mismatched student is under.
To rematch a subject to a different record:
Select the first image in the mismatched subject’s image sequence, the handwritten data card. A bar should now appear to the left of the selected image.
locate the Match image with area on the left of the screen
In the Subject field, type the subject’s LAST NAME and click the record when it appears. This will match the image with the record
Press Enter on the keyboard to assign the next image(s) in the sequence to assign them to that same record
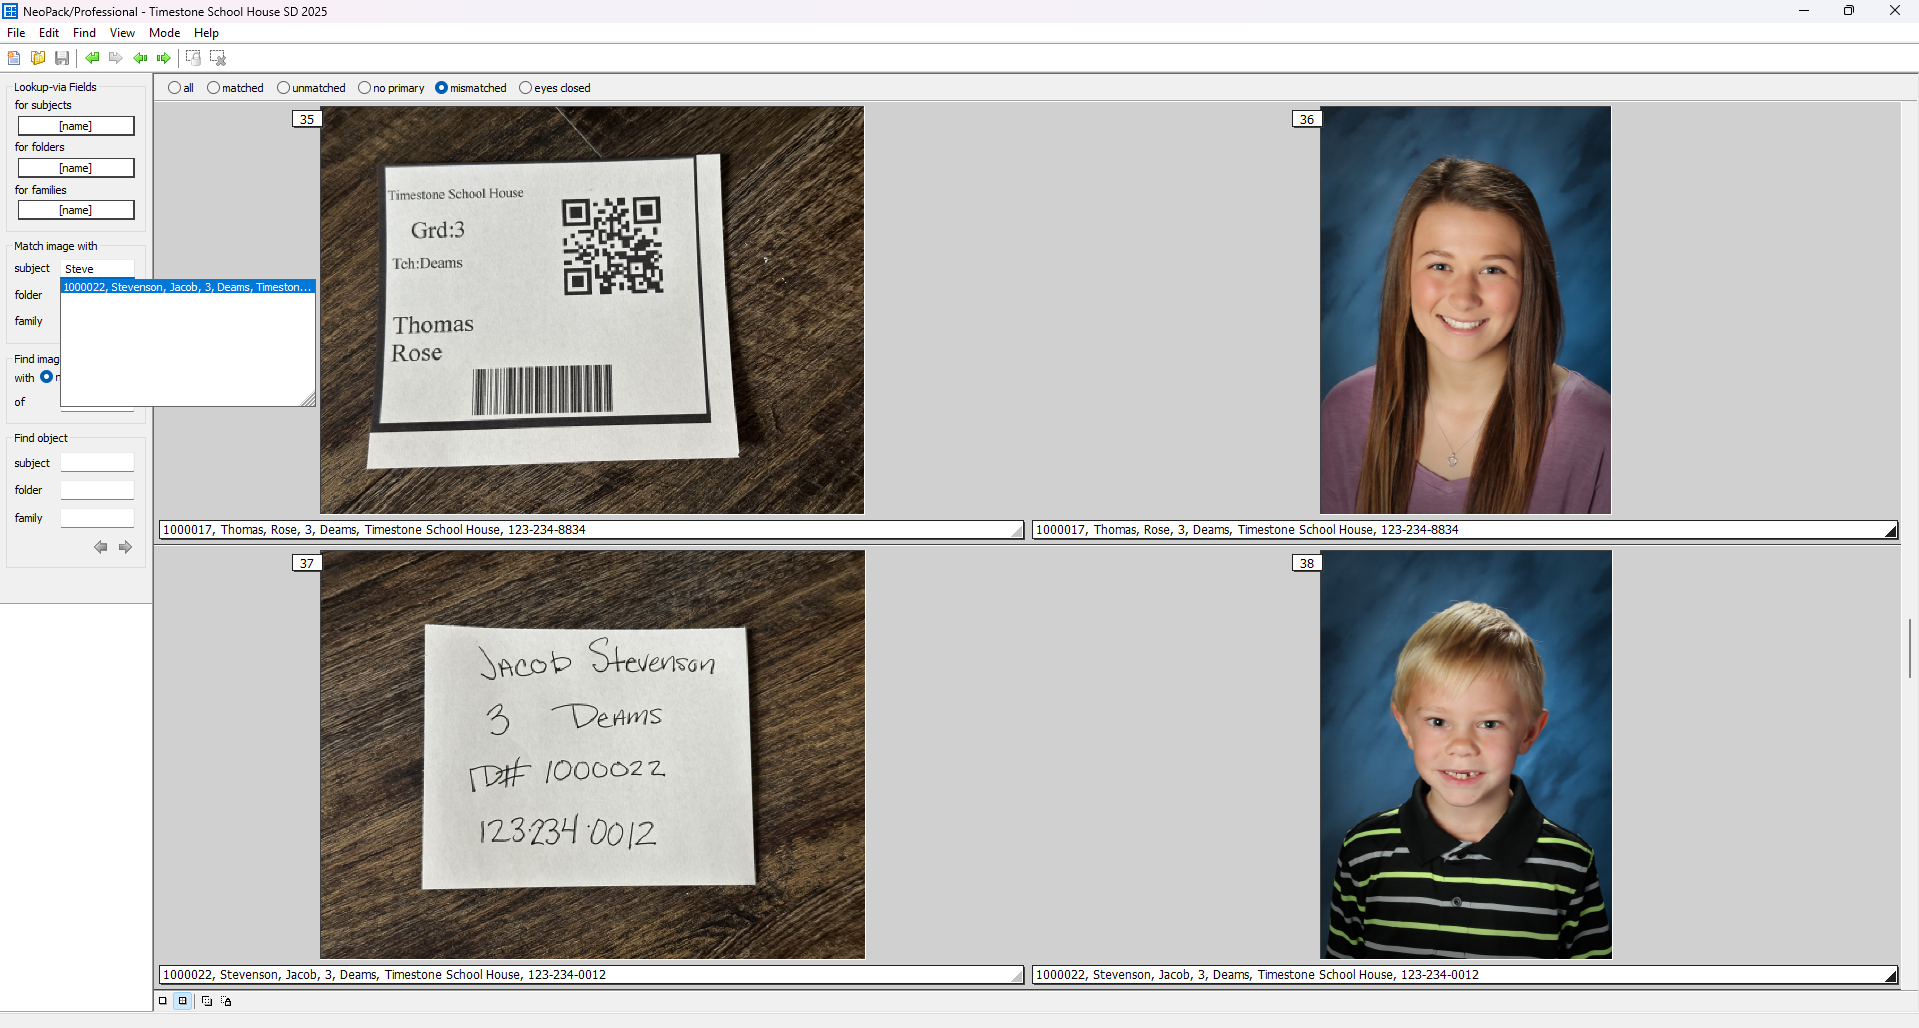
Figure 29: Match mode showing the previously mismatched records
NOTE
When an image is reassigned to a subject the information bar under the image will update to the assigned records information and the indecator bar will automatically advance to the next image in the sequence.
Place an order
Once all images are imported and correctly matched with their records, you can input orders. Timestone offers several ways to collect order information; however, this article will only touch on keyboard entry.
To place an order for a given subject, navigate to details mode and then find and select the desired subject.
Using the Orders menu> Add orders or the F3 key will open the order entry dialog window.
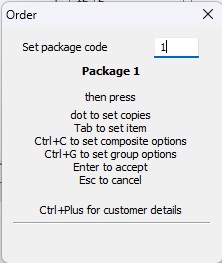
Figure 30: The keyboard order entry window
You can then enter the package codes set earlier to order the desired package and strike the Enter key to place the order.
If a customer orders multiple packages, the process can be repeated for each subsequent order.