While it is possible to assign poses to images by scanning a pose barcode in CapturePost or importing a text file, for the most part poses are assigned to images in Poses Mode.
Poses Mode has the following uses:
To mark a subject’s image as the primary image
To assign pose numbers or pose labels to images
To flag a subject's images as requiring retouching or to retouch a previously flagged image
To check for mismatched subject images
Further Reading: Alternate Methods of Assigning Poses
In addition to assigning poses in Poses Mode, the user can import a text file or assign poses via barcode in CapturePost.
The Primary (Main) Image
By default, if multiple images are matched to a single subject, the software will only use the last image in production. This image is termed the primary or main image.
As an alternative to the last image, the operator can mark any of the other images as the primary image. This can be done in either Match Mode or Poses Mode, or even in CapturePost. The Primary image is marked by a Black carrot on the bottom right of the image
TIP
The primary image can be set by control- clicking an image in Poses Mode.
Assigning Poses to Images
Images can be assigned poses. These are often simply a numeric progression from 1 to ‘n’ but may be any alpha-numeric characters. Images to be exported for yearbooks are often assigned the pose ‘YB’ for example.
Assigning poses allows for better use of a subject's images. Proof sheets, for example, can display each subject's image with corresponding pose number or label. The customer can then order a particular pose or poses.
In turn, many Products can be defined to use a particular pose, while a layout with multiple image holes can have a different pose in each hole. A composite page can be formed using a particular pose. Many other examples exist where the user may wish a product, or a particular image hole on a product, to use a specific pose.
Further Reading: Adding Poses to Templates
Image holes on a template can specify a pose number or pose label. When the template is used for a particular subject, the specified pose will be used in the image hole.
CAUTION
For an image to have a pose assigned it must first be matched to a subject.
In Poses Mode, pose numbers can be assigned in one of two ways:
Automatically, by assigning numbers 1-n for each subject image
Manually, by shift-clicking each image
Automatically assigning poses
It is possible to automatically assign pose numbers for each subject matched to more than one image. Each pose will be labelled 1 through “n”, depending on the number of poses matched to each subject.
To auto-assign poses, simply select Edit> Auto assign poses or use the Shift+Ctrl+A keyboard shortcut.
TIP
To remove the assigned pose from one image select Edit> Remove Pose(s) from image or Crtl+D
To remove the assigned poses from all images select Edit> Remove Poses from all Images from image or Shift+Crtl+D
.jpg)
Figure 1: Pose mode with the Poses automatically assigned.
Important points to note regarding auto-assigning poses:
Poses numbers will be assigned in image order. The first image is pose 1, the second image is pose 2, and so on.
If poses have been manually assigned to only some images, auto assigning poses will assign poses to the remaining images beginning with next available pose number.
It is not possible to auto-assign pose labels.
Any existing pose numbers or labels will not be overwritten
Poses will be assigned for all images for all subjects.
Manually assigning poses
Manually assigning poses provides the user with greater flexibility.
By manually assigning poses, it is possible to:
Assign poses to only some images rather than every subject image
Assign poses to some subjects rather than every subject
Assign pose labels rather than pose numbers
Assign poses in a user-selected order rather than 1 for the first image, 2 for the second, and so on
The Assign poses parameters
Before assigning poses, the user selects whether they will be assigning numbered poses or pose labels as defined in a Poses set. If numbers are being used, the upper limit of the range is set.
Pose numbers or Pose labels
Pose numbers are exactly that - numbers beginning with 1. Pose labels are alpha-numeric labels and can be used to give a more descriptive label to the image such as Formal1, Full Length, Fun Shot etc.
Setting a range of Pose numbers
Pose numbers require the user to define a range of numbers to use. This range may be of any length but must always begin at 1 (1 to n).
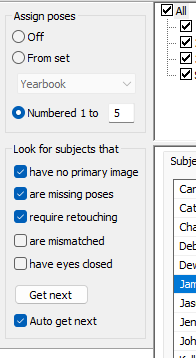
Figure 2: Setting the Numbered Range 1 through 5.
TIP
It is not necessary to define a pose number range if using auto-assign of pose numbers
Creating a Pose label set
Pose labels are defined as a set. It is possible to define more than one set of pose labels. The user could, for example, have a set for Formals, another for Proms, and another for Communions, for example.
Pose sets are defined in Edit>Pose sets:
Click the New button to add a new Pose Set and give it a description
Click the Add button to add a Pose Label to the set and give it a description
Repeat step 2 to add further poses to the set
Repeat Step 1 to begin another Pose Set
Use the up/down arrows to change the order of either the Pose Sets or the Pose Labels
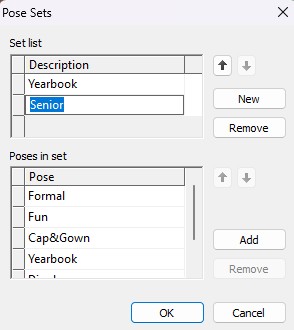
Figure 3: Creating Pose Sets
Assigning the poses
With a pose number range defined or a pose label set created, it is now possible to assign poses to the images.
The process involves:
Selecting whether to use numbers or labels
Displaying the required subjects
Assigning the poses for each subject
Use the Assign Poses tools to select whether to assign poses from a set or use numbered poses:
If using a Pose Set, select the From set option and use the drop-down to find the desired Pose Set
If using numbered poses, select the Numbered 1 to … option and enter the last number in the range
To view subjects who require poses:
Select the Look for subjects that are missing poses option
Click the Get Next button to display the first subject requiring poses
Shift-click the subject's image to assign the first pose number or pose label to that image
Continue assigning poses for each of the subject's images requiring poses
If an error is made, use the undo feature, Edit>Undo, to remove the last pose, or use the remove poses function, Edit> Remove Poses, to remove all the poses
When ready, click the Get Next button to display the next subject requiring poses
.jpg)
Figure 4: Manually assigned poses in pose mode.
NOTE
It is not necessary to assign poses to every image for a subject.
For example, the user may have four images per subject but only wish to use three of the images.
Using Auto Get Next
Use the Auto Get Next feature to have Poses Mode automatically advance to the next subject requiring poses once the user has finished assigning poses for a subject. Auto get next will only occur once every pose number in the defined range or every pose label in the Pose Set has been assigned to the subject.
Check the Auto Get Next option
Assign poses in the normal way
When all pose numbers or labels have been used, the next subject will be displayed
Checking for Mismatched Images
Since Poses Mode displays one subject at a time, it is a popular tool for finding mismatched subject images.
Prior to the advent of Face Recognition, the user would advance through the subjects one at a time and visually inspect their images. Face recognition has automated this task with the addition of an are mismatched lookup option. With the option checked, the Get Next function advances through the subjects with mismatched images.
Further reading: Checking for mismatched images
One of the most powerful uses of the software’s Face Detection and Recognition is in aiding the user to find mismatched subject images. This can be done in Poses Mode or Match Mode and is described in detail in the following article:
Flagging image for Retouching
Pose mode also allows users to flag images for retouching. While assigning poses, users might come across images that need touch-ups.
To flag an image for retouching, select one or more images, then choose Edit > Mark/Unmark Retouching, or use the shortcut Ctrl + R. A brush icon will appear above the image preview to indicate it's been flagged.
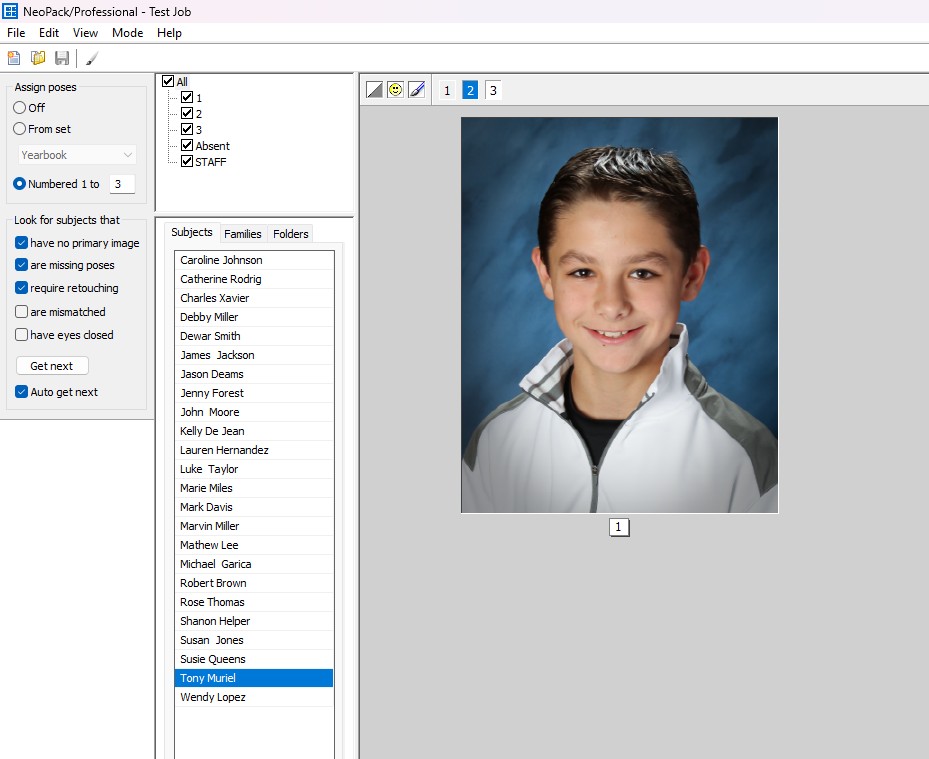
Figure 5: An image flagged for retouching
NOTE
Flagged images can be easily reviewed later in Images Mode by selecting the Retouching radio button in the filter area.
FAQ
What is Poses Mode used for?
Poses Mode is used to mark a subject's image as the primary image, assign pose numbers or labels, flag images for retouching, and check for mismatched subject images.
Can poses be assigned to images in ways other than Poses Mode?
Yes, poses can also be assigned by importing a text file or scanning a pose barcode in CapturePost.
How can I mark an image as the primary image?
You can mark an image as the primary image by control-clicking it in Poses Mode.
How do I remove the primary image?
Remember there is always a primary, main image. If you do nothing it will be the last image matched to the subject. If you explicitly mark an image as the primary image then realise you have made a mistake, just mark any of the other images as the main image.
Is it possible to automatically assign pose numbers?
Yes, you can automatically assign pose numbers by selecting Edit > Auto assign poses or using the Shift+Ctrl+A keyboard shortcut.
Can I manually assign pose labels instead of numbers?
Yes, you can manually assign pose labels or numbers.
What should I do if I need to flag an image for retouching?
To flag an image for retouching, select the image and choose Edit > Mark/Unmark Retouching or use the shortcut Ctrl + R.
Can I check for mismatched images in Poses Mode?
Yes, Poses Mode can be used to check for mismatched images, especially with the help of face recognition features.
Do I need to assign poses to every image for a subject?
No, it is not necessary to assign poses to every image for a subject; you can choose which images to assign poses to.