Images can be exported at any time from Images Mode. There are two methods of exporting images:
Export … For all, filtered, or a selection of images
Export Folder or Legacy … For all subjects in a selected folder(s) or subject images in a historical Job Collection
Important
Images can only be exported if they are matched.
This article focuses on the first method.
Further Reading: Exporting Legacy Images
In addition to Legacy Products, it is possible to use Historical Job Collections to export a subject’s images across the jobs in the collection. These images are referred to as Legacy Images.
Exporting All, Filtered, or a Selection of Images
Whether exporting all images, a few, or just a single image, the procedure remains fundamentally the same.
To export Images:
In Images Mode, select the desired image(s) for export by using the filter options at the top of the preview window or by selecting individual images.
Navigate to Images> Export…
In the Export images window, configure the desired settings (discussed below)
Click Start to begin the export
Optionally use Stop to pause or cancel the export.
When the export is complete, click Exit to close the window
NOTE
Exporting from Images Mode only includes images and does not generate a corresponding text file.
Further Reading: Exports with Text Files
A variety of Yearbook and admin/ CD exports are available as default options within Timestone Software’s applications. This will export new versions of images and create an associated text file according to the export configuration. Users also have the option to create custom exports via XML files.
Export settings
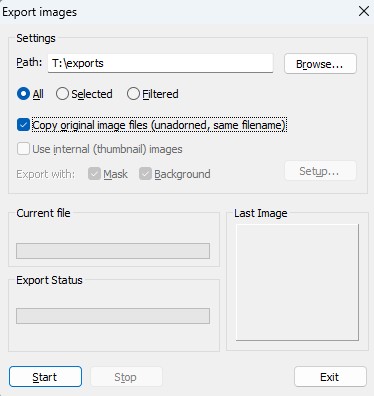
Figure 1: The Image export window.
In the pop-up dialogue menu, the user gains access to the following settings:
Export location: Choose the destination folder by clicking Browse
Scope: Select which images to export using the appropriate ratio button:
All - Exports all matched images.
Selected - Exports only the images that are manually selected.
Filtered - Exports all the images in the filtered view.
File Options:
Copy original Files (unadorned, Same file name). If this option is selected, the following options are unavailable.
Use the internal (Thumbnail) images
Export with Mask and/or Background
Setup. This opens the Images Export Setup window, Figure 2, with additional options for file naming, folders, extensions, file size, etc.

Figure 2: Images Export Setup Window
Common issues
The following are frequently-troubleshot issues:
The file name extension and bitmap type must match.
If the file name extension and the bitmap format type (JPG, PNG, etc) don’t match, the system cannot process the file, and no action will occur. Always confirm that the file extension matches the actual file format before attempting to export the image(s).“Cannot find bitmap file” error.
This indicates that the system cannot locate the image at the specified file path. Double-check the file path to ensure it points to the correct folder and that the image has not been moved, renamed, or deleted.‘Cannot write file “____” to disk’ error - unintended spaces
The error message “Cannot write file “____” to disk’ occurs typically when the filename contains unintended leading or trailing spaces. This is a common issue when using subject names as part of the output file name.‘Cannot write file “____” to disk’ error - permissions issue
When exporting images to a network location, the user will need read/write permissions at that location.