Overview
QR codes can be used to either match or allocate images to folders, depending on whether the images are imported into NeoPack (match) or NeoGroup (allocate).
The encoding of the QR code is the same and can be either:
/%F{foldername}
/%F{folderkey}
..where {foldername} is the name of the folder and {folderkey} is the folder key
How it works
Upon importing the images, the software will read the QR code of the first image and will match or allocate it to the folder specified in the QR code. (An option exists to not match or even import the "lead" image - this will be discussed later). Subsequent images will be matched or allocated to the same folder regardless of whether they contain a QR code or not - this allows multiple images to be matched or allocated to the same folder without the need for a QR code in each.
As the image import continues, when the software encounters another image with a QR code, the process is repeated, matching or allocating it to the specified folder along with subsequent images until yet another image with a QR is imported, and so on until all images have been imported.
The process can therefore be summarized thus:
An image with a QR code is matched or allocated to the folder it specifies. All subsequent images are matched or allocated to the same folder until the next image with a QR code is encountered, whereupon the pattern is repeated.
If the folder does not exist
A feature of the system is that the folder does not yet have to exist in order to match or allocate an image to it. In these cases, the folder is automatically created as the image is imported and named with the name in the QR code.
This behavior is especially useful when photographing events where the folder/group names are not known beforehand. Generic QR codes can be created and named, for example, Group1, Group2, etc.
Import options
When importing images with a view to matching via QR codes, various options are available. These are set in the Images Import window as shown in Figure 1 below.
First and foremost, the 'Use image barcode information' must be checked in order to "tell" the software that QR images are about to be imported. With this option checked, further options are then available. In most cases, only the first, or 'lead' image, has a QR code, as in the screen grab below. With this in mind, the option then exists whether or not to import this lead image, and if so, whether to match/allocate it.
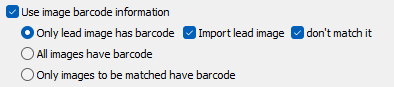
Figure 1: Import options
The screen grab above indicates the most common import option - where the lead image is imported but not matched or allocated. This allows the user to visually reference the QR image if needed, but since the QR image is not matched or allocated, no special handling is required to avoid printing or exporting the image.
Encoding and printing the QR code
The QR needs to be encoded with either the folder name or the folder key. @codes can be used to dynamically retrieve the folder name or key when printing the QR codes.
/%F@folder
/%F@key
Adding the QR code to a template
A tool is available in the template designer - Add 2D Barcode - that allows QR codes to be added to any pack layout or fixed-size item in NeoPack, PackBuilder, or DataPost. This allows QR codes to be printed onto data cards in the same manner as barcodes are printed for use in CapturePost, for example.
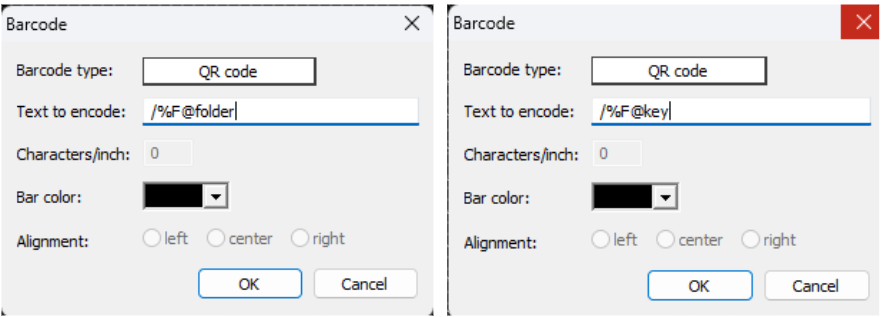
Figure 2: Using @codes
Printing the QR codes
Having created a template with the QR code, it may be printed in either Point and Click Mode (pack layouts) or Item Sheets Mode (fixed-size items). Fixed-size items can also be printed in DataPost.
In Point and Click Mode, simply select the folder or folders required from the Folder tab. Then click the QR template. A page will be added to the print queue for each of the folders.
In Item Sheets Mode, go to File>Print for folder... then select the folder or folders as required, then continue through the setup to print the pages.