Overview
QR coded shoot cards are a very popular method of matching images to subjects.
For each subject, the photographer first takes a photo of the subject’s Shoot Card then proceeds to photograph the subject as normal. The process is repeated for each subsequent subject.
The shoot cards can be produced either in the Timestone Software applications or by third-party systems. While the shoot card can display both variable and fixed data, the most important object on the shoot card is the QR code containing data that uniquely identifies the subject - either their unique field (ID) or their subject key.
The encoding of the can be either..
/%S{unique field}
/%K{subjectkey}
.. where {unique field} is the unique subject field (usually the ID) and {subjectkey} is the family key.
How it works
It is useful to consider the process as three stages:
Preparing the shoot cards
The photography
Importing the images
The shoot cards
Shoot card templates are designed in Timestone Software as either a pack layout template (extension .plt) or a fixed size item template (extension .pit).
Shoot cards designed as pack layouts are printed one per page in Point and Click Mode whereas shoot cards designed as item templates can be printed several per sheet in Item Sheets Mode. Sample templates are attached to this document.
Encoding and printing the QR code
As noted previously, in order for images to be matched to a subject the QR code needs to be encoded with either the unique field or the subject key. @codes can be used to dynamically retrieve the the subject ID or subject key when printing the QR codes.
A tool is available in the template designer - Add 2D Barcode - that allows QR codes to be added to any pack layout or fixed size item in NeoPack, PackBuilder or DataPost. This allows QR codes to be printed onto shoot cards in the same manner as barcodes are printed for use in CapturePost or elsewhere.
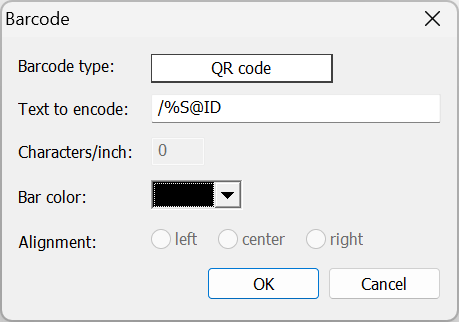
Figure 1: Adding a QR code, encoded with the subject ID, to a template.
Sample templates
A selection of shoot card templates are attached to this document. You are free to use and modify these templates as you wish.
The photography
Many workflows are available for the photographer with the following three examples being common approaches.
Ask the subject to hold the shoot card ensuring the QR code is visible
Have their photography assistant hold the shoot card, sometimes on a clip board
Collect the shoot card from the subject, place it on a desk and photograph it
Usually, for a given subject, only the first photo in their sequence is taken with the QR code. Subsequent photos of the same subject do not require the QR code to be in the frame.
In all cases the following should be noted:
The orientation of the shoot card does not matter
The shoot card should be in the same plane as the camera - not overly skewed or tilted
The QR code should not be obscured by fingers
Avoid heavy glare or flare falling onto the QR code
A common practice among photographers is to collect the shoot cards in order of photography. This provides a backup method of identification and matching should it be needed.
Importing the images
When importing images with a view to matching via QR codes, various options are available. These are set in the Images Import Window as shown in the screen grab below.
First and foremost the Use image barcode information must be checked in order to "tell" the software that QR images are about to be imported. With this option checked, further options are then available.
In most cases only the first, or Lead Image has a QR code. With this in mind the option then exists as to whether or not to import this and if so, whether to match it.
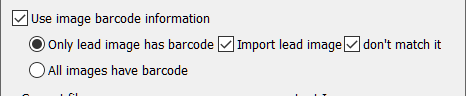
Figure 2: Import options
The screen grab above indicates the most common import option - where the lead image is imported but not matched. This allows the user to visually reference the QR image if needed but since the QR image is not matched, no special handling is required to avoid accidentally printing or exporting the image.
The import process
Upon importing the images and assuming the options shown in the screen grab above, the software will read the first image with a QR code and will ascertain the subject specified in the QR code. The lead image will or will not be matched to this subject depending on the option set in the screen grab above. Subsequent images will be matched to the subject regardless of whether they contain a QR code or not - this allows multiple images to be matched to the same subject without the need for a QR code in each.
As the import continues, when the software encounters another image with a QR code, the process is repeated, determining the subject specified in the QR code and matching images to this subject until yet another image with a QR is imported and so on until all images have been imported.
The process can therefore be summarized thus:
An image with a QR code is matched to the subject it specifies. All subsequent images are matched to the same subject until the next image with a QR code is encountered whereupon the pattern is repeated.
Sample Images
A small set of sample images are attached to this document. You can use these images to become familiar with the import process. The QR codes in the images are encoded with the following values for the unique field - the ID.
7198
7241
7246
7247
7249
7250
How to use the sample images
Detach and unzip the sample images attached to this document
In a test job create six subjects with the ID values above
Import the images using the options depicted in the screen grab above
The images will match to the subjects you created. This can be verified in Poses or Match Modes
Attention
The sample images provided are from a real photography shoot. Although the faces have been pixelated for privacy, please nevertheless respect these images and use them only for the purpose intended.
The importance of sequence
As stated, the process of matching involves reading the QR code, determining the subject specified in the QR code and matching all subsequent images to this subject until the next QR codes image is imported.
It should therefore be apparent that images must be kept and imported in the same order as they were photographed.
It is essential images are kept and imported in the same order as they were photographed.
If the subject does not exist
A feature of the system is that the subject does not yet have to exist in order to match images to it. In these cases the subject is automatically created using the ID encoded in the QR code when the images are imported. Images are matched to this subject in the normal manner.
Many photographers carry ‘blank’ shoot cards with user generated values for the unique field (ID). At photography, the subject’s details, such as first and last names, are hand written onto the shoot card. Once the images have been imported and the subject automatically created, the shoot card can be used visually tor update the subject record.
The blank, Stop Matching, QR code
A QR code encoded with just /%S (or /%K) will, when imported, stop matching images.
This is useful when subsequent images will be matched by other means, notably Face Recognition, rather than QR code.
FAQ
How big does the QR code need to be on the shoot card?
This is impossible to answer definitively as it will depend on factors such as the cropping and image size. In reality the QR code can be much smaller than most people imagine. The answer it to make it as large as it can be on the shoot card template you are designing. When using a new shoot card template it is important to thoroughly test it before using it live.
How can photographers ensure the QR code is captured correctly during a shoot?
Photographers can ensure the QR code is captured correctly by having the subject hold the shoot card with the QR code visible, or by using an assistant to hold it, while avoiding glare and ensuring the card is not obscured.
What happens during the image import process if a QR code is detected?
If a QR code is detected during the image import process, the software matches the first image with the QR code to the specified subject and continues to match subsequent images to that subject until another QR code is encountered.
Is it possible to create a subject automatically during the image import process?
Yes, if the subject does not exist, it will be automatically created using the ID encoded in the QR code during the image import process.
What is the significance of maintaining the order of images during import?
Maintaining the order of images during import is crucial because the software matches images based on the sequence they were photographed, ensuring accurate identification of subjects.
Can QR codes be used with CapturePost?
Yes. Photographing the QR coded shoot card in CapturePost will find and match the subject as the image comes into CapturePost.