It is possible to rotate image previews in the following ways:
Automatically by reading camera EXIF rotation as they are imported
In 90-degree increments as they are imported
In 90-degree increments after they have been imported
In 1-degree increments (free rotation) after they have been imported
NOTE
Keep in mind the procedures described below apply to rotating the previews (thumbnails) so the user may view and edit the images in the correct orientation. The original images are not rotated.
Rotating images as they are imported
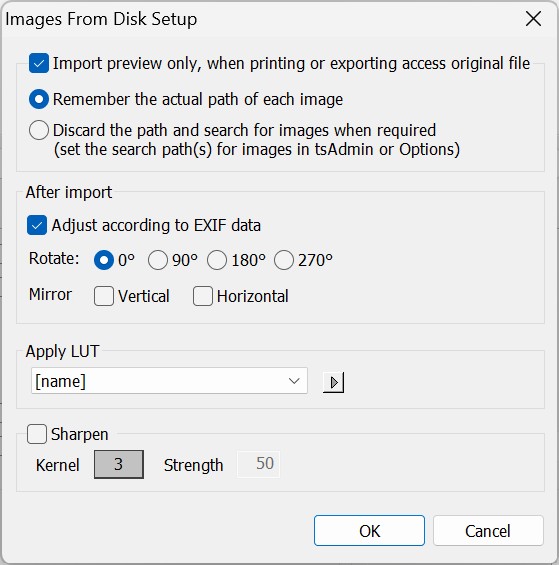
Images can be rotated as they are imported into the software. This applies both to importing images into Images Mode of the apps and when shooting with CapturePost.

Figure 1: Images import setup
Reading camera EXIF rotation
Where the photographer has auto-rotation set on their camera, it is possible for the software to read this EXIF and likewise auto-rotate the images as they import.
To use the EXIF data on import:
Navigate to Images Mode and Images>Import from disk (F3)
Click the Setup button. The Images from disk setup window appears
Check the option Adjust according to EXIF data
Click OK and continue with the import.
The previews will be rotated according the images’ EXIF
Note
If using the camera’s EXIF to auto-rotate, ensure the Rotate value in the setup window is set to 0 as shown in Figure 1 above.
Rotating by degree on import
In the absence of auto-rotation by EXIF as described above, it is possible to rotate images as they are imported. This is most useful when all or most images are in the same orientation (e.g., landscape).
To rotate images on import:
Navigate to Images Mode and Images>Import from disk (F3)
Click the Setup button. The Images from disk setup window appears
Select the desired rotation and click OK
Click OK and continue with the import.
The previews will be rotated by the amount selected
Mirroring Images on Import
It is also possible to mirror images while importing. Similar to the previous two options, the user can access these settings under the Images from disk setup window.
To mirror images on import:
Navigate to Images Mode and Images>Import from disk (F3)
Click the Setup button. The Images from disk setup window appears
Select the desired mirror orientation, Vertical and Horizontal
Click OK and continue with the import.
The previews will be mirrored
WARNING
It is not possible to ‘un-mirror’ or ‘un-flip’ images. The option to do so should be used withe extreme caution
Rotating the previews after import
If an image or images have been imported in an incorrect orientation, they can be rotated after import.
To rotate images:
Select the image or images to be rotated
Go to the Images menu and select Rotate
Rotate the image(s) 90 degrees to the left or right or by 180 degrees
TIP
Keyboard shortcuts are also available as an alternative to the menu options above
Rotating images in 1-degree increments
Whereas the rotation options mentioned above all rotate images in 90 degree increments, it is also possible to ‘slightly’ rotate images by1 degree.
This feature is most useful for ‘straightening up heads.’
To slightly rotate images:
Select the image or images to be rotated
Use Ctrl+Shift+Right Arrow to rotate the image(s) clockwise
Use Ctrl+Shift+Left Arrow to rotate the image(s) counterclockwise
It is also possible to use the Images menu as described above.
Caution
When rotating images in other than 90 degree increments it may be necessary to zoom into the image slightly to avoid ‘empty’ space.
FAQ
I don’t see the “Adjust according to EXIF data” option?
This feature is new to 4.11. To check what version of the application you are using, navigate to Help > About NeoPack/Professional…
Do the “Adjust according to EXIF data” and the “Use EXIF information if available” options accomplish the same thing?
No, the “Adjust according to EXIF data” reads the rotation information provided by the camera, and the “Use EXIF information if available” uses the EXIF user comments to attempt to match subjects with their images.