Broadly, Face Detection and Recognition can be used with folders to perform two tasks.
Where a folder already exists, Face Recognition can associate (copy) the subjects to the folder
Where the folder does not yet exist, Face Recognition can be used to create the folder, match the group image to it, and associate the subjects.
Further Reading: Using Facial Recognition with Families
Similar to the process of using facial recognition with folders, face recognition can be used with families.
The document below includes a video tutorial that is also useful in the context of folders.
Associate subjects with folders
Face recognition can be used to associate (copy) subjects into a folder. This is useful for situations where the photographer does not know which folder the subjects belong to.
How it works
The Face Recognition technology examines the faces in the group image matched to the folder. It then compares these faces to the subject images. Where a match is found, the subject’s record is copied into the folder.
NOTE
It is important to understand associating subjects to folders copies the subjects to the folder and therefore does not set the folder as the subjects’ home folder.
The user can easily designate the home folder using Edit> Set Home Folder or Ctrl + H
To associate subjects with a folder
In Images Mode, ensure face detection has been performed on both subject and folder images.
In Details Mode, select all the folders.
From the menu, select Folders>Associate with subject faces.
The subjects will be associated with (copied to) their folder.
NOTE
It is important to remove any unwanted faces or artifact faces from images. Ensure that there is only one face for subject images.
Create folders using face recognition
Face recognition can be used with unmatched folder images to perform one or more of the following functions.
Where a folder already exists and has an image matched to it with the same faces, the unmatched image can be automatically matched to the existing folder.
Where a matching folder does not exist, it is possible to:
Create a new folder
Match the unmatched image to the folder
Associate subjects with the folder
Name the folder based on the image filename
To create folders from unmatched images
In Images Mode, ensure face detection has been performed on both the subject and folder images. Make sure that all face detection is tidied up and all artifact faces are removed, and the individual images only have one face.
Select the unmatched folder images
Select Images>Create for unmatched>Folders ..
From the pop-up, check Recognize and detect same faces
Check other options as desired
also match with existing Folders - to match to any existing folders already created
associated with matched subject faces - to copy (associate) subjects into the folder
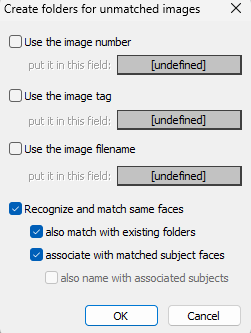
Figure 1: Create for unmatched window
How are the folders named?
When folders are automatically created using Face Recognition, the folder will be named based on the image filename.
NOTE
It's important to remember that you always retain the flexibility to manually rename folders.