Identify Ordering is a method for online orders that does not require individual access keys; instead, all customers enter the site with a common Job Key. They then proceed to enter information about the entity (e.g., subject or family) for whom they are ordering before continuing to the Shop.
Identify Ordering is therefore a popular method of ‘pre-ordering’ since the photographer does not need to distribute individual subject keys as access keys. Indeed, in many cases of Identify pre-ordering, the photographer may not yet have subject data.
Key points
All customers enter the site with a job key
Customers are prompted to enter information about the entity they are ordering for
Entity information is downloaded with orders, whereby the photographer ‘identifies’ the customer supplied information against the actual data
While Identify ordering can be enabled for subjects, folders, and families, this article will focus on Identify Ordering for subjects.
How it works
Instead of relying on preloaded data, Identify Ordering allows customers to enter key details (such as the subject’s name and class, grade, team, etc) when placing an order online. This information is downloaded with the orders and is matched (‘identified’) to a subject record in a given job.
The nature of Identify Ordering introduces some special considerations:
Customers should only order for subjects in one job at a time
Orders are not assigned to the subject until they are identified
Since customers are providing their own information, there may be errors.
The Identify window in IOS
Upon entering the job key, customers are directed to the Identify window, where they are prompted to enter data about themselves and the subject they are ordering for.
TIP
Where jobs already have folder data, it is possible to have the folders selectable from a pull-down list rather than have the customer enter ‘free-hand’ the subject’s team/grade/class/homeroom.
This ensures the data is entered exactly as it appears in the job - a fact that greatly helps the process of identifying the orders once downloaded.
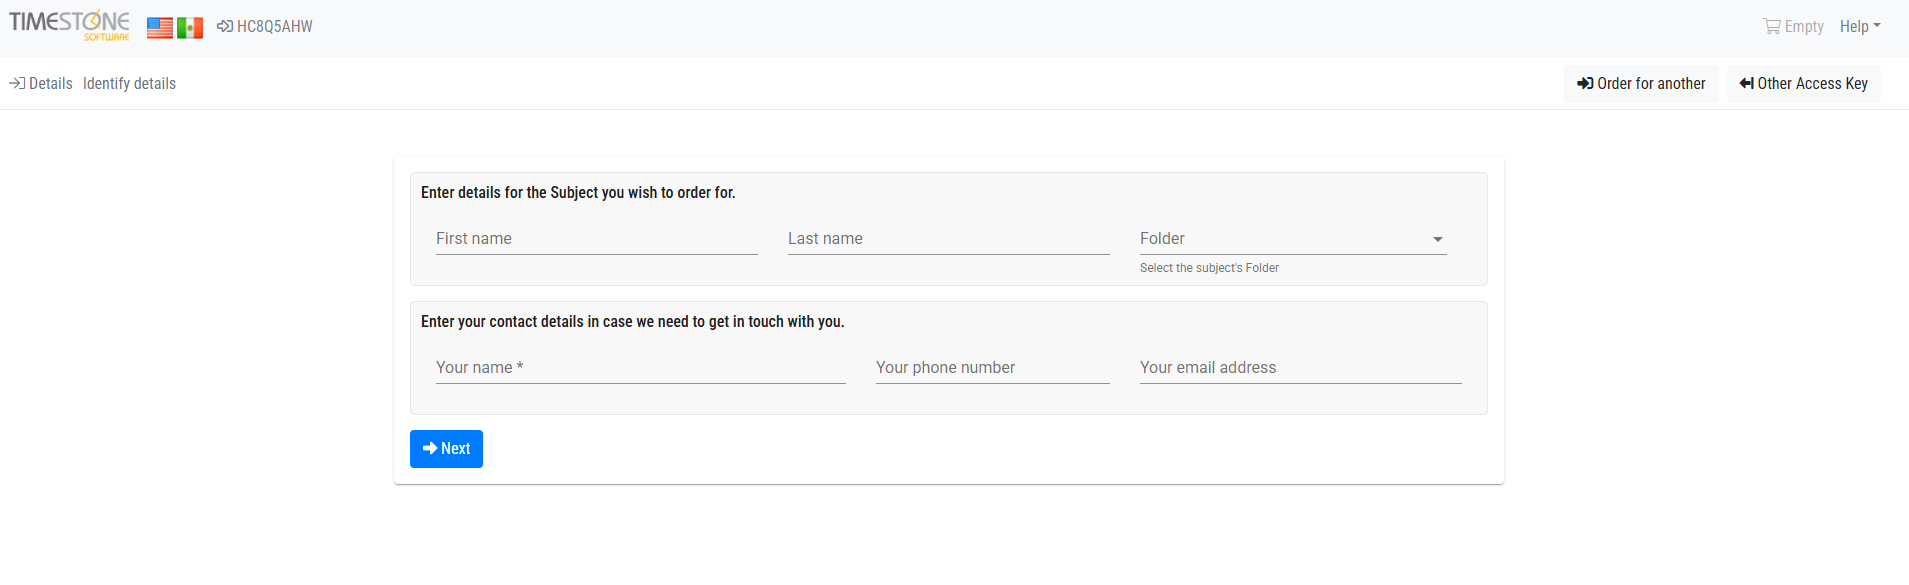
Figure 1: The Identify ordering screen online
Customers can only proceed to the Shop once information is entered into all the required fields.
CAUTION
It is important to note that the customer can only order for subjects in one job per session. It is common practice to place a snippet or popup on the Identify screen online to inform the customer of this. The message is often similar to the following:
“You are currently ordering for @job.friendlyname . Only subjects who are part of this organization can order with this key: @shootkey.
Carts are only able to contain orders for one photography session at a time. If your [student, athlete, etc.] does not attend this [school, playground, organization], please complete your purchase for those in attendance first, then start a new order for that subject using the correct job key.”
Further Reading: Snippets
Snippets and popups are an important part of IOS enabling the photographer to display messages and banners on their site. The ability to make these objects Conditional means they can be displayed in different circumstances. A powerful feature of snippets is the ability to display variable data through the use of @codes.
The Identify window in the apps
Identify orders tend to be batch downloaded into NeoPack’s Orders Mode or, less commonly, Fulfill. They are then identified against the job’s subject data via the Identify window.
The system will attempt to automatically match the order to a subject; however, the user will still need to confirm the match. Tools are available to look up subjects where an automatic match cannot be found. It is also possible to create a new subject based on the data entered by the customer.
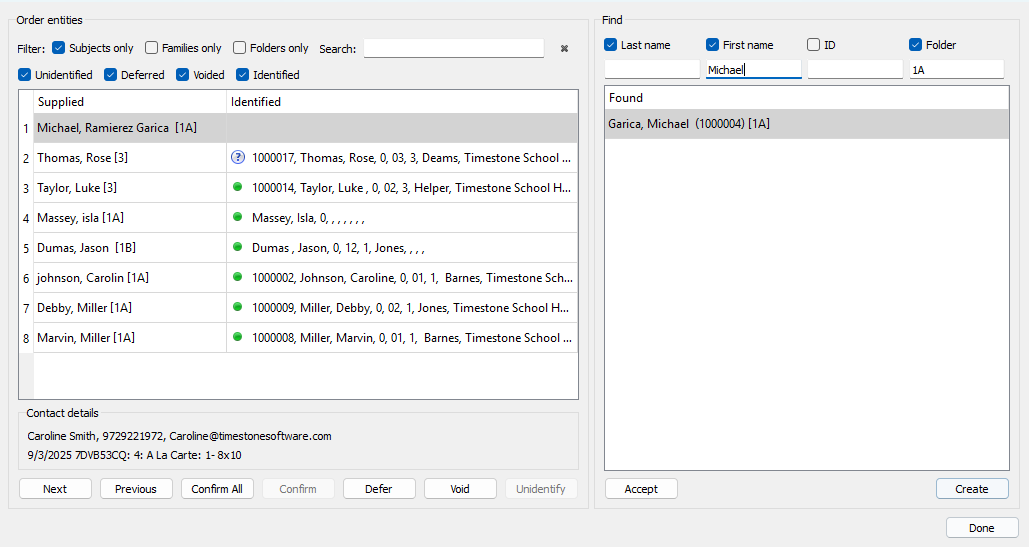
Figure 2: The Identify window in NeoPack’s Orders Mode
Setting Up Identify Ordering
Identify is managed for a given job via tsIOS on the Job Keys & Identify tab.
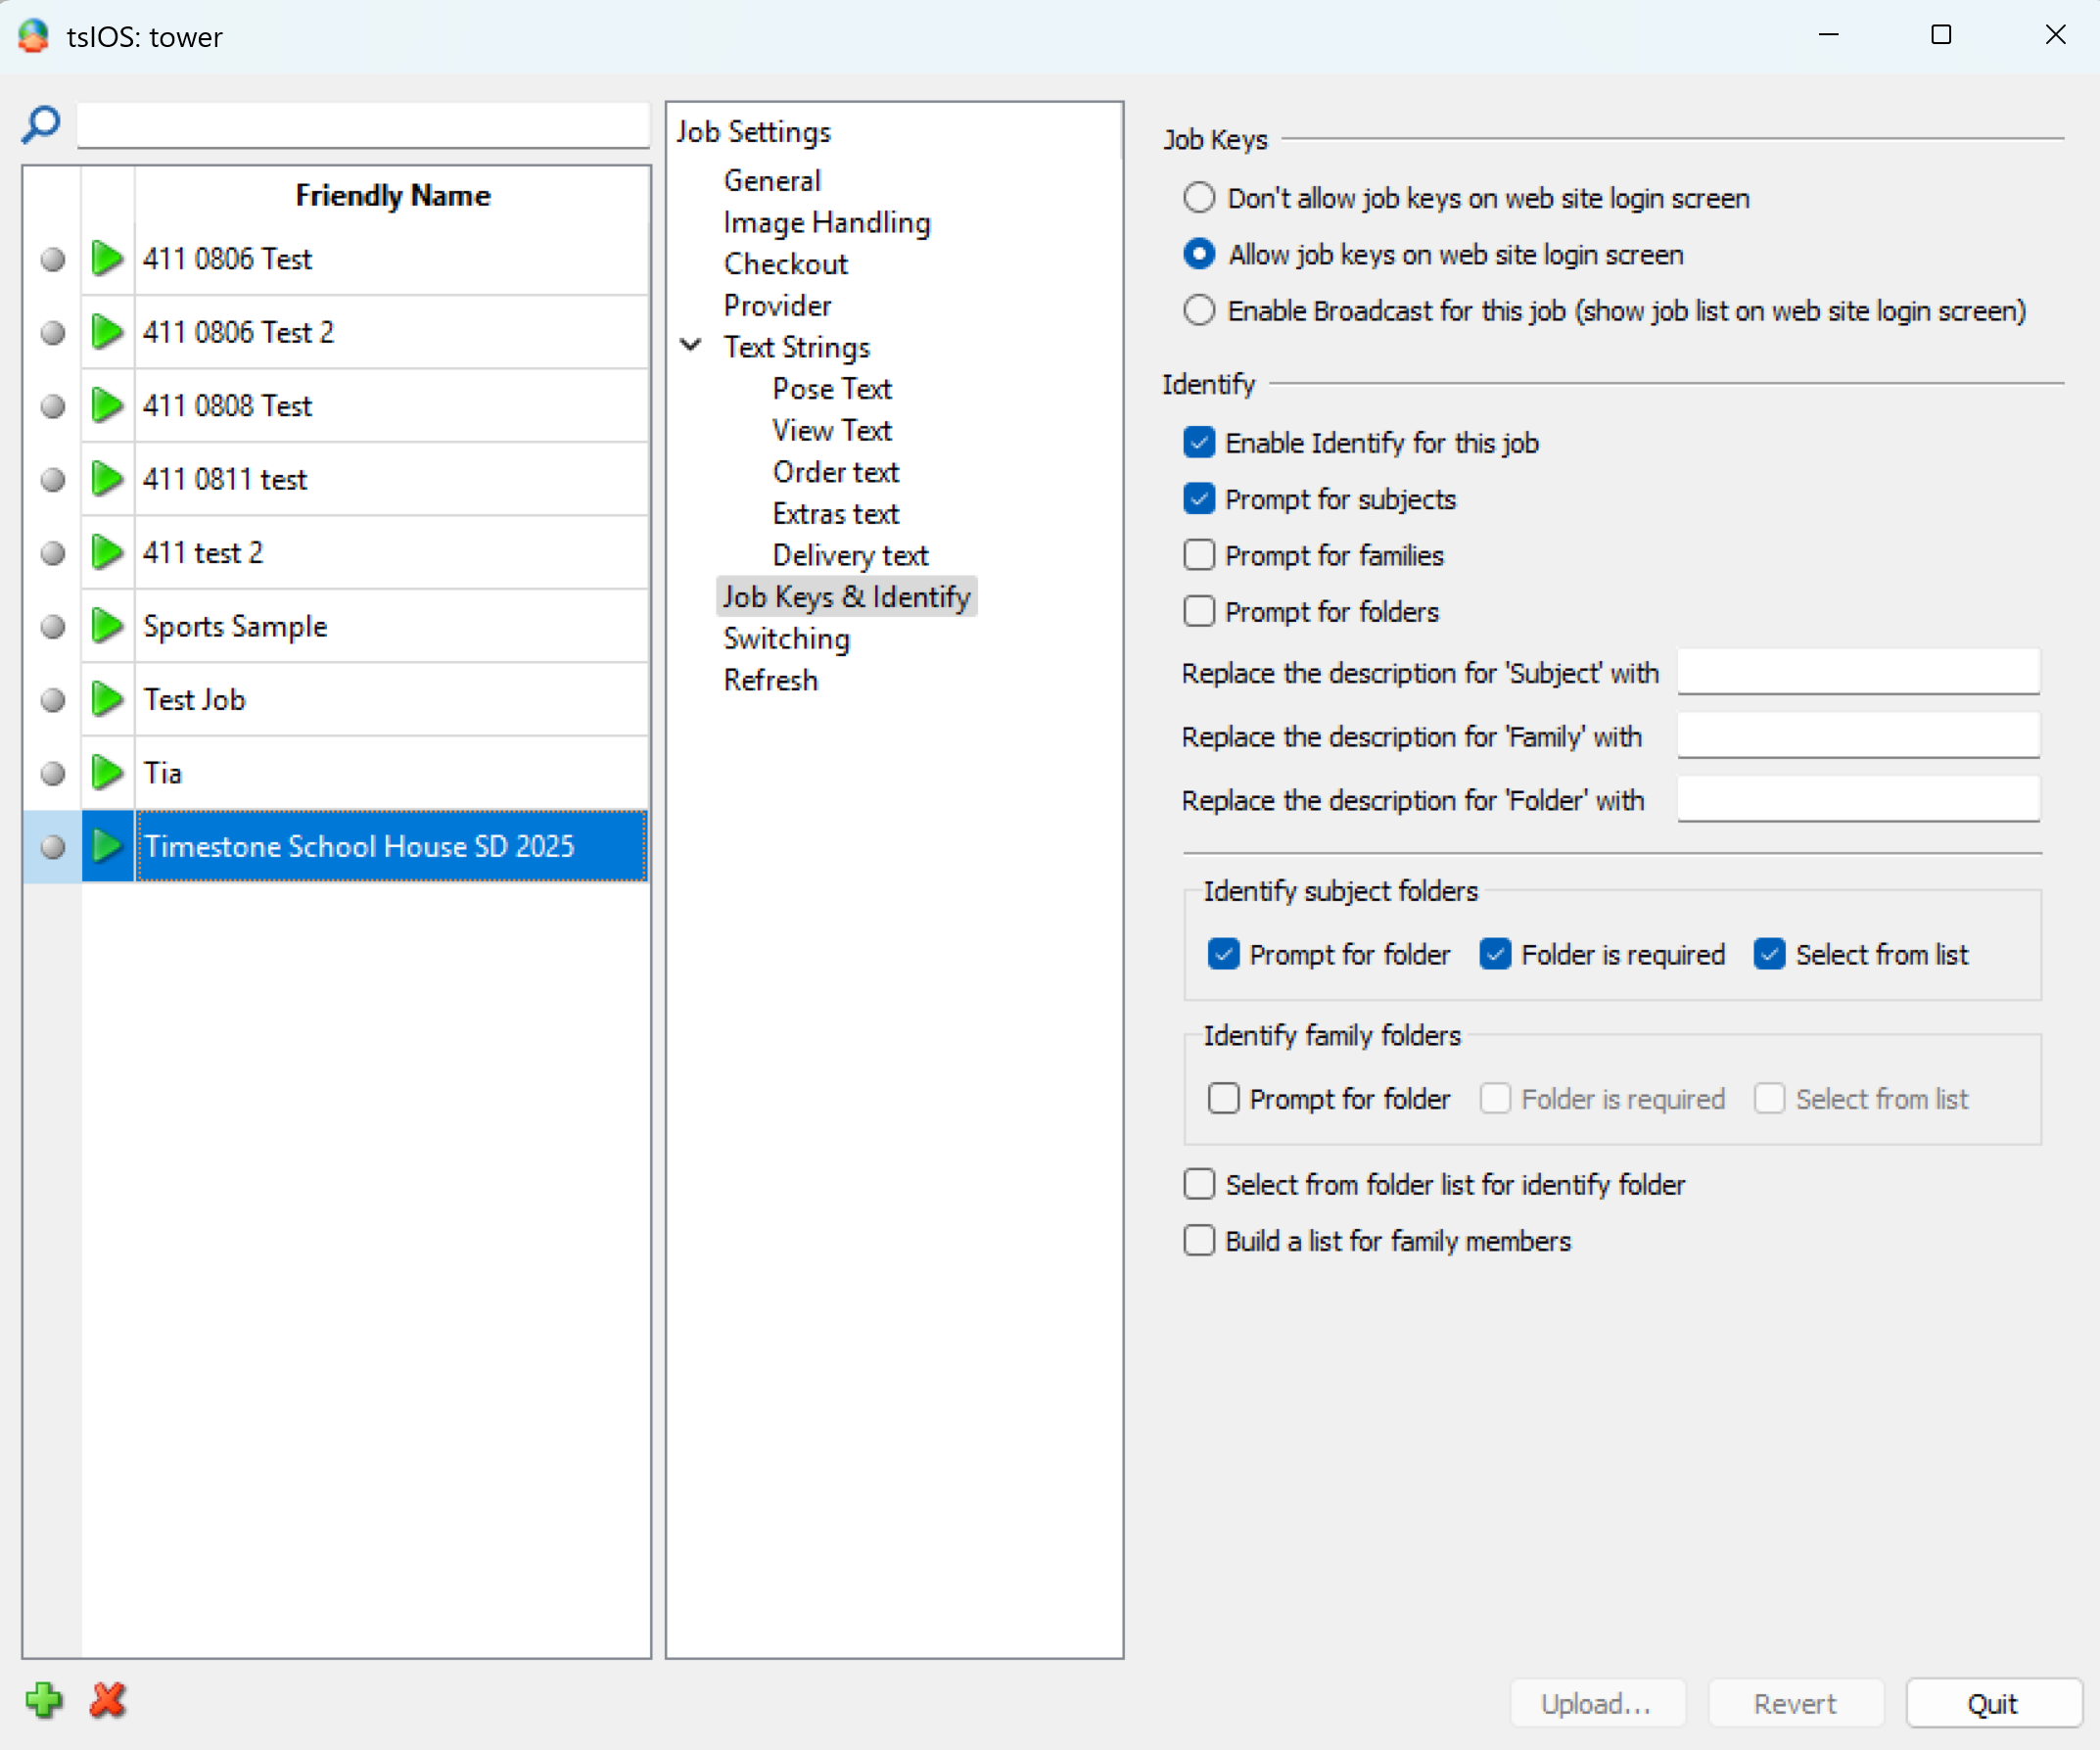
Figure 3: The identify settings area in tsIOS
Enabling the job key
The user can then choose from the following settings for the Job Key:
Don’t allow job keys on web site login screen - cannot be used for Identify Ordering
Allow the job key on web site login screen - the most common option
Enable Broadcast for this job - displays job names in a drop down list
Allowing job keys allows the photographer to send out a single Access Key; the Job Key. Broadcasting jobs eliminates the need for an access key altogether; however, it is seldom used since the photographer may not wish to publicly display the names of the schools or leagues they photograph. Moreover, broadcasting jobs introduces the potential of a customer selecting the wrong job from the list.
Enabling Identify
Check the option ‘Enable Identify for this Job’ and ‘Prompt for subjects’.
It is possible to change the word ‘Subject’ (along with the words ‘Folder’ and ‘Family), meaning the user can choose an alternate word, such as ‘student’ or ‘athlete’ for Subject, or ‘grade’ or ‘team’ for Folder.
Identify subject folders
Commonly, the user will elect to prompt customers for the subject’s folder, as this will help with the identification process once the orders are downloaded. Three options are available to this end:
Prompt for folder - will prompt the online customer for the subject’s folder
Folder is required - the folder field is obligatory and cannot be left blank by the customer
Select from list - the job’s folders will be presented in a drop-down list
Matching order entities to the subject
Orders must be downloaded into either NeoPack or Fulfill before they can be identified and matched to the appropriate subject.
To begin the identification process, navigate to Orders> Identify order entities… in NeoPack or File>Identify order entities… in Fulfill with the appropriate job opened or selected. The keyboard shortcut, Control-I, may also be used.
The Identify window and the workflow for identifying orders are the same regardless of the application
The Identify window
The basic anatomy of this window is as follows, and can be split into two main parts: the Order entity area (left) and the Find area (right)
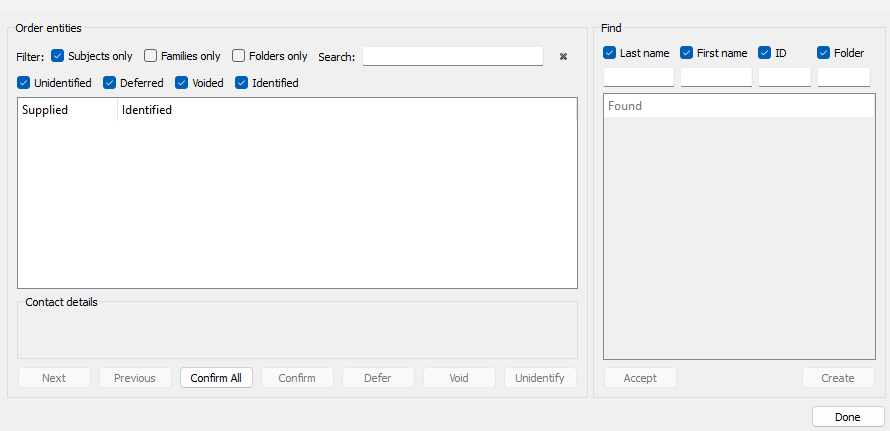
Figure 4: The Identify window
Order Entity area
The order entities area displays the list of orders along with the information provided by the customer. Its main components are:
Area | Use |
|---|---|
Filters | View order entities based on selected filters or search for a specific entity. |
Supplied information | Customer-supplied information |
Identified information | Subject match, Indicators:
|
Contact Details | The customer’s contact details for the selected order |
Buttons | Actions such as Confirm all (Identified matches), Confirm (the selected order match), Defer, Void, or Unidentify (an order from a subject) |
Find area
The Find panel on the right side of the window lets the user search for potential matches by checking, unchecking, or slightly adjusting the customer-provided information fields.
Potential matches will appear in the Subject area below the search fields. If the correct subject is found, click Accept to confirm the match. If no subject matches, click Create to add a new subject record with the customer-provided information.
Note
The ID field while present is not used when identifying order entities but is used for the identification of images using facial recognition and job collections.
Identifying the subject
Once orders are downloaded and visible in the identify window, it is necessary to link the order entity with the appropriate subject record. For each order, the software will attempt to propose the subject to whom the order belongs. Such subjects will appear in the Identified column with a question mark symbol. Where the software cannot automatically find an order’s corresponding subject, the Identified column will be blank.
Confirming proposed matches
The software will attempt to automatically find the correct subject by comparing the data entered by the customer with the data in the job. These proposed matches can be confirmed in bulk with the Confirm All button or individually with the Confirm button.
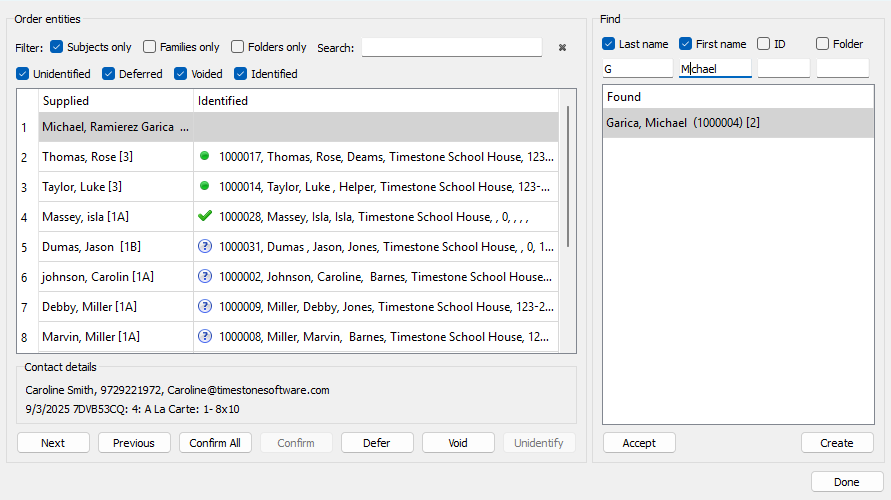
Figure 5: Orders being identified
Manually finding and confirming a subject
For orders where a match was not automatically found, or if the user wishes to override a proposed match, the user can select the individual order and manually find the correct subject. A proposed subject can be seen in the Find area, and/or the user can search for potential matches by manipulating the displayed customer-supplied subject information.
Incorrect information supplied by the customer
Commonly, customer-supplied information can have errors such as typos, use a common nickname that is not the subject’s “official” name, or the customer provides their own name in place of the subject’s name.
In this situation, the system will not be able to automatically propose a match, and the user will be required to search for alternate fields or slightly change certain information to look for the match. Once the correct subject is found, it is accepted with the Accept button.
For example, in Figure 4 above, the customer mistakenly entered the first name into the Last Name field and the last name into the First Name field. In addition, the organization’s data listed the student’s last name only as Garcia instead of Ramirez Garcia. The user found the subject by searching in the Find section - entering the student’s firstname in the First name field.
Creating a subject
Occasionally, an identify order will be received for a subject who does not exist in the job, and no manner of searching with the Find tools will find the correct entity. In these cases, a subject can be created with the data supplied by the customer by clicking the Create button. The user can then find the new subject in Details Mode and enter additional information as needed.
Conditions and Identify
Conditions can be created based on certain entity data entered by the customer.
Folder text
Contact email text
Contact phone text
The conditions can then be used to trigger designated behaviors for items, packages, pricelists, and more.
For example, a condition can be used for a package that should only appear for the 12th graders. The condition created in Figure 6 below, when applied to the appropriate package in tsAdmin, will cause that package to appear only when a customer enters (or selects from a drop-down list) a folder that begins with “12”.
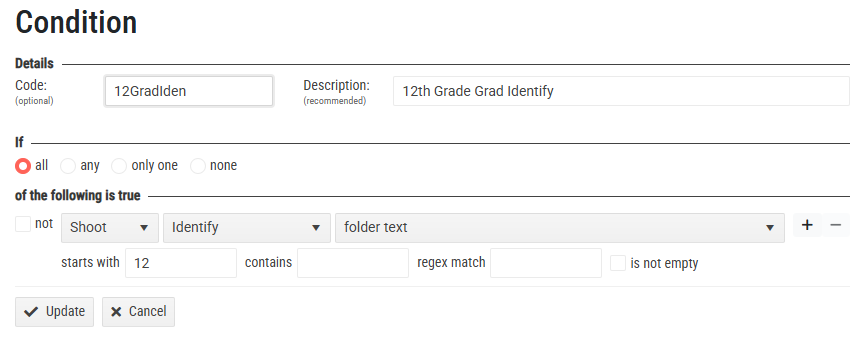
Figure 6: A condition using the Identify information
Further Reading: Conditional Packages and Pricelists
By default, Packages in the Timestone Internet Ordering System (IOS) are offered to all subjects. However, it is possible to restrict packages to specific subjects only
Conditional & Limited Packages
A very powerful feature of the Timestone Software Internet Ordering System is the ability to create conditional price lists where the prices of Packages in an Offer are reduced depending on conditions the user has defined.
FAQ
What is Identify Ordering?
Identify Ordering is a method for online orders that allows all customers to enter the site using a common Job Key, rather than individual access keys.
Can Identify Ordering be used to login and see your images?
No. Because of privacy and security restrictions, Identify Ordering cannot be used to view images. For that, a unique access key per subject (their subject key) is needed.
Can customers order for multiple subjects in one session?
Yes, however, customers can only order for subjects in one job at a time.
What information do customers need to provide when placing an order?
Customers need to enter information about the entity they are ordering for; their first and last name and optionally their Home Folder (class, grade, team etc)
Is it possible to create a new subject if it does not exist in the job?
Yes, if a subject does not exist, a new subject can be created using the data supplied by the customer.
Are there any special considerations when using Identify Ordering?
Yes, users should be aware that orders are not assigned to a subject until they are identified, and there may be errors in the information provided by customers.