When naming subjects in a traditional group photo, the names will by default appear in the conventional format - firstname plus lastname separated by a space. Successive names in a row are then separated by a comma and space.
Figure 1 below shows a typical Names List in NeoGroup.

Figure 1: A typical names list in NeoGroup
Alternative formatting
There are times when an alternative formatting is required. Some examples include but are not limited to:
Using just the subject’s firstname rather than full name
Adding data from other fields such as ‘Title’ and ‘Position’ fields
Adding fixed text to each name
Names need to be formatted conditionally
Alternative formatting can be achieved by making use of the Names format window inside the Group Page Settings window.
The Group Page Settings window is where the user also selects a template to be used for forming the finished group photo and can be accessed by Form Pages Mode (F7) > Edit > Page settings. A keyboard shortcut and toolbar icon are also available.
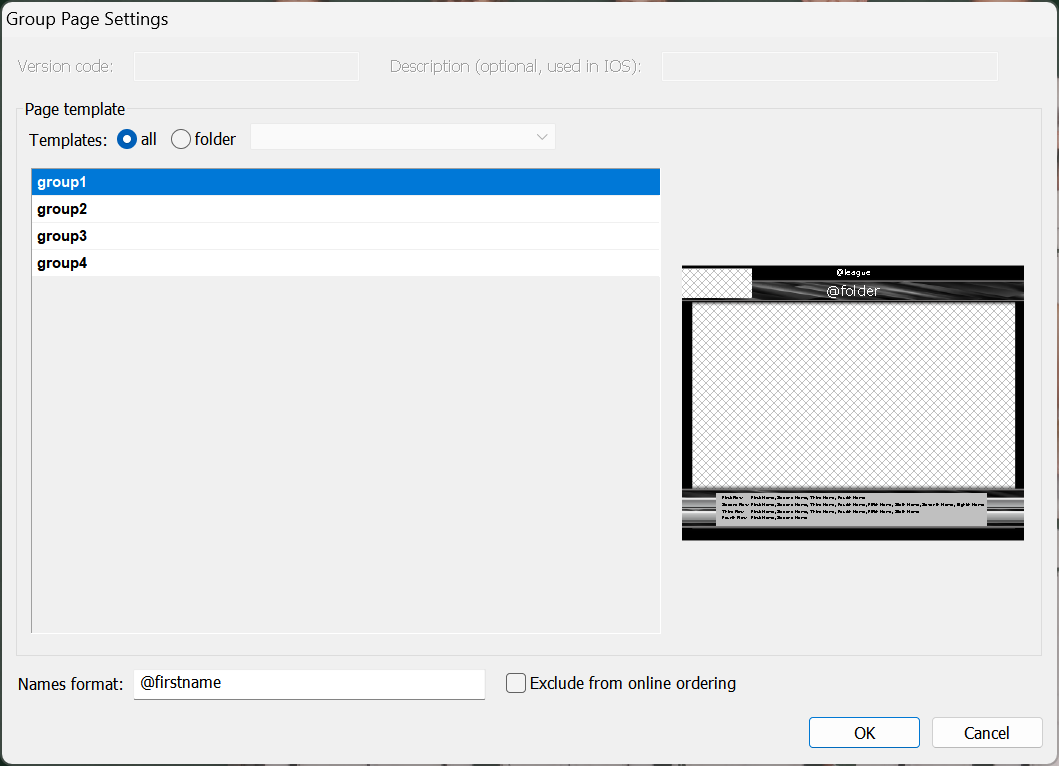
Figure 2: The Group Page Settings showing the Names format window at bottom left
Using just the firstname
Quite common in kindergarten and pre-school photography is to name the groups with the child’s firstname only. This can be achieved by simply entering @firstname into the Names format window as shown in the screen grab above.
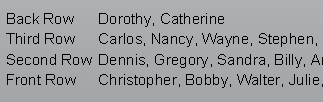
Figure 3: A names list with only first names
Adding fixed text
Although seldom used, it is possible to add fixed text to all names. An example could be if all subjects are male and require the prefix Mr. before their names. This could be achieved with the following entry in the Names format window
Mr. @firstname @lastname
Figure 4 below shows the result of such formatting

Figure 4: The fixed text Mr. has been added to all names
Using a title field
The example above where the title Mr. was added as fixed text to all subjects is obviously an unrealistic one.
A far more common approach to handling data such as titles is to have a ‘Title’ subject field. The field can then be called into the Names format window with an @ code.
@title @firstname @lastname
This formatting results in a names list as shown below. Note only the staff member has been prefixed with the title Mr. which was called from a subject field called Title.
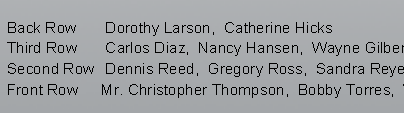
Figure 5: Calling the title for the teacher from a field.
Conditional formatting
A close examination of Figure 5 will reveal a problem that was introduced by simple adding @title to the formatting string. Note the additional space between the comma and the next name.
In fact what was added to the format window was @title followed by a space. This was needed so that the teacher’s name was displayed as Mr. Christopher Thompson not Mr.Christopher Thompson. This presents a problem because while the remaining subjects do not have a title, the space is a fixed character and is applied to every subject. The problem is resolved by making use of conditional text.
The general principle of conditional text is as follows:
Conditional Text
Conditional text statements are enclosed in curly brackets { } and include an upright bar that separates the condition to test and the result.
Upon encountering a { character, everything up to the upright bar | becomes a condition. If the condition is true i.e. has a value, everything after the upright bar | is used. If no text results from the condition (i.e. the condition is false) everything after the upright bar is ignored.
By using conditional text, the title field and the space after it can be part of the condition as below.
{@title|@title }@firstname @lastname
Interpreting the above conditional formatting
Note the pair of curly brackets, this represents the conditional statement. Everything to the left of the upright bar (the pipe symbol) is the condition. If it is true, in other words if the field called Title has a value in it, everything after the pipe symbol is used, otherwise it is ignored. Take particular note of the space after the second @title
For the teacher, the condition is true therefore the rest of the conditional statement is used - the contents of the @title field and the space character.
For the students, the condition is not true (the title field is empty) so the space is ignored.
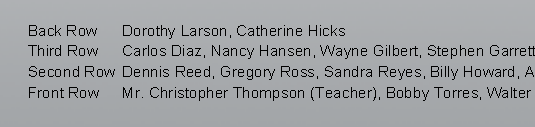
Figure 6: Correct Title and Role/Position formatting
Adding a role or position
In Figure 6 above, notice the Christopher Thompson’s role or position has also been added (Teacher) along with his role or position. In a similar manner to the Title, this was achieved with a subject field ‘Role’ and some extra conditional formatting to handle the space character before the role.
{@title|@title }@firstname @lastname{@role| @role}
Nested Conditions
Conditions can be nested to provide even more complex name formatting. Consider the situation where a teacher's name is to be displayed:
with the full name in the staff photo - Christopher Thompson
with title and position or role in the class photo - Mr. Christopher Thompson (Teacher)
with first initial and lastname extra group photos - Mr. C. Thompson
We have seen how the first two formats can be achieved. The third can be achieved by making use of nested conditions
{@title|@title @firstinitial|@firstname} @lastname
In the example above the condition is the @title field. If the condition is true (the subject has a value in the Title field) it will use what comes after the first upright bar - @title @firstinitial. If the condition is untrue (the subject has no value in the Title field) it will do what comes after the next upright bar - @firstname.
Name prefix and suffix
Names Mode gives the user the ability to add a prefix and suffix to any name ‘on the fly’. This provides maximum flexibility and eliminates the need for Title and Role fields. It is the preferred method when staff are likely to have different roles (and possibly titles) from group to group.
Our example of Christopher Thompson many need a role of Teacher for the class photo, Coach for the football team photo and Conductor for the school band photo. The best way to achieve this is by manually entering his role directly into the Names Mode suffix column as the names list is built.
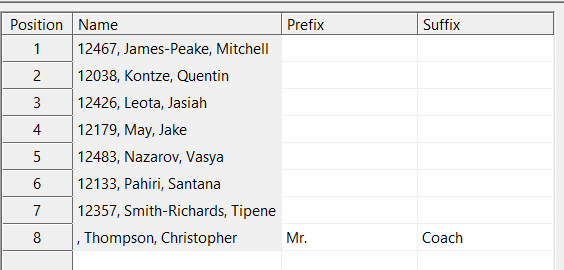
Figure 7: Manually adding a prefix and suffix to a group name
TIP
The prefix and suffix apply to the name in the current group only. As such their use provides maximum flexibility in handling titles and positions
The prefix and suffix can also be used in the format window using the following tags:
@name-prefix
@name-suffix
This means the prefix and suffix can be used with other name formatting including conditions such as:
@name-prefix @firstinitial. @lastname{@name-suffix| (@name-suffix)}
FAQ
What is the default format for naming subjects in a group photo?
The default format is firstname plus lastname, separated by a space, with successive names separated by a comma and space.
Can I use only the first name for subjects in a group photo?
Yes, you can use just the subject's firstname by entering @firstname in the Names format window.
Is it possible to add fixed text to names in a group photo?
Yes, you can add fixed text to all names, such as a prefix like Mr., by using the format 'Mr. @firstname @lastname'.
How can I include titles and roles in the names list?
You can include titles and roles by using the corresponding subject fields in the Names format window, such as '@title @firstname @lastname @role'.
What is conditional formatting in the context of naming subjects?
Conditional formatting allows you to format names based on whether fields like a Title and Role field have data in them or not.
Can I add a prefix and suffix to names in the group photo?
Yes, you can add a prefix and suffix in Names Mode.
How do I access the Group Page Settings window?
You can access the Group Page Settings window by using Form Pages Mode (F7) > Edit > Page settings.
Can I format names differently for various group photos?
Yes, you can format names differently for different group photos meaning staff names for example can appear differently and have different titles and roles depending on the group