There are several ways to make changes to the subject data after import. This article will touch on many of the different methods, including:
Manual editing
Importing a secondary text file
Adding a field
Populating a field
Changing the case of the data
Manual Editing
At any time, the data in a given field may be edited in Details Mode by selecting the desired field and double-clicking to make changes.
Importing a secondary text file
Importing a secondary text file follows the same process as the initial text import with a few variations.
The user must prepare a new CSV that contains the unique subject Field in addition to the desired data. Then in Details mode, select File> Import text file and follow the onscreen prompts to map the data to the appropriate columns.
At the bottom of the import file detail screen is the Details for elements that already exist area. Carefully select one of the following options:
Keep existing
incoming data will be ignored however any new subjects will be added
Replace all
incoming data will replace all existing data even if the incoming data is blank
Replace if Blank
incoming data will replace existing data only if the existing data is blank
Update with non-blank
existing data will be replaced by incoming data only if the incoming data is not blank
Further Reading: Importing a text file
Importing data by text file is a fundamental task that all users should be familiar with.
Adding a Field
If, when making changes to subject data, a new field is needed, it can be added in one of three ways.
‘on-the-fly’ as the text file is being imported
Adding the new field to the current job via Details Mode> Edit> Fields…
Adding the new field to the Timestone Administrator (tsAdmin)
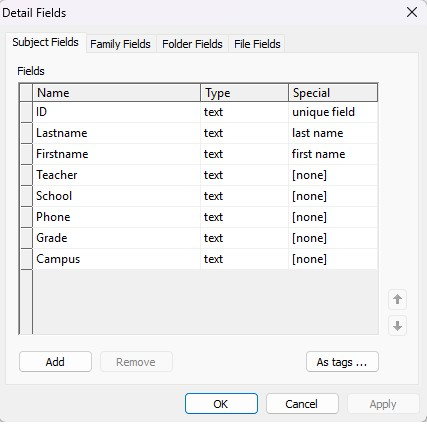
Figure 1: Adding a field to the current job via Details Mode> Edit> Fields…
Further Reading: Setting Default Fields
If the field to be added is likely to be needed for multiple jobs, it is recommended that it be added to tsAdmin (the third option listed above). A more thorough discussion of tsAdmin and fields is available in the following documents.
Populating a Field
The populate field option allows the user to add data to a specific subject field automatically. The data can be randomly generated or fixed text and can be applied to all subjects, a selected folder or a selection of records.
To use populate field:
Open the desired job in Details Mode
Optionally sort the data - the fields will populate in the sorted order.
Select Edit> Populate Field
Select the field to be populated and the parameters of the data to populate it with.
Select the folder(s) or subjects as needed
Click OK To populate the fields with the data
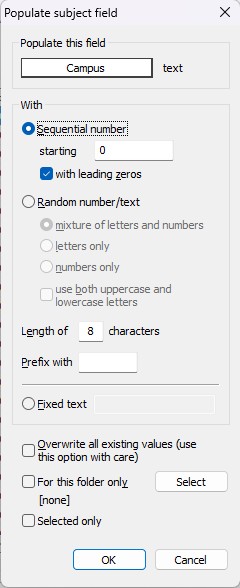
Figure 2: The populate subject field window.
TIP
Populate field is great for generating unique subject data like an ID number when none was provided or for online gallery passwords.
Changing the Case of the Data
There may be occasions when the user wishes to change the case of the data in one or more fields. For example, the data in the Firstname and Lastname fields may be in upper case, and yet the output requires the data to be in “name” case, where only the first letter is capitalized.
To change the case of a field, select Details Mode> Edit> Change field case…
Figure 3: Change subject field case window
Select the desired field from the dropdown, then select whether to change the case to:
All upper case, eg SMITH
All lower case, eg smith
Name case where only the first letter is capitalized, eg Smith
By default, the system will apply the change case to the selected field for all records; however, these changes can be made to a specific record or records or a specific folder by selecting the appropriate option:
For this Folder only
For Selected only
NOTE
The “for this folder only” and “selected only” options are only in version 4.11.
Once the desired field and options are selected, click OK to apply the change case.
Handling special names
Changing the case of data is most commonly used with subject name data. With this in mind, the user must understand how some of the names are handled when changing from upper or lower case to name case.
Mc as in McDonald, McKenzie - When the software encounters Mc as the first two letters of a name, it will always capitalize the third letter.
Mac as in Mackie, Macey - Names beginning with Mac cannot be treated the same way as Mc since there are too many situations where the fourth letter should not be capitalized, such as Mackie, Macy.
Hyphenated names and names with apostrophes as in Smith-Kline and O'Reilly - The software will always capitalize the first letter after a non-alphabetic character.
Names with spaces as in Van Der Haar and Van Essen - The first letter after a space will always be capitalized.
FAQ
What methods can I use to make changes to subject data after import?
You can use manual editing, importing a secondary text file, adding a field, populating a field, and changing the case of the data.
How can I manually edit data in a field?
You can edit data in a given field by selecting the desired field in Details Mode and double-clicking to make changes.
What is the process for importing a secondary text file?
Prepare a new CSV with the unique subject field and desired data, then select File > Import text file in Details mode and follow the prompts to map the data.
Can I add a new field while importing a text file?
Yes, you can add a new field on-the-fly during the import process.
What options do I have when importing data that already exists?
You can choose to keep existing data, replace all data, replace if blank, or update with non-blank data.
How do I populate a field with data?
Open the job in Details Mode, select Edit > Populate Field, choose the field and parameters, select the subjects, and click OK.
Is it possible to change the case of data in fields?
Yes, you can change the case of data by selecting Details Mode > Edit > Change field case and choosing the desired case format.
How does the software handle special names when changing case?
The software capitalizes specific letters in names like 'Mc', 'Mac', and handles hyphenated names and names with spaces appropriately.