Overview
This is a brief introductory guide to utilising Timestone Software, learning how to create Offers and jobs, manage templates, and implement fundamental workflows for effective projects. While this guide was written using Neopack as the example, it can be applied to all other applications.
Chapter 1: Installation and Set up
To start, the user must select a computer to serve as the License Server and choose a place for the Timestone Directories. Ideally, the License server should not be the daily workstation of any one person. The initial configuration may appear overwhelming, but a member of the Timestone support team is available to help at any time.
Installing the License Server and MySQL
Typically, the user will have assistance from a member of the Timestone support staff to assist with the initial installation and setup of the Timestone license server and MySQL; therefore, this guide will not go into detail on this process.
Installing the Applications
Once the Server is set up, download and install NeoPack. NeoPack and the other Timestone Applications can be downloaded from the Timestone website.
Once the software is installed, the user must find and enable the license keys by accessing the file. Upon starting, sign in with the credentials set up with the Timestone support staff and specify the server location.
Further Reading: Installation and Licensing
Licenses for the Timestone Software application are allocated from a License Server utility on the local network.
The Computer hosting the USB dongle and onto which the License Server utility is installed is the License Server.
Setting Up the Directories
A key first step is to designate a clear and effective system for handling the various assets and support documents related to the Offers and jobs. Choosing a location that is conveniently reachable by all intended users and consistently backed up is crucial for sustained success and user-friendliness. The directories will contain all the templates, images, backgrounds, graphics, etc., developed for any offer and job.
The user will need an Image Directory, a Graphics Directory, a Template Directory, and a Background Directory. The image below shows a basic Directory folder layout.
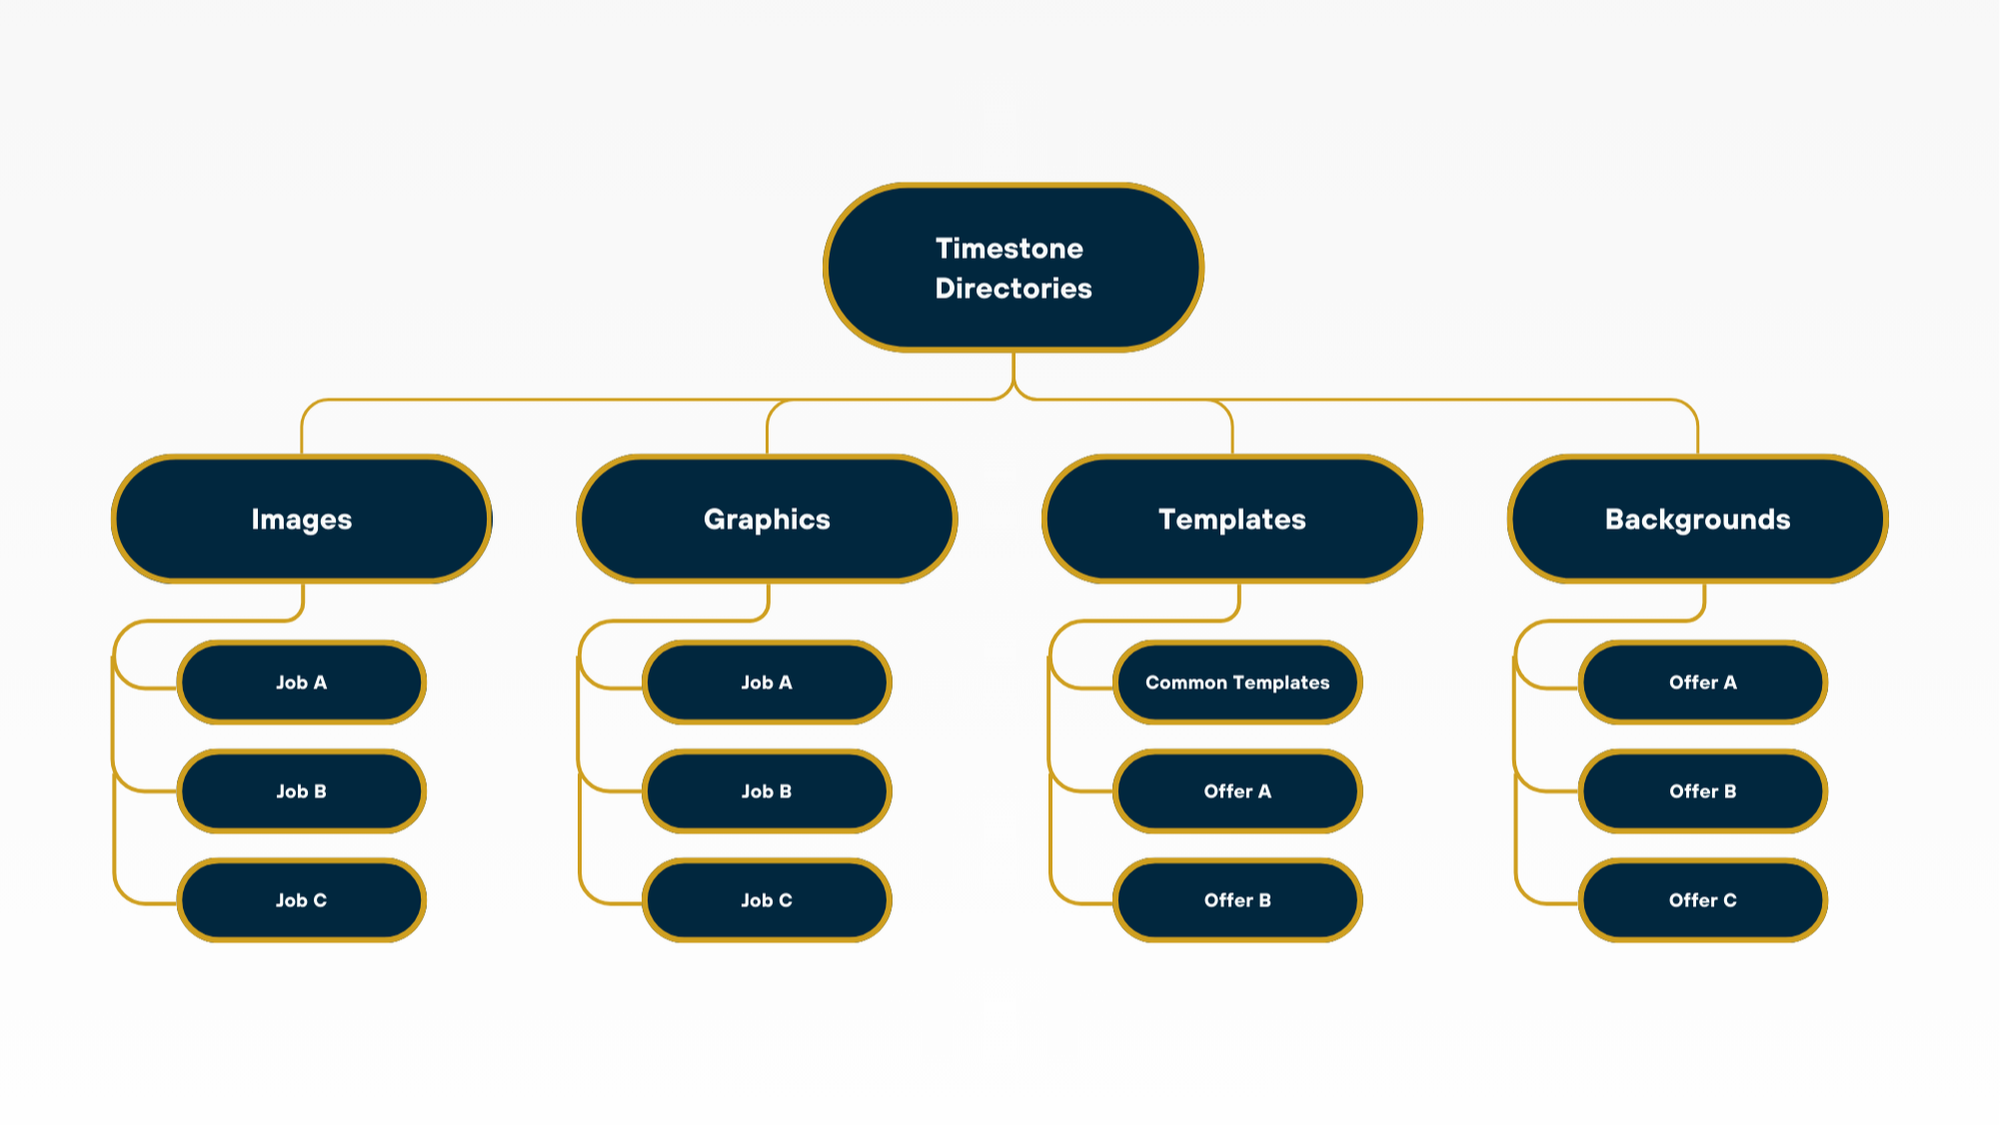
Figure 1: Basic Folder Directory Layout.
The Image directory includes all images captured by the user, typically organised by job. Similarly, the graphic directory contains graphic sets sorted by job, season, workspace, etc. The Background Directory stores backgrounds for any specific offer and is usually structured by offer; within this directory, the individual subfolder should be named after the offer. The Template Directory can be laid out like the other directories, but may also include a “common templates” folder used by all offers and jobs.
WARNING!
Each subfolder withing the directory must be named to exactly match the corresponding job, offer, season or workspace within Timestone Software.
Further Reading: The Directories
The Timestone Directories are dedicated folders intended to house all of the various images, graphics, and other support material for any offers and jobs created by the user.
Setting the Directory Path in Timestone Administrator
After the server license, MySQL, and NeoPack are installed, the user should indicate to the server where the directories are located. This is done via the Timestone Administrator ( tsAdmin ). TS Admin is used to communicate or make changes to the Timestone Software MySQL database.
WARNING!
Many of the actions in tsAdmin are global in nature and can effect most or all jobs in the database. For this reason the Timestone Administrator should only be used by senior staff in the company who are very familiar with the software.
Further Reading: The Timestone Administrator
The Timestone Administrator (stAdmin) is used as the main point to create, update and interact with the TImestone Software MySQL database.
Directory paths are one of the many things controlled in the Timestone Administrator. Open tsAdmin and navigate to the Paths section using the left navigation tabs. Then, using the * options for season, workspace, and account combination area, the user will set the default path for each directory.
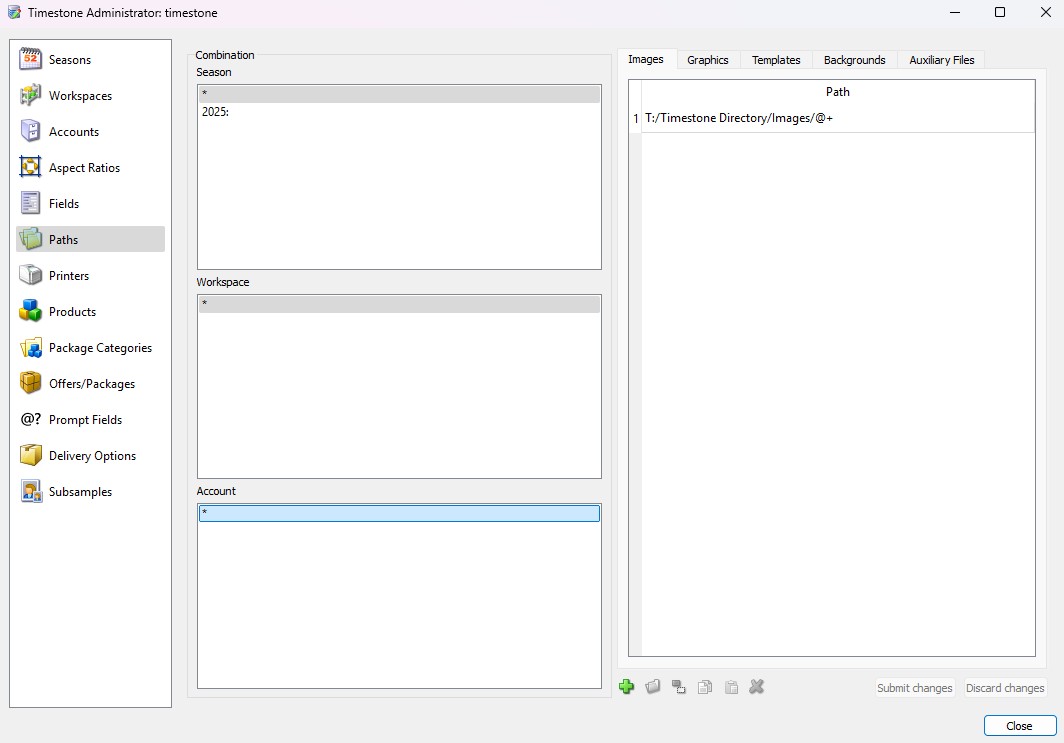
Figure 2: tsAdmin screen shows the interface for setting up the initial directory paths.
To set the path to each directory, use the right-hand area and select the first directory, Images. Click the green + icon to create a new path. The adjacent folder icon can be used to browse to the correct folder location. The user must then add the @+ wildcard to the end of the path to indicate that the application should look at the respective job or offer subfolders. Click the submit changes button to save. Repeat the above steps with each of the directories on their respective tab using the respective folder location and desired combination of @+ or @ Offercode
WARNING!
Avoid multiple direct paths (paths with no Wildcards), or paths to unnecesssary folders even if the folders are empty. This can cause jobs to have increased load times.
Further Reading: Paths
One of the most important administrative considerations for a user is an efficient, organised structure for the storage of assets, specifically templates.
Chapter 2: Creating an Offer
To begin selling with Timestone Software, the user must set up an offer. There are several steps involved in creating an offer, but simply put: An Offer requires Packages, Packages require Products, and Products consist of templates.
Templates are designed in NeoPack or another Timestone application using the Template Designer; offers, packages, and products are managed in tsAdmin.
Further Reading: Offers, Products and Packages
Products, packages and offers are essential components of all ordering methods available in Timestone Software. The user must understand what these terms mean and how they relate to each other.
Creating Templates
Templates are utilized to generate the design of the rendered item and employ the file extension “.plt.”. They map the different elements of an item design together. Templates can have 3 versions for every Product: Printable Version, Customer Version, and Preview Version. This article will focus mainly on printable templates.
WARNING!
Be sure to make sure the directories and their paths are properly set in tsAdmin.
When a new template is created, the user can select from the following options:
A Pack Layout defines the position of the elements in a pack, including holes for the subject image, graphics, items, or text.
This is the default selection when a new template is made.
An item sheet layout defines a page used for item sheets, including the area where the items are placed.
A sizeable item has an abstract size and is scaled to fit within a hole on a pack layout. This is used only in Packs.
For example, this is used by users offering changeable backgrounds to create the Item associated with the background options for all print sizes. NeoPack then takes this template and places its assembled result in the Item frame on the Pack layout
A fixed size item has an explicit size (in inches or mm) and is printed at that size within holes on pack layouts and sheets.
Package layouts are utilised by IOS to display a package preview.
Further Reading: Alternative types of Template
While a template defaults to a printable version, it is possible to create customer and preview versions of any pack layout templates.
Customer Versions of Templates
A feature of the Timestone Internet Ordering System (IOS) is the concept of "Live Rendering", meaning the customer sees their images inside the Products ordered.
Creating Templates for Print Items
Templates are designed to serve as the blueprint for the final printed products. At a minimum, the user needs to specify a position for the background and image layers within a specific layout.
To create or change templates, open NeoPack and switch to the Template Designer View Mode. Then, either open the intended template or create a new file.
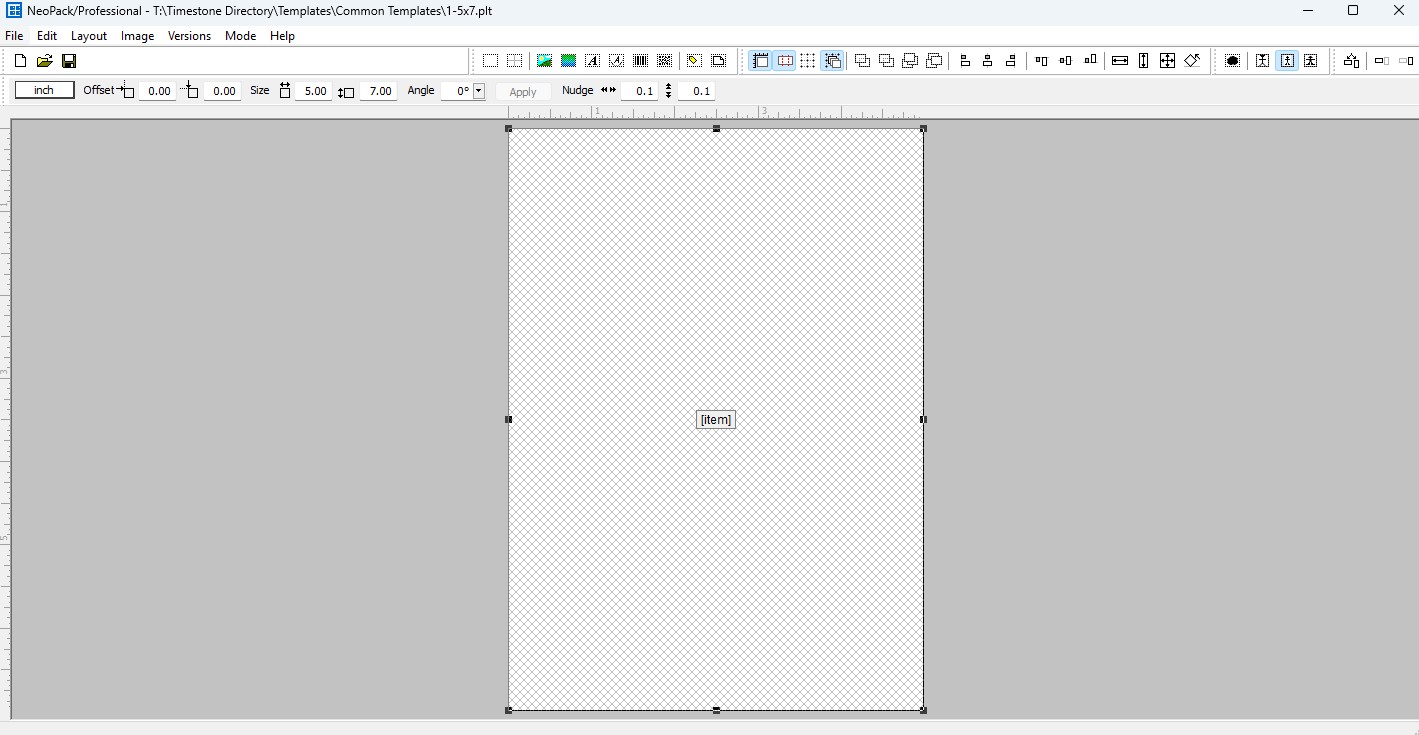
Figure 3: Sample template of a 5×7-inch print
To set the print size, use the size fields above the preview window. The User can change from Inches to mm as the unit of measure, adjust the offset, and nudge individual objects.
To place the Item area in the print field, use the “Add Hole” button, represented by a dashed square icon.
A Hole can be filled by an item design or an image. For a print template, select the option for item design. This allows any other sizable items to be placed into the hole.
To add cutmarks, navigate to Edit>Cut Marks… . This will launch the cutmarks menu where the user can input the cut line location.
To show or hide the cut marks use the “Show cut mark” icon - a horizontal rectangle trisected my red dashed lines.
For more information on **Templates/Template designer
Before saving the design template, be sure to include a description and a key. These details can be filled in the design properties interface, File> Properties.
TIP
Download a few commonly used templates.
Further Reading: Template Designer
The template designer is the design area for any printed or preview item in Timestone software.
Creating Products
A Product refers to any item “produced” within Timestone Software. This includes portrait-based prints generated using templates, digital downloads, or group images. Products form the foundational elements that are later grouped into Packages.
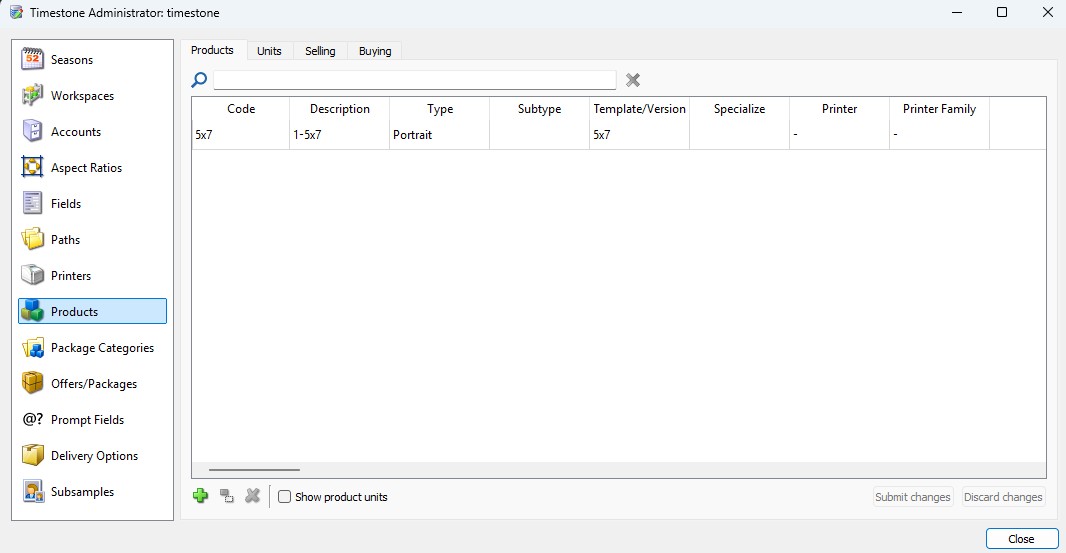
Figure 4: tsAdmin Product tab with a single product, 1- 5×7 inch print.
To create a Product, the user accesses the Products tab within tsAdmin and clicks the New Product icon (represented by a green plus sign). Relevant attributes must be entered in their designated fields. The Template/Version column should reflect the title of the associated template, as defined in the Template Designer. Once all information is entered, click Submit Changes to save the new product into the system.
Further Reading: Product Options
Before products can be ordered, they must be entered into the Timestone Administrator (tsAdmin) and then added to Packages in Offers.
Creating the Offer
Packages are grouped to create an Offer, which acts as the digital counterpart to a printed brochure.
To create an Offer, Open tsAdmin and navigate to the Offers/Packages section. From that point, the user chooses a particular Season and/or Account to which the Offer will be relevant, or opts for the “ * ” symbol to signify that the Offer should be accessible across all Seasons and Accounts. Click the New Offer icon (green plus sign) to initiate the Offer creation process.
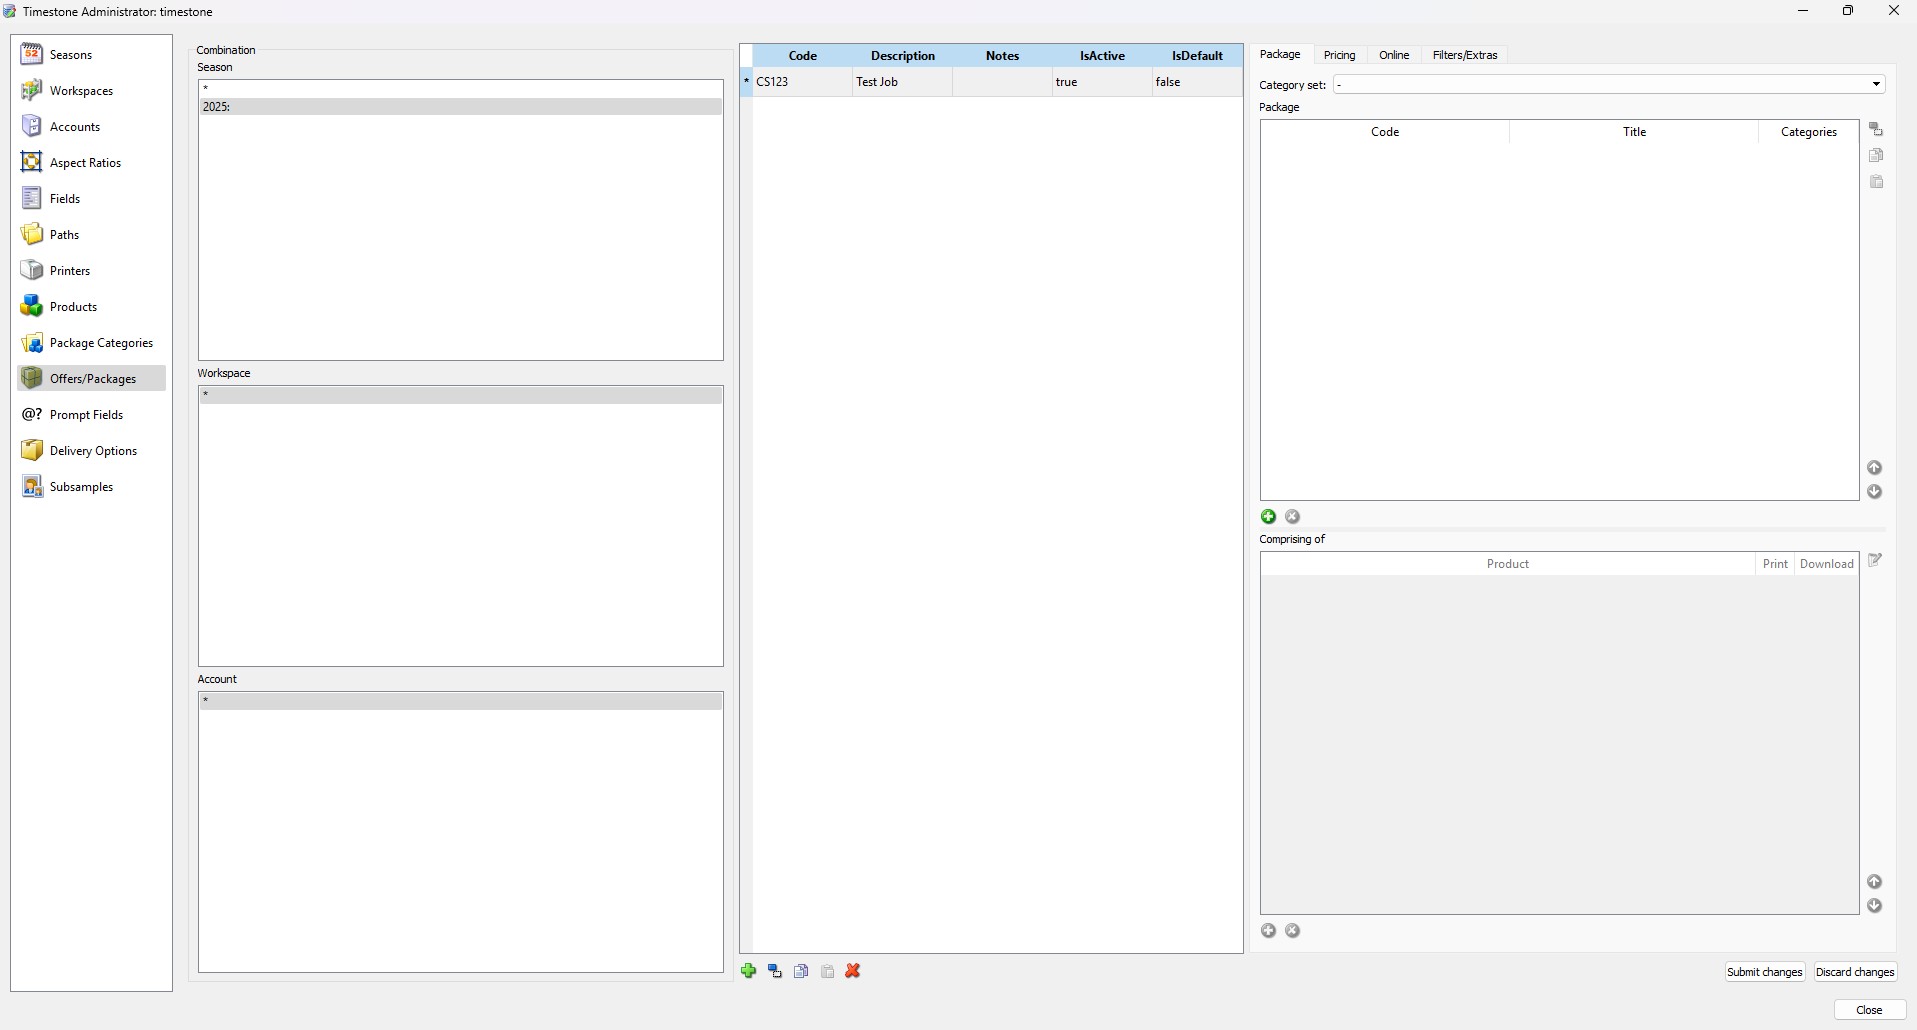
Figure 5: tsAdmin Offers/Packages screen with one offer created.
An Offer Code is required. This code is typically an abbreviated representation of the related program brochure; in Figure 5, it is set to “CS123”. The user should also add a short description of the Offer in the description field, “Test Job” in the example. Again, click submit changes to save any alterations.
TIP!
Have a defined approach when generating offer codes. Although the code can be anything the user wishes, it is advisable to utilize existing identifying codes from related brochures if they are already in place. This will ensure uniformity across the various elements of the user's program.
Once the Offer is created, select the new offer and proceed to add one or more packages. Each Package can then be populated with one or more Products. After defining the contents, navigate to the pricing tab to set a base price for each package. Upon completion, click Submit Changes to finalise and save the offer.
Creating Packages
When customers make a purchase, they select a Package, which consists of one or more grouped products. The user creates a Package by combining these Products and assigning specific attributes such as Price and a unique Package Code. This Package Code is the identifier entered into the system during the order or package entry process.
TIP!
Packages typically directly align with the options presented in the physical brochure available to customers. Accordingly, Package Codes are often shortened versions of the full package titles featured in the brochure.
Figure 6: tsAdmin screen showing the Offers/Packages workspace with an offer containing three packages and one assigned product.
In the Offers/Packages section of tsAdmin, the user should select an offer, then navigate to the right column and select the Packages tab. Click the New package icon, a Green Circle featuring a white Plus Icon, to add Packages to the offer. Select the newly created Package and proceed to the Comprising of window below. Include all Products that make up the particular Package.
TIP!
Use the Template Report to verify that all items are configured correctly. For additional information, refer to the Template Report article.
Further Reading: Package Templates
A feature of the Timestone Internet Ordering System (IOS) is the concept of "Live Rendering", meaning the customer sees their images inside the Products ordered.
Chapter 3: Creating a Job
Creating jobs is an essential part of working in Timestone. Jobs are where all individual subject data is stored, Images are matched to subjects, and orders can be tracked.
Organising Jobs
Timestone provides various solutions to assist in organising jobs and offers by categorising them within a common framework. One such solution is Seasons. Typically, seasons are used to group jobs using the calendar as a reference.
For example, a school photographer might use a Season such as “Fall 2025” for all Jobs within that academic period, while a sports photographer could use “LakeshorePlayground2025” to group all Jobs linked to that location for the year.
Seasons are managed in tsAdmin under the seasons tab and can be created by clicking the Add New Season icon (Green Plus). The season should be given a code and a description by the user.
TIP!
The description of the season will be shown as part of the preferences and new job creation, so it should to be clear and consise.
Seasons can include predefined parameters such as:
Aspect Ratios & Head Guides
Fields
Paths
Offers & Packages
Further Reading: Organising Offers and Jobs
Seasons, workspaces, and accounts offer the user multiple methods for organizing jobs and Offers that can be used in a single application or in combination with each other to further refine groups. tsAdmin is used to manage various parameters for the groupings, thereby providing a consistent working environment.
Creating a New Job
A Job in Timestone Software refers to the individual collection of subject records associated with a specific program at a particular location.
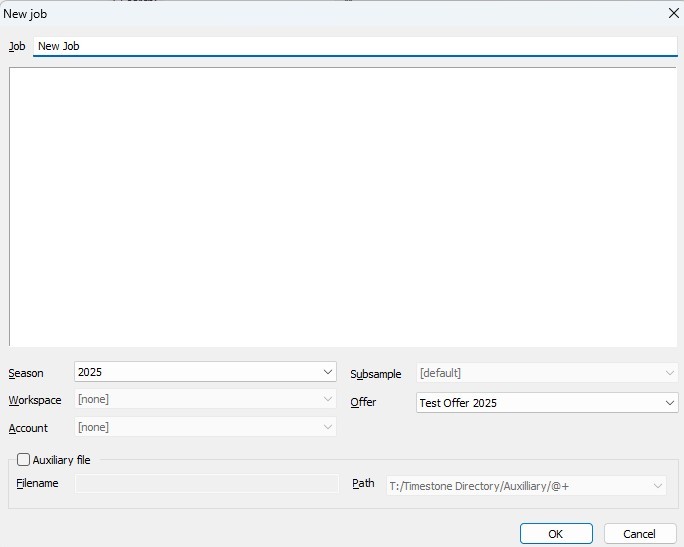
Figure 7: The New Job Creation Window
To create a new job, launch NeoPack and navigate to File > New. A name should be entered for the Job—for example, “Saint Paul’s Catholic School 2025”. Then select the appropriate Season, Account, Workspace, and Offer from their respective drop-down menus. Once all selections are made, clicking OK will finalise the creation of the new Job.
Importing Data via a Text File
There are multiple methods for importing data into the system, including through CSV files or existing TNJ files. This article will focus on importing data via a text file.
Preparing A Data File
Using the Roster or Student information provided by the external organisation, the user should determine which columns in the file correspond to the appropriate fields in the job. Once the plan for mapping is clear and any extraneous columns are removed, the file should be saved in one of the following file types:
CSV, or Comma Separated Value, files are the most commonly used file Type as they are fully supported in Microsoft Excel or another similar application.
CSV file type is what is used in the example import below.
Tab delimited text files are a plain text file where data is organized into rows and columns, with the column’s values separated by a tab.
Fixed-length format files are rarely seen. They use ordinal positions, which are offsets to identify where fields are within a record. There are no field delimiters.
WARNING! Only the above formats are supported for importing data.
Users may receive data in many forms such as Microsoft Word (.doc), Microsoft Excel (.xls), Microsoft Access (.mdb) or from any number of third party applications. In these cases the data must be either converted, saved or exported into one of the supported formats.
Importing Data
To import Data, open the appropriate job—while in the Details mode, navigate to File> Import Text File.
Rather Watch a Video?
A Webinar was made for version 4.10 introducing some technical features, including the Text File Import Wizard, that simplifies the process of bringing external data into jobs.
This action will open a pop-up dialogue window where the user can select the prepared data file. After selecting the file, map each column in the data file to its corresponding data field within the job.
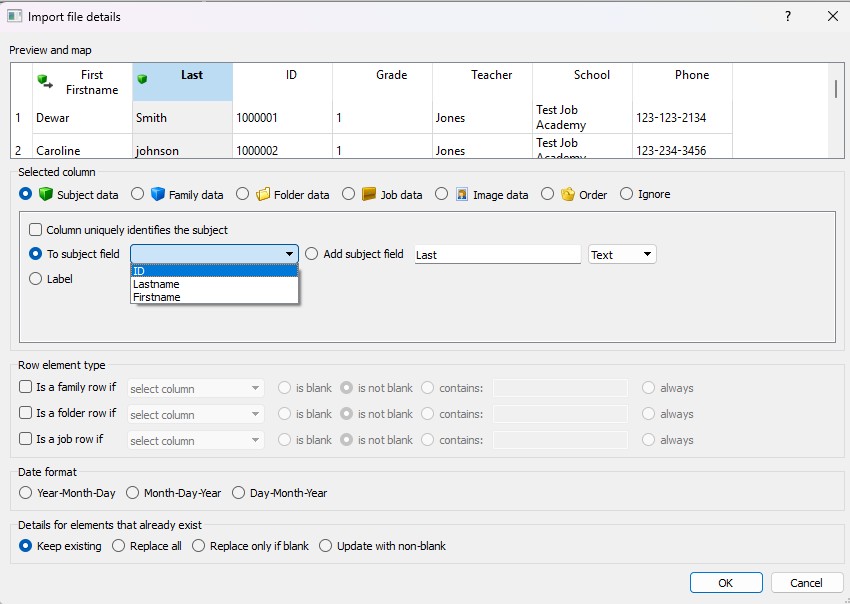
Figure 8: Import File Details window showing the selection of Subject data
The user will map the data column by column, either by selecting one of the pre-defined subject fields in the dropdown associated with the To Subject Field Radio button or by selecting the Add Subject field radio button and typing in the desired column header. Additionally, if the field is unique to each subject, such as a student ID number, it should be designated in the column’s option tab during the import process by checking the box Column Uniquely Identifies the Subject.
TIP!
If the columns needed are consistent between jobs, pre-defefine default fields within tsAdmin.
Creating Subject Folders
The user has the option to specify a field to automatically create folders within NeoPack. Folders can be used to help organise subjects into smaller, more manageable groups, such as by teacher, grade or team.
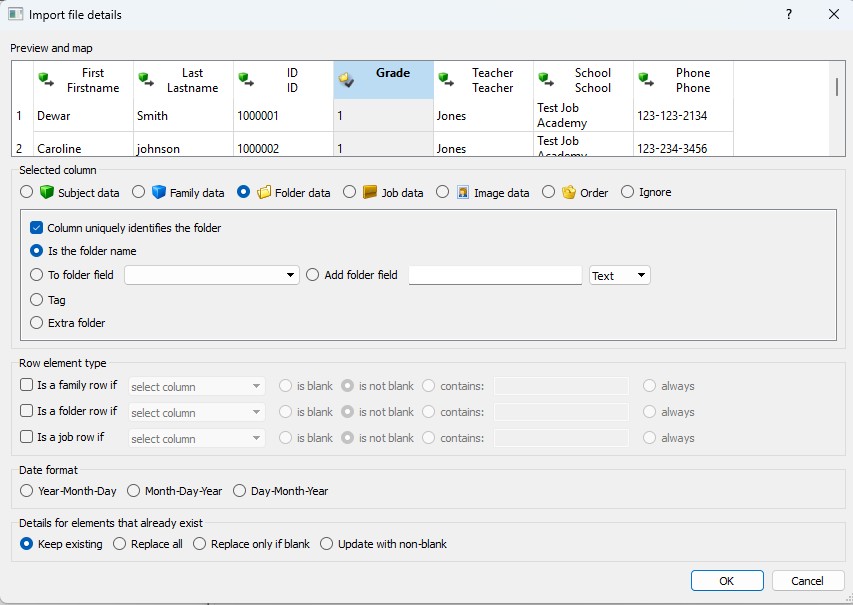
Figure 9: Import File Details window showing the selection of Folder data
To designate a column in the data file as a folder, select the Folder data radio button, then select the is the folder name radio button. Subjects may also be added to folders manually or by another text import.
TIP!
If the subject data being used to create the folder is also a desired column in the subject data (like grade or homeroom) duplicating the column in the data file is a simple way to have the data entered into the field associated with the subject but also be able to assign it as a subject folder in a single import.
Further Reading: Making Changes to Subject Data
Subject data may be altered or added to via another text file import or on an individual basis within NeoPack.
Making changes to Subject Data
Folders and Families are a tool for organizing subjects into smaller groups.
Manually Adding a New Subject
At any point, the user can add a new subject in details mode.
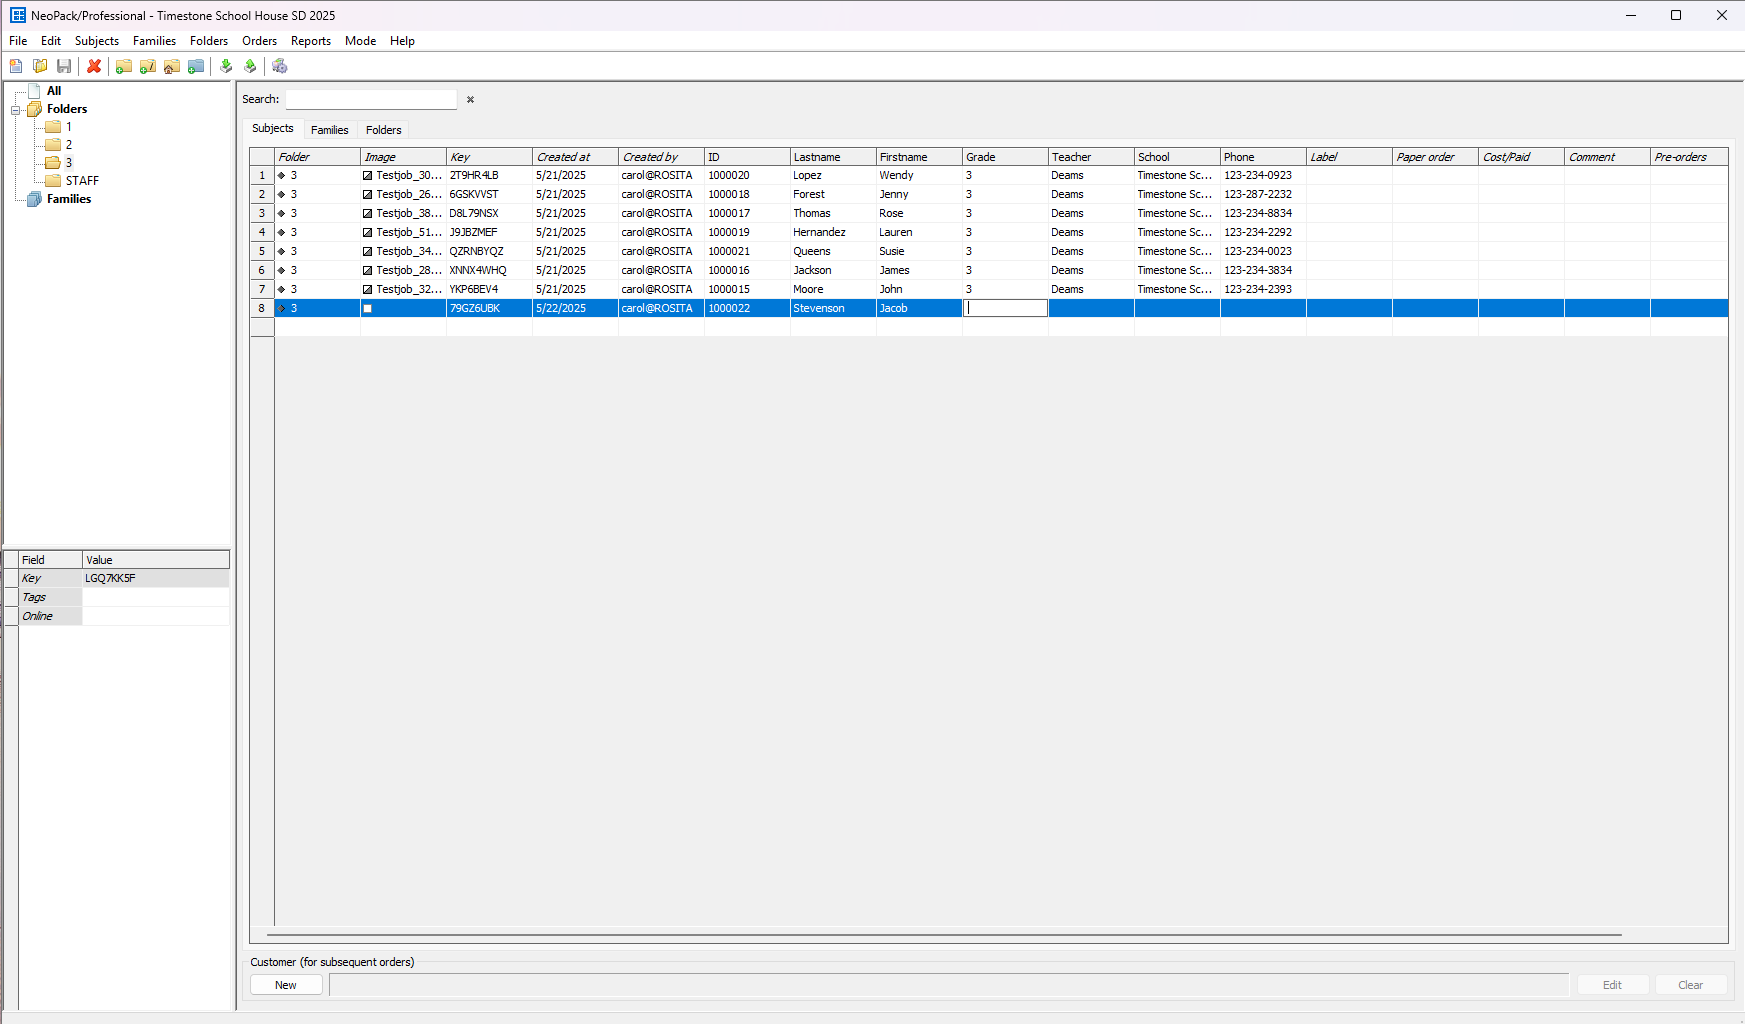
Figure 10: Adding a New Subject in Details Mode
To create a new record:
Locate the empty row at the bottom of the list of subjects in this folder
Click on the Respective fields and type in the associated data as needed.
TIP
A new Record can be made directly into the desired home folder by navigating to the lase row or that folder and following the steps above. If the Subject was made in the All view simply click and drag that record to the desired folder to add it.
Creating Data Cards for Photographers
Data cards are essential tools that enable photographers to match subject information from the job with their photographs while in the field. These cards can include both Job and Subject details, such as the job title, season, subject name, grade, and ID number. In addition, they feature a Barcode and/or QR Code, which can be scanned on-site using CapturePost, or captured as a match to subject data and photos during import into NeoPack.
TIP!
Data Cards, also called Shoot cards or camera cards, can include more than plain text data. Barcodes and QR codes can be included to assist in the matching process or automate it almost entirely.
Users can choose to use and alter the pre-designed templates- the standard Camera Card layout and 6-up Item sheet Layout, or create a custom template tailored to their specific needs using the Template Designer.
To render data cards, switch to Item Sheet Mode. From there, clicking the New icon initiates the creation of the Data Card sheets. A pop-up window will appear, prompting the user to either include all subjects or select a specific folder of subjects to be added to the sheet. Once the selection is made, click Next to select the template/arrangement options. In the template and layout background selection area, find and select the desired template/layouts, and then choose the desired flow and duplicate options. Click Next to advance to the Sheet Page Settings. The user can then select how the subjects will be sorted and other settings; when complete, click Finish to render the sheets.
To print the completed data cards to a traditional “office” printer, the user should click the print icon, select the Microsoft Print to PDF, and follow the onscreen prompts to save the document. The PDF can then be opened and printed to produce physical copies of the data cards for field use.
Further Reading: Data Cards
QR code shoot cards are a popular method of matching images to subjects and Families.
Chapter 4: The Shoot
CapturePost Shooting
When the Photographer is capturing images using CapturePost, a TNJ file is required. This serves as a duplicate of the job that enables the photographer to correlate the subjects and images within the job during the shoot.
As a Subject approaches the photographer, the Photographer will either scan the barcode on the subject's data card or search for the subject in CapturePost. Once identified, the photographer can continue capturing images of that subject, repeating this process for each subsequent subject. At the end of the day, the photographer’s stored images, along with the TNJ file, will be integrated back into the primary job, ensuring that all subject data and images are synchronised.
CAUTION!
When shooting into CapturePost each photogrpaher should have their own copy of the TNJ file on their local drive. The Photographers should not be shooting to a combined location on a remote server.
Further Reading: CapturePost
CapturePost is an application that allows photographers to tether a camera to a computer while simultaneously photographing and matching images to subject records.
Exporting a TNJ
To export a TNJ file, first access the Job for which the TNJ file is necessary. After opening the Job, go to File > Export to TNJ. A dialogue box will pop up, enabling the user to set a few specific export preferences; however, none of these options are mandatory for CapturePost to function for image capture. These preferences are whether to include images, orders, offers, or solely the core data. Once the preferred options are chosen, continue with the export to create the TNJ file.
TIP!
A TNJ File that includes all images, orders and offers is a great way to have a back up of a job at different states throughout the workflow.
QR Code Shooting
Alternatively, if the photographer is not shooting tethered into CapturePost, the data card can be photographed as the Lead Image.
When a subject approaches, the photographer will first capture an image of the data card before proceeding to take the subject's photograph. This process is repeated for each subsequent subject. At the end of the day, the images can be imported into the main job, using the image of the data card to match the photographs to the correct subject data in the job, ensuring proper correlation between images and subject information.
Further Reading: QR Codes and Subject images
QR code shoot cards are a very popular method of matching images to subjects and Families.
Chapter 5: Importing Images
Depending on the method of image capture, the import process will vary slightly. However, regardless of the workflow—whether the photographer is shooting tethered through CapturePost or capturing lead images with data cards—all images should be placed into the corresponding Job’s Image Directory folder.
Importing from CapturePost
After a photographer returns from a job where CapturePost was used, the captured images and data must be merged back into the main Job. To begin, the user will need both the corresponding TNJ file and the folder of images created by CapturePost, typically named JobName#images.
WARNING!
CapturePost will create the Image folder adjacent to the location where the TNJ file is stored. The folder and file MUST remain in their relative locations to each other for the import process to continue, though they may be moved together from one location to another.
For Example, the TNJ and image folder can be moved from a photographer’s local drive to a production file server.
Start by opening the associated Job in NeoPack and switching to Details View. From the menu, navigate to File > Merge TNJ. In the dialogue box that appears, select the correct TNJ file. Ensure that the option Merge - Associated job is selected, then click OK. This process will update the Job’s data by importing any new subjects as well as syncing images and subject data that were modified during the shoot.
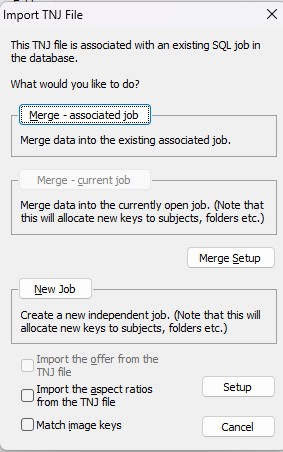
Figure 11: The Import TNJ file window with the Merge- Associated job button selected.
Next, within the Timestone Directory folder structure, locate the Image directory folder. Inside, find or create a sub-folder named EXACTLY the same as the corresponding job. Copy the images from the #images folder into this matching image sub-folder to complete the merge process.
WARNING!
If the images are not copied from the #Images to the Image Directory subfolder or if the Folder and job names are not identical, the job will not be able to access the images, though thumbnails will display within the job.
Further Reading: CapturePost
CapturePost is an application that allows photographers to tether a camera to a computer in order to automatically match images to their subjects.
Importing images from Disk
To import images, first switch to Images Mode in NeoPack. From the top menu, select Images > Import from Disk…. In the pop-up window, click the Selected button to proceed. A file viewer will appear—navigate to the location where the images are stored, select all relevant image files, and click Open. This will populate the import window with the selected images.
Use the Setup… Button in the upper right to launch the Images from Disk Setup window. Here, the user can select from the following options:
Remember or discard the actual path of the image. Discarding the Path will use the Path set in tsAdmin
Control the Image Rotation (if no EXIF data is included) and Mirroring
Apply LUT (Lookup Table Editor)
Apply Sharpening
If the user opts for using lead image barcodes, before starting the import, ensure the following options are enabled:
Check the box Use image Barcode Information
Select the radio button Only lead image has barcode
Optionally, Check the boxes Import lead image and don’t match it
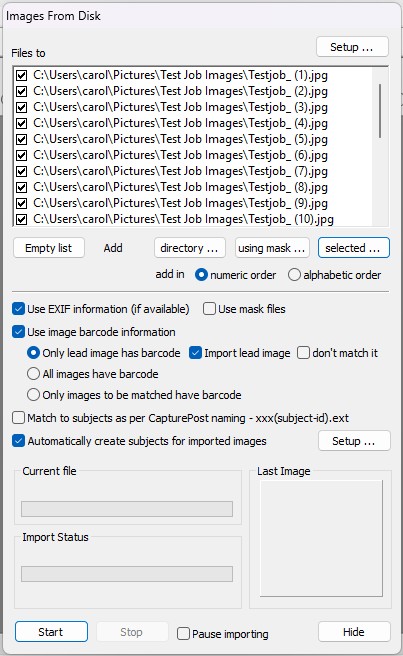
Figure 12: The import images from disk window.
Once these options are selected, click Start to begin the import process. NeoPack will then match each image to the appropriate subject based on the barcode contained in the lead image.
Additionally, within the Timestone Directory folder structure, navigate to the Image directory folder and confirm that a sub-folder exists with the EXACT name of the Job. Copy the image files from wherever they are stored into this matching Image sub-folder to ensure proper organisation and future accessibility.
WARNING!
If the images are not copied from wherever they were stored to the Image Directory subfolder or if the folder and job names are not identical, the job will not be able to access the images, though thumbnails will display within the job.
TIP!
To verify the job and confirm that all images have been correctly added to both the job and the job’s image directory folder, execute the Check Function. In NeoPack, under the Images mode, Select Images>Check.
Chapter 6: Image Matching/ Verification
Once all the images have been imported, check to ensure that all subjects are in their records, primary images are selected, and poses are assigned. Using the data cards and a combination of Match and Poses modes is the easiest way to catch any misassigned subjects.
Match Mode
Once images are imported into a job, the user can switch to match mode to assign or reassign any subjects that were not automatically linked to the correct record.
At the top of the image preview window, there are several filter options available: All, Matched, Unmatched, No Primary, Mismatched, and Eyes Closed. These will help quickly identify images that need attention.
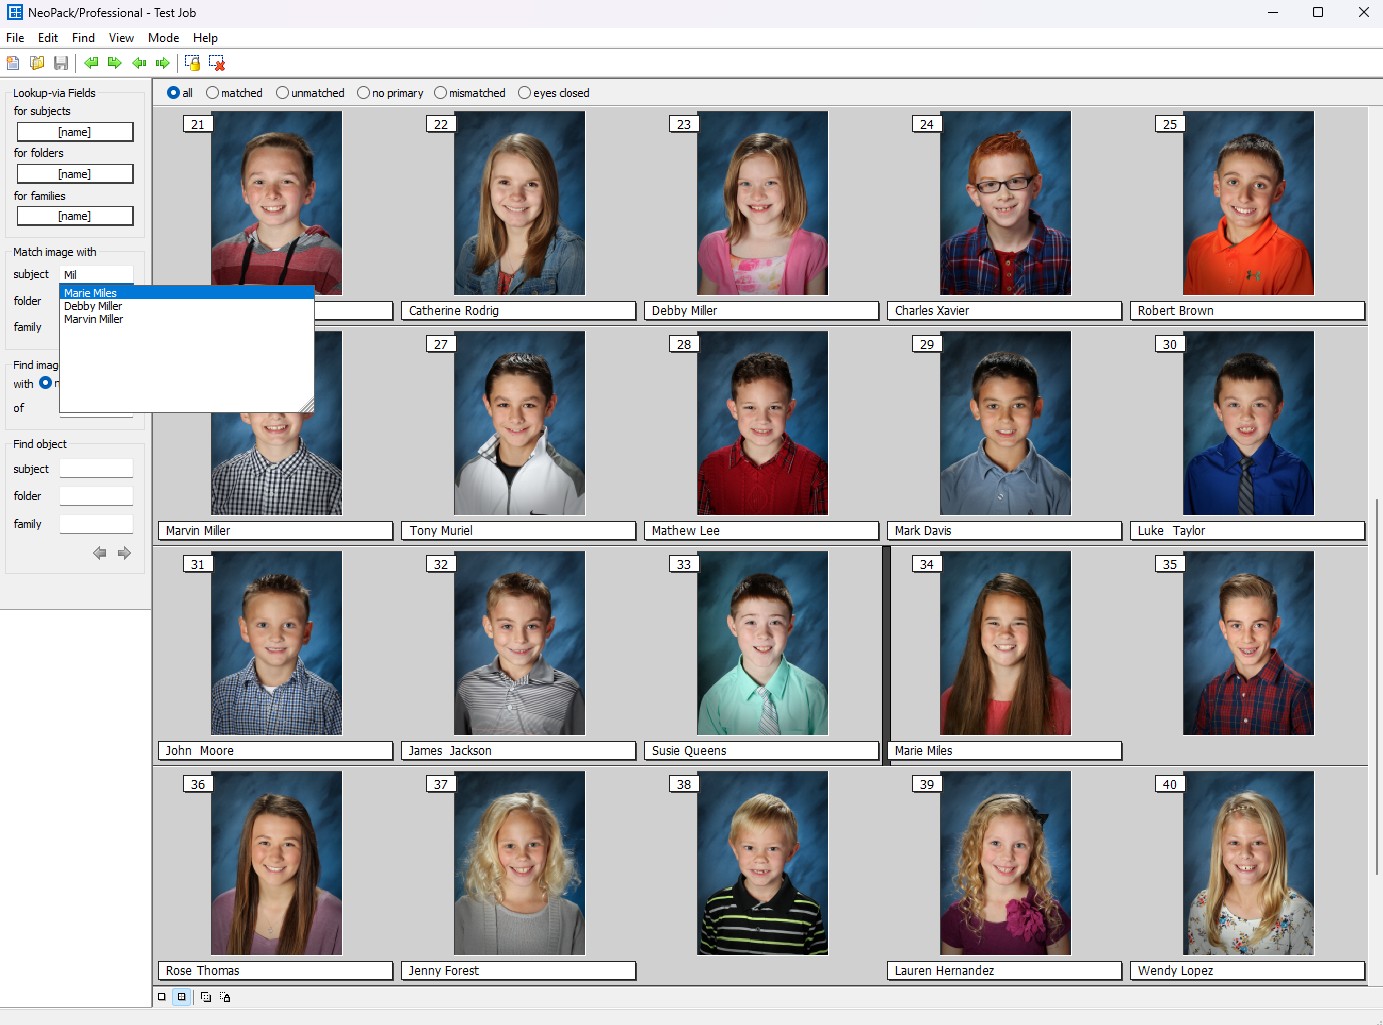
Figure 13: Poses mode showing an image after being matched with its subject.
If an image or images have not been assigned to the correct record, the user should start by selecting the first image in the sequence—an indicator bar will appear to the left of the active image. From there, navigate to Match image with on the left of the screen. In the Subject field, type the name of the desired subject, starting with their last name. The searched subject field with its dropdown results is displayed in Figure 12. Once the correct subject is found, click the name to assign it to the selected image. If that same subject appears in a series of images, each one can be assigned by pressing the Enter key for each image in the sequence.
WARNING!
The Green Arrows are not used to navigate through images! Used in combination with match lock to move unlocked but matched records for the entire job; the “Move Left From Selected”, “Move Right From Selected”, “Move Left” and “Slide Right” should only be used in specific cases.
Further Reading: Match Mode
Match mode is used to manually match, unmatch, and re-match images.
Face recognition can also be employed to assist in identifying mismatched images.
Poses mode
Poses mode is a helpful tool for setting the primary image for each subject, assigning labels to alternate poses, and flagging an image for retouching. It’s also a great way to confirm that each record has only one subject’s images.
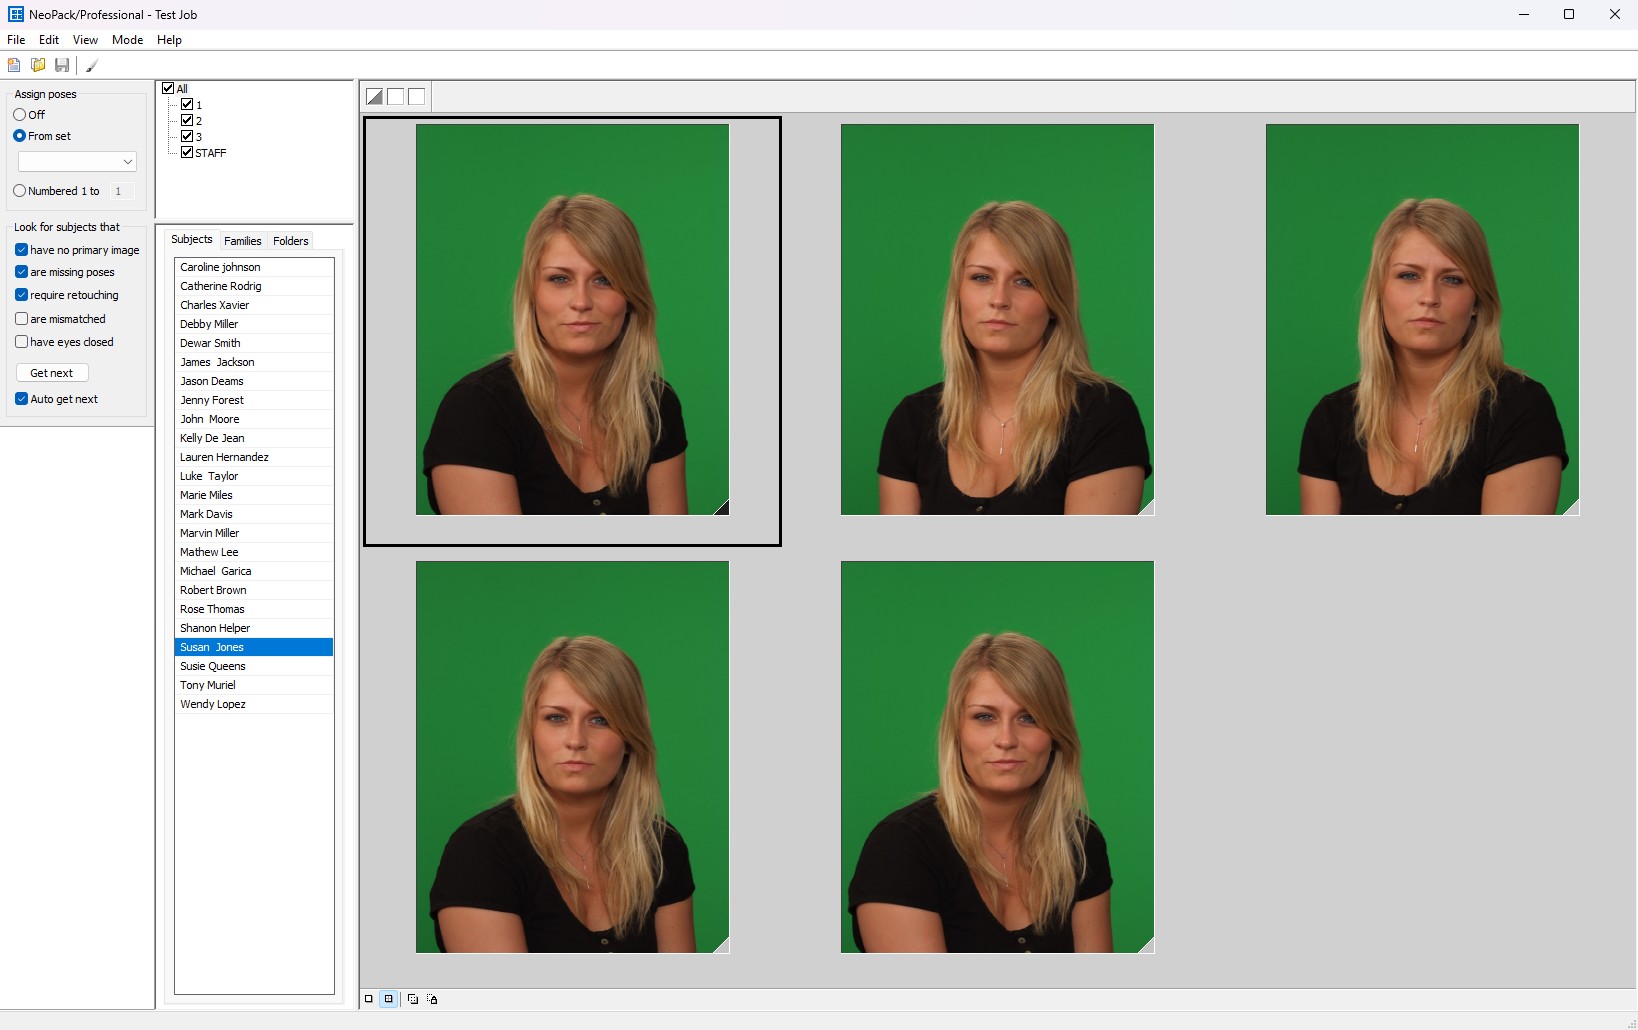
Figure 14: Poses mode with a Subject selected that has 5 images. The Black tab on the lower right of the first image indicates that it is the primary image for the subject.
Once in Poses Mode, select a subject from the list on the left to view all the images assigned to that individual. To mark a main image, simply shift + click the image to designate it as the main image. Each image will have a tab on the lower right corner that indicates its status: black for the primary or grey for alternate.
Using Fields as Tags to Control Subject Order in Poses Mode
To show subjects in image order—displaying only the image number, first name, and last name—start in Details mode. Go to Edit > Fields, then click "as Tags…". In the Details Tag Text window, under "Uniquely Identifying Text for Item," select "Specific" and enter: @Imagetag @Fristname @lastname
Further Reading: Poses Mode
Poses mode is a helpful tool for setting the primary image for each subject, assigning labels to alternate poses, and flagging an image for retouching.
Chapter 7: Orders
There are multiple methods of collecting or inputting order information: importing with a text file, keyboard entry, scanner sheets, and online ordering with tsIOS. This article will only touch briefly on online ordering and will focus mainly on basic keyboard entry of paper orders.
Online Orders
If online ordering is offered, orders must be downloaded via Download online orders under the Orders menu in Orders mode. The user then must identify the order to pair it with the proper record using Orders>Identify order entities…. This launches a new window where the online orders are displayed on the left and can be matched to the subject records on the right. To pair the order with the appropriate subject on the right, click Accept. The application should automatically move to the next entity to be identified.
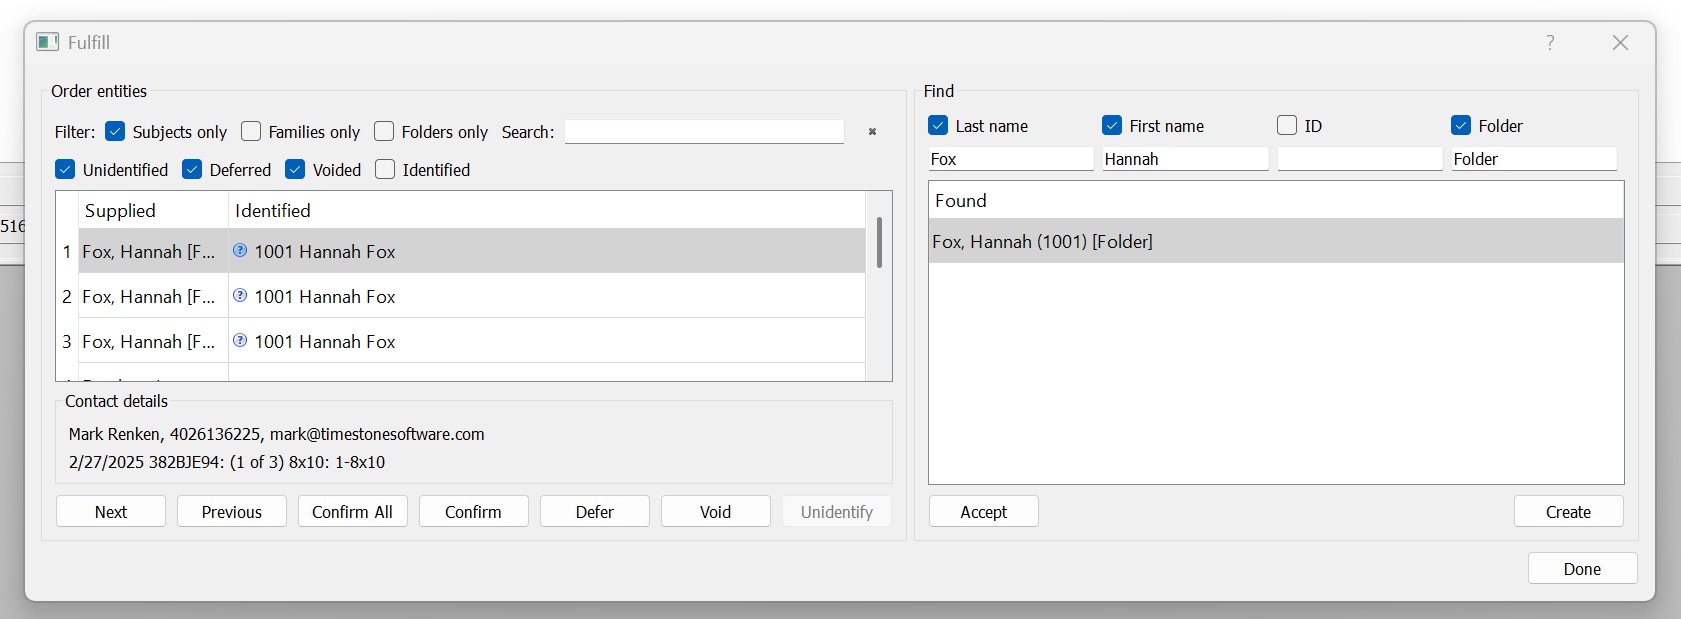
Figure 15: The Identify orders entities screen used in both NeoPack and Fulfill.
TIP!
Orders are downloaded manually into NeoPack but are automatically downloaded into Fulfill; though the identify orders screen is the same.
Further Reading: Online ordering with tsIOS
tsIOS is Timestone Software’s fully integrated Internet Ordering System. Offering a fully custom shopping experience for customers.
Paper (non-online) Orders
There are several ways for a user to input orders in NeoPack:
Keyboard entry in Details mode (F3)
Input via Scanner sheet in Details mode
Importing a text file
This article focuses on the simplest method: Keyboard entry
Note!
Manually adding pages to the queue in Point and Click mode, is not considered an ordering method. When this mode is used no record of the page is tied to the subject or customer, a page is simply added to the queue.
Further Reading: Other Methods of Order Entry
Timestone Software offers multiple methods of paper order entry for non-online orders.
Using the “Add order…” Option
To enter an order manually using the Add order… option, the user must first be in Details mode with the appropriate subject record selected. Then navigate to the Orders>Add order…, or simply press the F3 key to open the order entry pop-up.
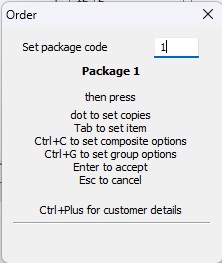
Figure 16: The Keyboard entry window.
The user will then enter the package code in the field, and then be prompted to press the key associated with one of the following options:
Action | Shortcut |
|---|---|
Set Copies | . (Dot) |
Set Item | Tab |
Set Composite Options | Ctrl + C |
Set Group Options | Ctrl + G |
Accept Order | Enter |
Cancel Order | Esc |
View Customer Details | Ctrl + + (Plus) |
As codes are entered, the Package String will update beneath the divider at the bottom of the pop-up window.
TIP!
The first four commands (Copies, Item, Composite Options, Group Options) can be used in any order to enter the relevant order information.
Once all order information is complete, press Enter to accept and finalize the order. It will then display in the Orders column associated with the previously selected record.
Chapter 8: Exporting
Exporting images for editing in an outside application is a common task for users. Below are instructions for exporting images from a job.
Exporting images
Whether exporting all images, a few, or just a single image, the procedure remains fundamentally the same.
In Image mode, select the desired image(s) for export by using the filter options at the top of the preview window or by selecting individual images.
Once the images are selected, navigate to Images> Export. In the pop-up dialogue menu, the user should:
Choose the export location by clicking Browse
Select the appropriate option from the following options by using the ratio button:
All - Exports all available images
Selected - Exports only the images that are manually selected
Filtered - Exports only the images shown in the preview window based on the active filters
Check the box labelled Copy original Files (unadorned, Same file name)
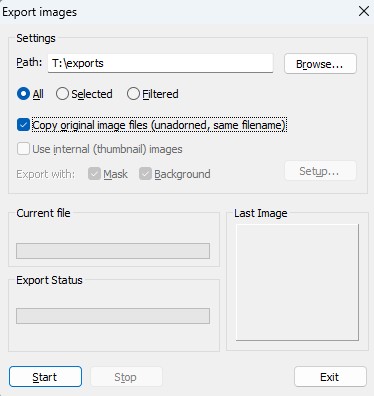
Figure 17: The Image export window.
Once all of the above have been completed, click Start to begin the export.
To stop or pause the Export, use the Stop Button.
Once the Export is completed, use Exit to close the export dialogue window.
TIP!
If a user is only working with primary images, the filter options can greatly narrow down what is displayed in the image preview area. By checking the Using box and then selecting the Primary radio button, only the Subjects’ primary image will be displayed. This combined with the filtered option on the export menu can simplify the export process.
Chapter 9: Refreshing Images
Refreshing images
Once edits are made to an image, the job images must be refreshed for the updated image to display and be recognised as the new primary Image for printing and ordering.
Refresh
The refresh command is utilised to update the image thumbnail within the job. This function allows for a quick update of the images after modifications have been made to the file in the image directory, provided that the file extension remains unchanged. For instance, if an image is chosen for retouching, the file is modified in an external application to eliminate imperfections and saved back in its original location within the job’s image directory, overwriting the original file. To reflect these changes in Timestone, the image must be refreshed.
In Image mode, find and select the image or images that need to be refreshed. Then navigate to Images> Refresh.
Renamed Refresh
Renamed refresh is used to refresh the link between the job and the associated image file when the user has made changes to the file, including the file extension. For example, when the subject of an image is extracted from the background via a third-party application, and the new file is stored as a PNG.
Before beginning the refresh, the user must ensure that the file name remains Identical between the original and the edited versions of the image, even if the file extension changes. For example:
Original: 1239573(12084285).JPG
Edited: 1239573(12084285).PNG
The edited image must then be added to the Image directory folders in the respective Jobs image subfolder.
In Image mode, find and select the image or images that need to be refreshed. Then navigate to the Image menu> Rename Refresh.
This action will give the application a command to refresh the path between the image and the internal thumbnail image while replacing the primary image name in the job with the edited image.
Warning!
File names must match exactly for the Refresh to be successful.
The System will use the newest version of the file, regardless of the file extension.
Chapter 10: Admin and Yearbook Exports
A variety of exports are available as default options within NeoPack, including several Admin and Yearbook export options. Regardless of the export type chosen, the steps are consistent.
The basic steps of the export process are as follows:
In details mode, navigate to File> Export…. A new window will appear with a category drop-down where the user can select the export category: Miscellaneous, US School Admin, or US Yearbook. Once the category is selected, another list of preconfigured export styles will appear. The user can also choose from a few other options, including exporting the primary image only and using internal thumbnails.
Once the user has made their selections, click next.
The user should then designate if the subject names are made of one or two fields, select the correct column headers for both the First and Last name fields, as well as the ID field. Some exports will also ask for additional data to be mapped on similar screens.
Once complete, click next.
The next step is to select how the subjects should be grouped; the user can designate to use a column or use the subject’s home folder. Click Next. If the user chooses the home folder option, they must also choose the folders included in the export.
The user must then set the Export output path using the Browse button and name the folder that the export is placed in. When all settings are chosen, click Finish to begin the Export.
CAUTION
Remember to turn on image backgrounds if images are stored as PNGs!
If a job’s images are stored as PNG a background must be turned on for the image export to render correctly.
To set a background, the user must go to images mode, select the images, the navigate to Images>Background>Set…, and then choose the desired background.
Further Reading: Exports
Admin exports are used for both Yearbooks and in the school/organisation’s internal systems.
FAQ
What types of directories are essential for organising assets in Timestone Software?
Essential directories include Image Directory, Graphics Directory, Template Directory, and Background Directory.
How are templates utilised in creating offers?
Templates are used to design the rendered item and are essential for creating products within offers.
What is the purpose of the Timestone Administrator (tsAdmin)?
tsAdmin is used to set directory paths and manage various configurations within Timestone Software.
What file formats are supported for importing data into Timestone Software?
Supported file formats for importing data include CSV, Tab Delimited Text, and Fixed-Length Text.
How can users create a new Offer in Timestone Software?
Users can create a new Offer by navigating to the Offers/Packages section in tsAdmin and selecting the New Offer icon.
What types of layouts can be selected when creating templates?
Users can choose from Pack Layout, Item Sheet Layout, Sizable Item, Fixed Size Item, and Package Layout when creating templates.
What steps should be taken to set up directories for managing assets in Timestone Software?
Users should create an Image Directory, Graphics Directory, Template Directory, and Background Directory, ensuring they are easily accessible and backed up.
How do users activate their NeoPack license after installation?
After installing NeoPack, users need to locate their license keys and activate them by opening the file and logging in with their credentials.
What is the process for creating a new Job in Timestone Software?
To create a new Job, users must launch NeoPack, navigate to File > New, enter a name for the Job, and select the appropriate Season, Account, Workspace, and Offer.
Can users customize the layout of templates in Timestone Software?
Yes, users can select from various layout options, such as Pack Layout, Item Sheet Layout, and others, when creating templates.
What is the purpose of data cards for photographers in Timestone Software?
Data cards help photographers match subject information with their photographs in the field, including details like job title, season, and subject ID.