Almost all are the result of user-defined templates.
Several types of templates are available depending on their use and the application in which they will be used. This article will focus on NeoPack and its 2 main template types:
Layouts - defining prints or packs
Items - a design placed onto a layout
The different types of templates are as follows:
A Pack Layout is the most common type of template and is used to create Products for subjects, folders or families. It defines the position of the elements in a product, including holes(placeholders) for the image, graphics, items, or text.
This is the default selection when a new template is made.
An Item Sheet Layout defines a page used for item sheets, including the area where the items are placed.
It is used in combination with Fixed Size Items.
A Sizeable Item has an abstract size and is scaled to fit within an image hole on a Pack Layout. It is only used in combination with a Pack Layout.
For example, the user can create an overlay for a dance as a Sizeable Item which can be used in conjunction with all Pack Layouts regardless of their size. NeoPack then takes this template and places it into the Image Hole(s) of the associated Pack Layout.
A Fixed Size item has an explicit size. Like Sizable Items, it can be used on Pack Layouts but is more commonly used to form Item Sheets with or without an Item Sheet Layout.
A common use of Fixed Size Items is to create sheets of ID cards, proofs and camera/data cards.
Package Templates are utilised by IOS to display a preview of the package.
Further reading: Package Templates
Package Preview Templates (more commonly referred to simply as Package Templates) are a stand-alone template that are used to depict a package in the Timestone Software Internet Ordering System (IOS). r
Coming Soon
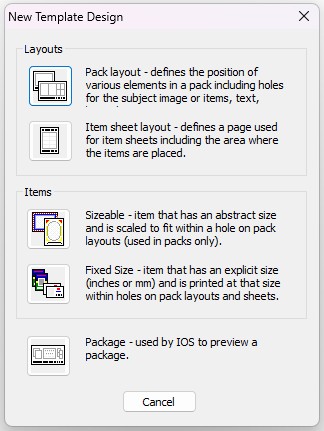
Figure 1: New Template Window
Creating a Pack Layout Template
A Pack Layout template is a single print size or a group of print sizes that will form a package.
To create a new Pack Layout Template:
Switch to Mode> Template Designer
Choose New. This will launch the new template window, shown in Figure 1 above
Choose Pack Layout from the selection, and a blank template will be created
Set the Page Size
The first step when designing a layout is to set the page size required. When creating a single print size, this is the size of that print. When designing a package, it is the size of the completed pack. Set the page size by clicking on the white background canvas.
To change the page size:
Select the correct units by clicking the units drop-down
Click on the blank white canvas to ensure it is active
Enter the desired page size
Click Apply
Placing Objects
The various objects can be placed upon the template canvas by:
Choosing the object to place by clicking the appropriate icon on the toolbar
Clicking and dragging the object area onto the template canvas
Setting the object options
Setting the object size
NOTE
When selected the handles on an object or the background will become active as well as the size entry area.
Creating a Single Print Size Layout
The subjects’ images are displayed in 'holes' that are positioned on a template. A template can accommodate various numbers of holes based on the user's design, and these holes can vary in size and orientation. The applications will automatically adjust the image's scale and rotation to optimally fit each hole.
To create a single image hole, click the Place Image Hole button. The cursor changes to the Place Object cursor. Position the mouse over the area on the page where the user wants the hole to appear. Click and drag a box over the page to place the hole. This will display the Hole options window; the user will then make a selection and click OK.
TIP
It is not important perfectly place the hole in the correct spot at this point. the user can adjust the the hole’s position and size at any time.
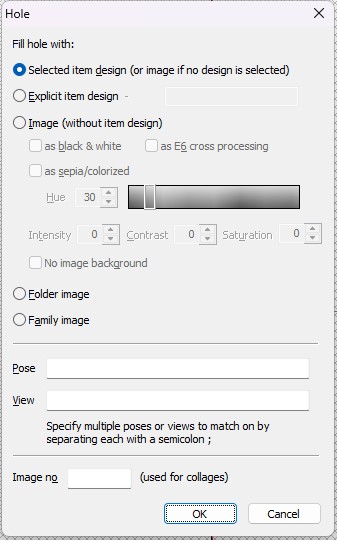
Figure 2: Hole Option Menu
There are several options available when placing an image hole:
Selected Item Design (or image if no design is selected) - any item design can be filled into the hole
Explicit item design - a specified item design will be placed in the hole.
Image (Without Item design) - A simple image will be placed into the hole, regardless of whether an item has been selected. The colour options below can be applied as a filter:
As black and white
As E6 cross processing
As Sepia/Colorized
Folder Image - The image matched to the folder (e.g., a team photo) will be placed in the hole
Family Image - The image matched to the family (e.g., a sibling photo) will be placed in the hole
Pose Lock - Only allow certain poses to be filled into the hole (ie, a senior formal pose). Multiple poses can be added to a by separating them with a ;
View Lock - Only allow certain views to be filled into the hole, similar to the above
Image No (Used for collages primarily with OutPost) - Specify the image number in the collage to be placed in the hole.
Positioning and Sizing the Objects
All objects can be positioned and sized using the mouse, or more accurately, with the Object dimensions entry on the toolbar. Choose the object by clicking it; the active object will have handles displayed.
Sizing and positioning with the mouse
To resize an object with the mouse, click and drag one of the handles to the desired position.
To move an object, click and drag inside the selected object; the object will move with the mouse until the mouse button is released.
Sizing and positioning with the toolbar
More exact control of the size and position of an object can be achieved by using the Object Dimensions toolbar. Choose the desired object, then click the value the user wants to adjust. Pressing the Tab key switches to the next entry area. Once all the required changes have been made, click Apply.
For Example, to create a single print layout that is 5×7” in the portrait orientation, set the X and Y offset to 0,0 and the Size to 5, 7, and click Apply. The Image Hole object is placed in the top left corner, and is sized to 5×7”.
NOTE
Units can be changed using the unit dropdown on the toolbar.
Creating a Package Print Layout
By positioning more than one image hole onto the layout canvas, the user can create a package print template.
When this layout is selected in the main program, the image is placed into each of the image holes, automatically scaled and rotated to fit the hole. To create the Pack Layout, set the page size large enough so all the required prints fit on the canvas. Place the first print size as demonstrated in the previous section. Now, place another Image Hole object. Select it, and set the offset value and size so that it is correctly positioned in the layout. Continue placing Image Holes until the pack layout is complete.
TIP
If the Pack Layout would be cut, the user can add cut marks to the template to indicate where the cuts will occur.
To add a Cut Mark, Select Edit> Cut Marks… then indicate the orientation of the mark and its location on the canvas.
Example: Creating a Package layout for an 8×10 and two 5×7 prints
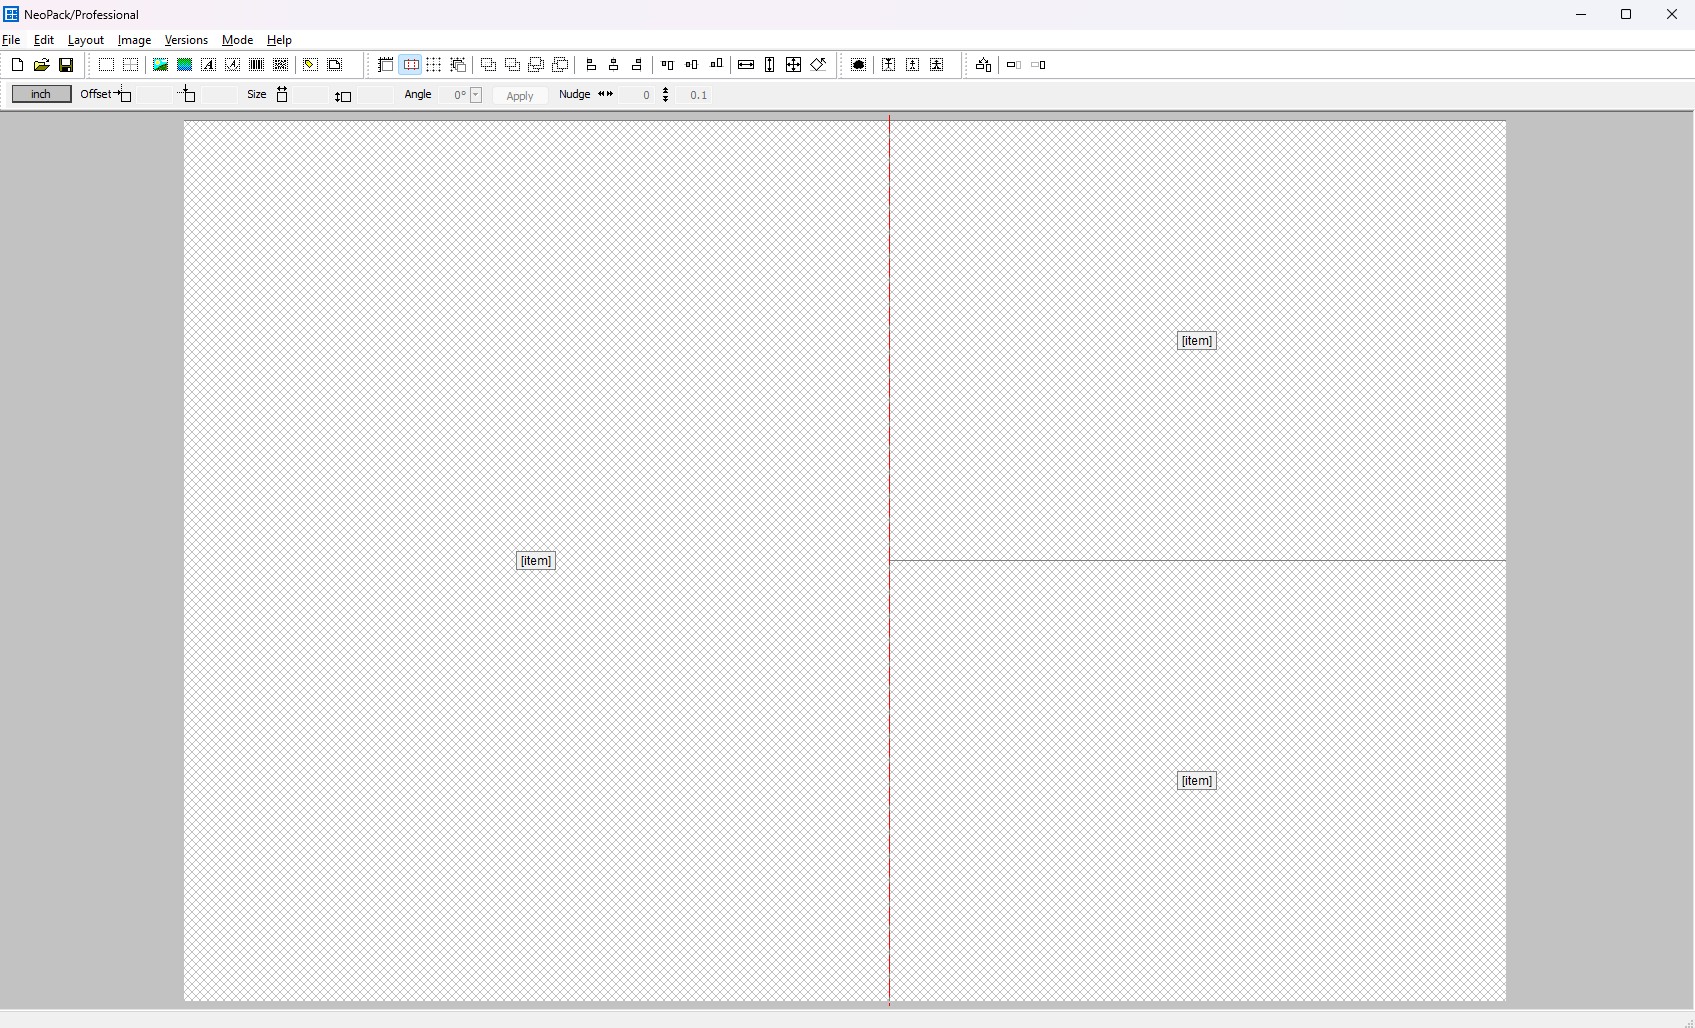
Figure 3: Template designer window with a pack layout including an 8×10” and two 5×7” prints
Set the page size
Create a new Layout. Click the Page background. Note that the Size values become available, but not the Offset. Set the page size to 15, 10 to allow for all the required print sizes to be placed onto the canvas.
.jpg)
Figure 4: Intended Print Layout.
Place the 8×10" hole
Choose the Image Hole button, then click and drag the mouse over the template canvas area. A new Image Hole object is placed onto the canvas. It is not important to be accurate in the placement or sizing of the hole at this point.
Size and position the 8×10” hole
Select the image hole by clicking it. Note that the object handles appear, indicating it is selected, and that the Object Dimensions entry boxes in the toolbar become available to edit.
The Offset values represent the top left corner of the object. In this example, the top left corner of the hole should be positioned in the absolute top left of the layout. Enter the values 0,0 for the Offset. Now enter the print size of 8, 10, then click Apply. The hole is positioned in the top left corner and sized to 8x10".
.jpg)
Figure 5: Illustration of an image hole with the offset indicated.
Place the first 5x7" hole
After the 10x8" hole has been placed, click the Image Hole button again, and click and drag another Image Hole onto the layout canvas. Again, it is not important to be accurate. After placing the second hole, select it by clicking it with the mouse.
Size and position the first 5×7” hole
With this print, the top left corner of the first 5×7 is positioned at the top right corner of the 10x8" print. This means that the 5x7" print origin is 8,0. Enter these values in the Offset values of the toolbar.
Now, enter the width and height into the Size entry boxes. The correct size is 7, 5. Click Apply. The second hole is positioned and sized as shown.
.jpg)
Figure 6: Illustration showing the placement and offset of the first 5×7” hole
Place the second 5x7" hole
After the first 5x7" hole has been placed, click the Image Hole button again. Click and drag another Image Hole onto the layout canvas. Again, it is not important to be accurate.
After placing the second hole, select it by clicking it with the mouse.
Size and Position the second 5×7” hole
The top left corner of the second 5×7 hole should be positioned at the bottom left corner of the first 5x7" print; this means that the second 5x7" print origin is 8,5. Enter these values in the Offset values of the toolbar.
Now, enter the width and height into the Size entry boxes. The correct size is 7, 5. Click Apply. The second hole is positioned and sized as shown.
.jpg)
Figure 7: Illustration showing the placement and offset of the second 5×7” hole
Saving the Template
Once the layout is complete, the user must save the template into the applicable template directory folder (pathed in tsAdmin) for the applications to use it. Several attributes should be set before completing the template.
Setting the Template Design Properties
The user can specify a variety of properties on the Design properties menu located under File>Properties.
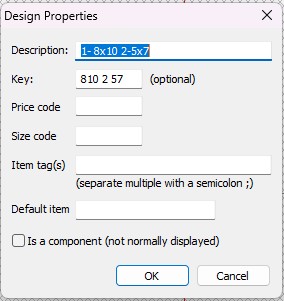
Figure 8: Design Properties Window
If the description field is left blank, the application will assume the template's filename should be used as the description.
A unique key for each template should be entered and copied exactly to create the product in tsAdmin. Template keys and filenames (IDs) should not be reused, as this can cause the application to have issues loading the proper template. To check for duplicate template IDs and keys for a given job, use the Template Report on the Help menu.
Further Reading: The Template Report & Creating a Product in tsAdmin
The template report provides the operator with a wealth of information regarding the templates available to a particular job.
A product can be considered to be anything that is “produced” in the Timestone Software applications. By adding products to Packages in Offers, the products can then be ordered by customers.
Save the template
Once the properties are set, the user can save the template.
WARNING
If the user does not have the paths appropriately set up in tsAdmin for the location the file is saved, the applications will not be able to find the template.
To save the template, choose File> Save to open the save dialog box, select the appropriate location, and click Save.
The template is now ready for use.
Troubleshooting
Once a template is saved and the appropriate information set up in tsAdmin, the user may need to close and re-open the job for the new template to appear. This is because Template Paths are read when the job is opened.
Further Reading: More on Templates
The efficient and organized storage of templates is one of the most important administrative considerations for a user.
The Template designer allows for several types of graphic elements to be included in an item design.
In addition to print templates, the user can create Customer versions of templates that will be displayed in Timestone’s Online Ordering System.
FAQ
What are the main types of templates available in NeoPack?
The main types of templates in NeoPack are Layouts and Items.
What is a Pack Layout?
A Pack Layout is a common type of template used to create products for subjects, folders, or families, defining the position of elements in a product.
How do I create a new Pack Layout template?
To create a new Pack Layout template, switch to Template Designer mode, choose New, select Pack Layout, and a blank template will be created.
What is the difference between a Sizeable Item and a Fixed Size Item?
A Sizeable Item has an abstract size and is scaled to fit within an image hole on a Pack Layout, while a Fixed Size Item has an explicit size and is commonly used to form Item Sheets.