When forming composite group pages, several methods are available to control the placement of staff images.
These include:
Sorting the subjects on the page so that staff appear first (or last)
Reserving the top or bottom row for subjects in a ‘Staff’ folder
Adding a subject block area to the page template that is populated by subjects in a ‘Staff’ folder
Adding labelled image holders to the page template that call specific staff members.
This article assumes a certain familiarity with the basics of creating templates and forming composites.
Further Reading: Creating Composites
NeoComposite templates are powerful combinations of graphics, text, and various replaceable objects. They are created with the integrated Template Designer by placing and positioning the various elements.
Form Pages mode enables users to create composites by selecting a combination of page templates, subject blocks, included subjects, and other settings.
Including faculty
When adding subjects to a composite, it is possible to add the entire folder of faculty or staff, or select which individuals should be included in the composite on the Composite Settings dialog window when creating the composite page in Form Pages Mode.
To add all the subjects in the given folder, simply check the box next to the desired folder.
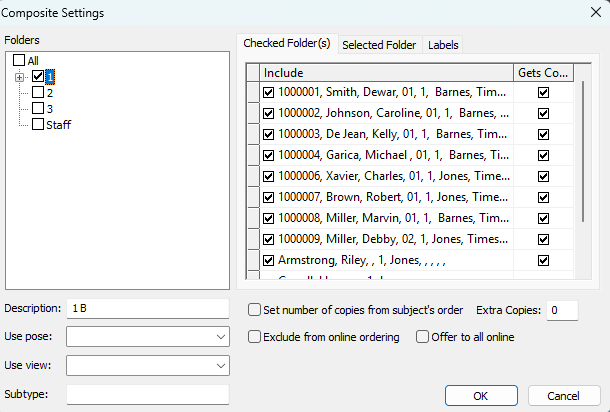
Figure 1: Selecting a folder of subjects to include in a composite
To add specific subjects:
Select the desired folder, but do not check the adjacent box
Navigate to the Selected Folder tab
Check the desired subjects
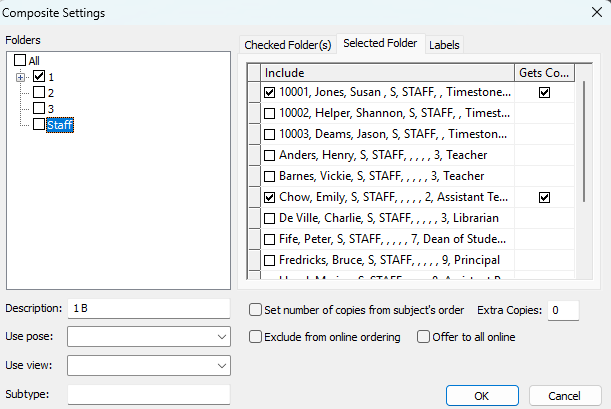
Figure 2: Selecting individuals from a folder to be included in a composite
Method 1: Sorting the subjects
In Form Pages Mode under the Subjects to Include Menu, the user simply includes all the desired subjects, or folders, including the faculty. the choost the desired Composite page and subject block template on the Composite Page settings menu, a scroll icon on the toolbar. Also located on this window is the Sort Order area allows subjects to be sorted by up to three different fields in ascending or descending order.
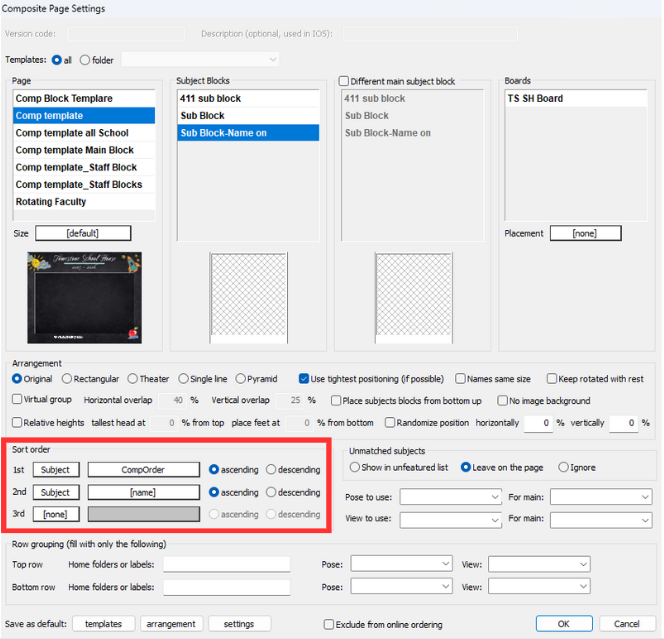
Figure 3: The Composite Set Details menu with the Sort Order option in red.
This allows the user to have the subject blocks displayed in a variety of ways simply by changing the Sort order of the subjects.
Additionally, the user can add a sort field, “CompSort” in the example, to finely control the order of the subjects in the group. This allows certain subjects to be placed at the front or back of the front or back of the composite at will. The field is added in details mode and is an integer value. Any subject that does not have a number assigned is assumed to be 0, so the user should select a sequential number with the subject that should be the “leader” or the “tail” of the composite, given the highest number.
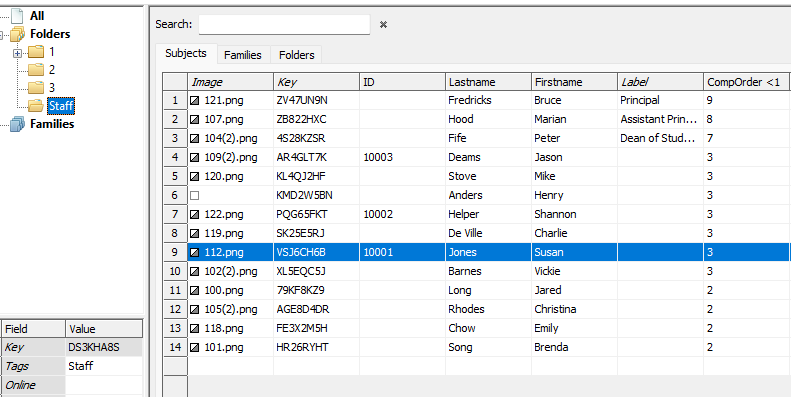
Figure 4: Details mode showing the staff folder with values in the created CompOrder field and values
Note
Subjects can be given the same sort number or not given one at all. If left blank, a value of zero is assumed.
See the three composite examples below; the only difference between them is the order in which the subjects are sorted.
This composite was simply sorted by the subject’s name only, with no regard for other subject information, such as grade, etc.
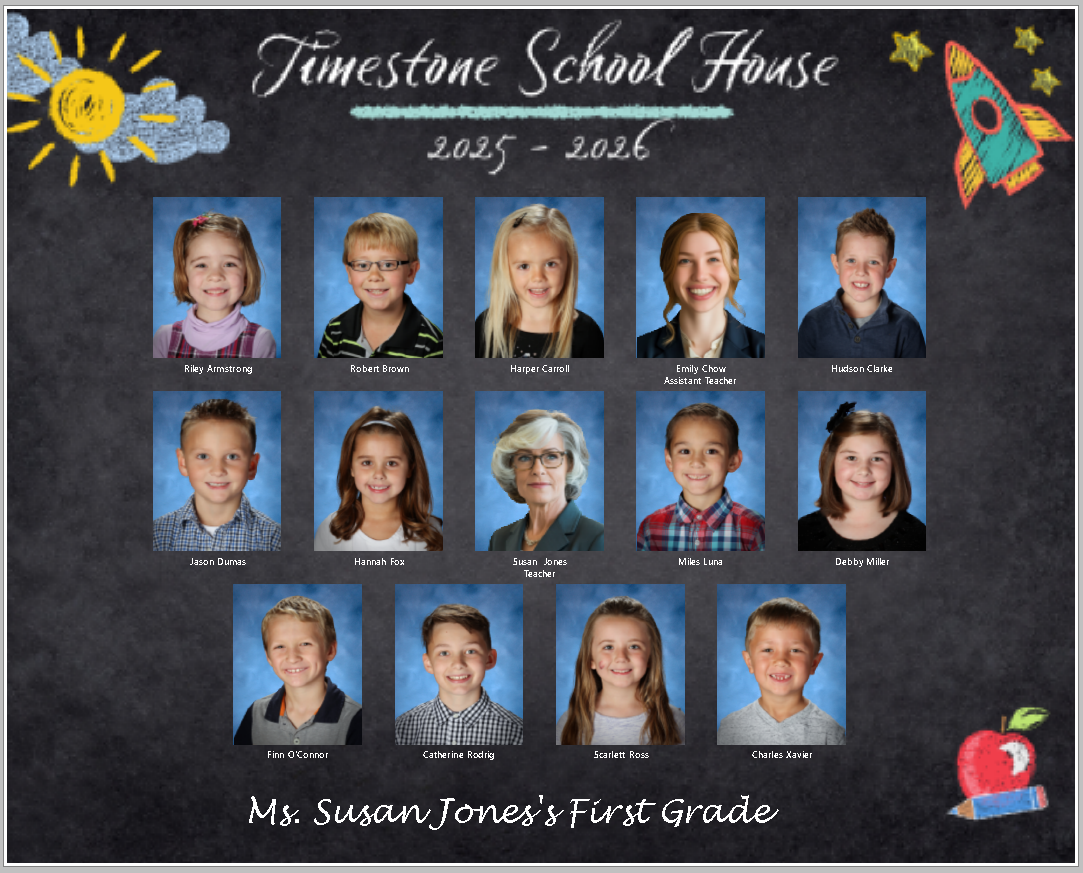
Figure 5: A composite with the images in alphabetical order by subject name.
The Sort Order for this composite is displayed below:

Figure 6: The sort order for Composite A
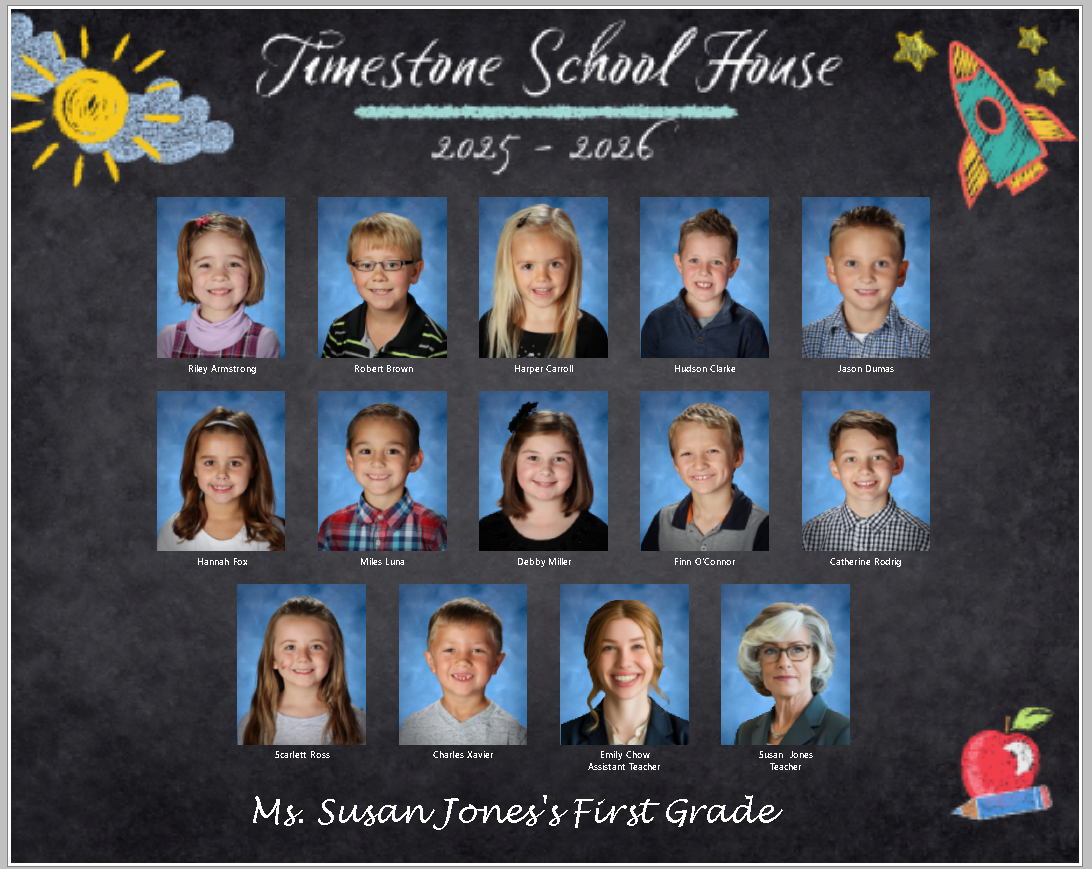
Figure 7: Composite B
The primary sort level is now the CompOrder field. Since the children do not have a value in this field (effectively, it is zero), they appear first and in Name order (thanks to the second level sort). The assistant, Emily Chow, has a value of 2 in the CompOrder field and so appears before the teacher (Susan Jones), who has a value of 3 in the CompOrder field

Figure 8: The sort order for Composite B
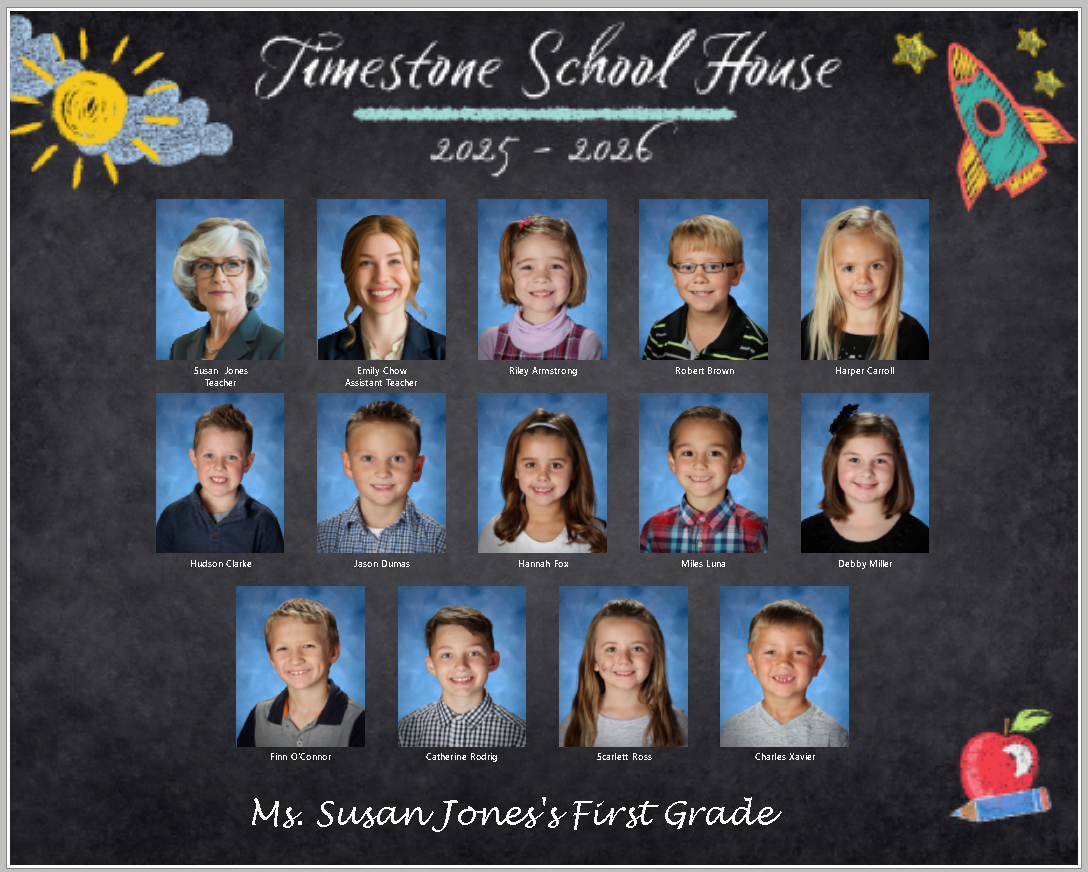
Figure 9: Composite C
The primary sort level is still the CompOrder field, but is now descending. Susan Jones has the highest value in this field (3) and so appears first, followed by Emily Chow (value of 2). The children effectively have a value of zero in the CompOrder field and so appear last, sorted by name, thanks to the second level sort.

Figure 10: The sort option for Composite C
Method 2: Reserving a row
When adding subjects to a composite, it is possible to reserve a row at the top or bottom of the comp area for a specific folder, “Staff” in this case, by making use of the Row Grouping area of the Set Composite Details window.
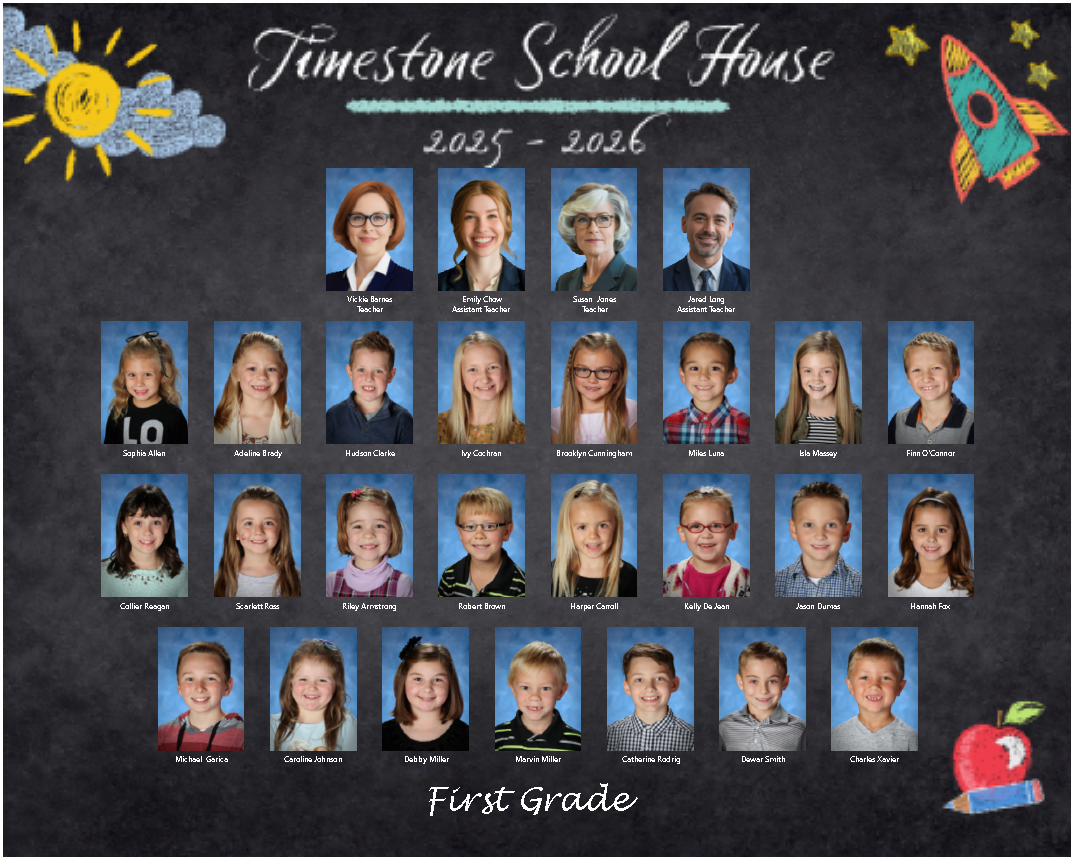
Figure 11: A composite with four staff members on their reserved row
To reserve a row for the “Staff”, simply select the desired subjects by the folder and or individually and create a composite in the same method as the above sorting method. Pause when you are on the Set Composite Details window.
Just below the Sort Order section is the Row Grouping section; in Figure 11, the top row is reserved for staff, and thus the “Staff; folder was added to the Top Row Home folders or Labels: section as shown in Figure 12.

Figure 12: The Sort Order and Row Grouping for the Composite shown in Figure 11
Method 3: Creating a separate block area
This method is perfect for adding the same group of subjects to each composite. As such, it is ideally suited for ‘Whole School’ composites where all the faculty members are to be shown in their own area,
For example, a school photographer wishes to display the selection of faculty in a class composite in their designated area at the top of the design.
NOTE
It is important to note that this method will cause the images of the staff to be scaled with the student images, ensuring that all subject blocks (images) remain the same size even though they are in two separate block areas.
To begin, the user must either add a label to the individual subjects or create a new home folder for the special subjects to be included in the composite. Labels and folders are created and managed in Details mode. This Faculty group can just include the subjects that the user wishes to include in the composite: the principal and a select group of teachers, for example.
Once the Folder is created or a Label applied, the user must navigate to the Template Designer to make a second Block area on the template that has been filtered to the folder or label(s).
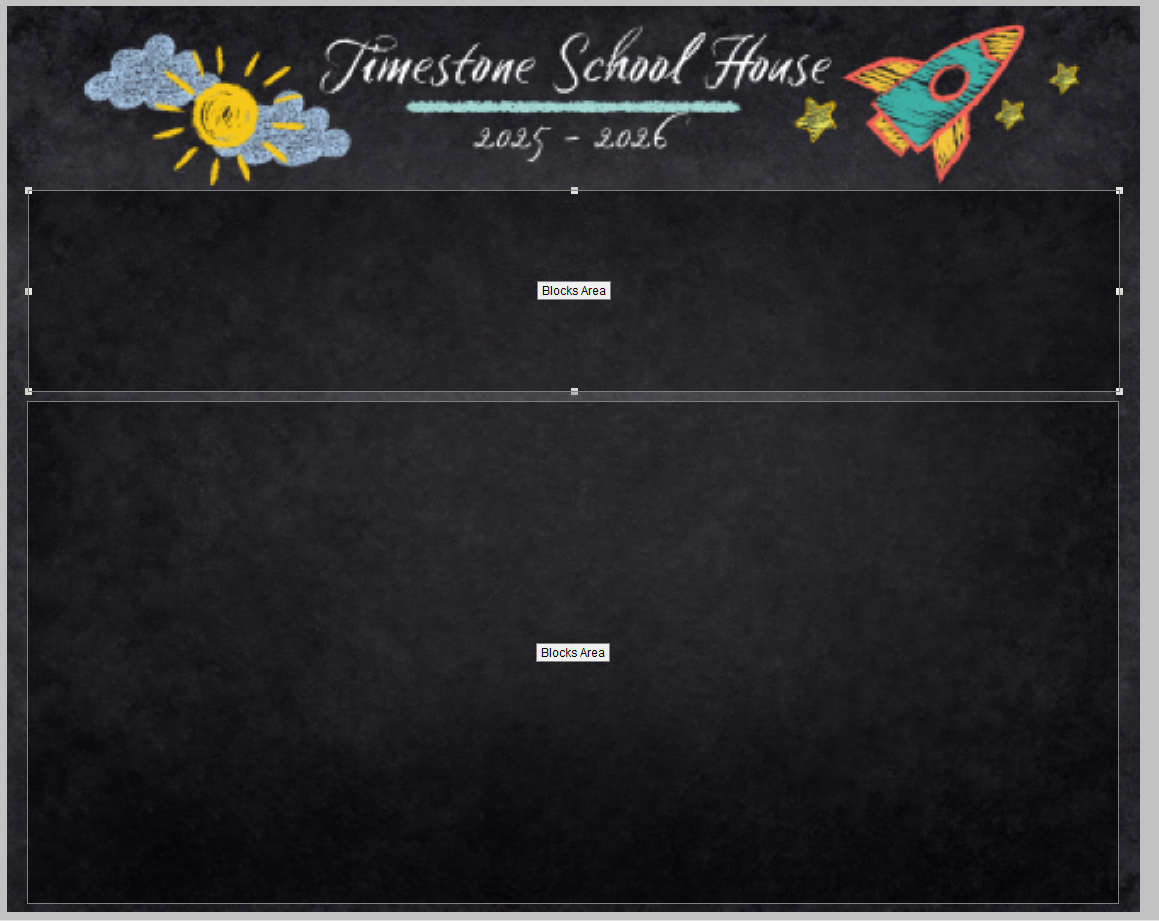
Figure 13: A Template with two designated block areas
To apply a filter to the block area:
Create a block area by clicking the Block area icon on the toolbar and then clicking and dragging to place the object. This will open the Block Area dialog window.
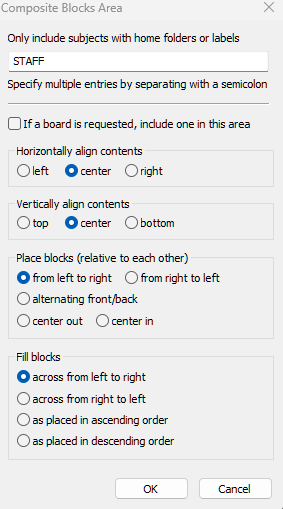
Figure 14: The composite block settings window
In the Dialog window, in the Only include subjects with the home folder or label text area, input the selected folder name or label(s) applied to the selected faculty (a Staff folder in the example).
Click OK
NOTE
If adding more than one folder or label, each entry must be separated with a semicolon “;“.
As indicated, this applies to Home folders only - when selecting ‘Subjects to include’ for this area, be sure to select them from their Home folder.
Forming the page
Having created the composite page layout as described above, the composite is formed in the usual method - using Form Pages mode to select the Subjects to be included in the composite, selecting the desired faculty folder and the desired student folder(s) to be included in the Composite.
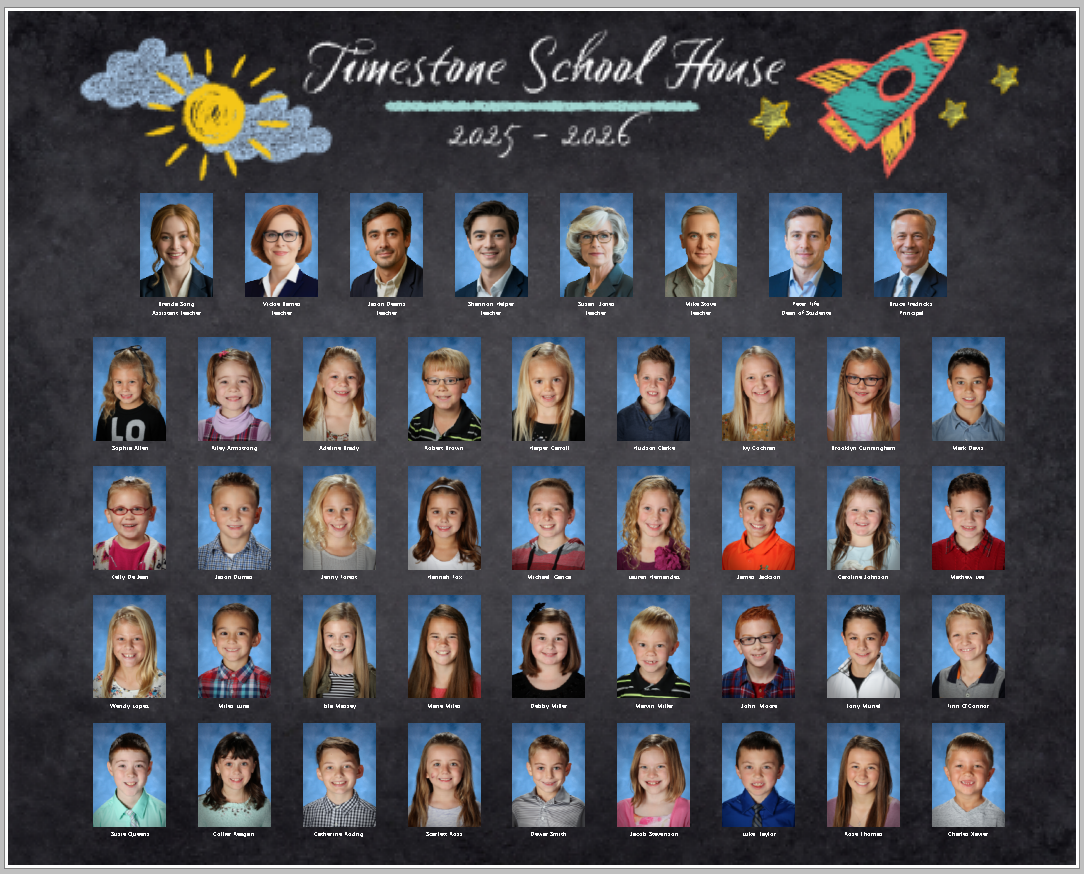
Figure 15: A composite with the faculty on their own Block
Method 4: Using labels
Labeled image holders can be used to include Staff members on the page but outside of the main block area. This is useful if the Faculty members need to be a different size to the students for example.
The example shown below shows a composite page with labeled image holders for the principal and the teacher. In this example the principal and teacher were respectively labelled as ‘Principal’ and ‘Teacher’.
Recommendation
Adding faculty members to composite pages using labels offers great flexibility however it is the least automatic method. It is generally only used when:
The staff are not to be included with the other subjects in the main block area
The staff images are required to be a different size (usually bigger) than the other subjects
Creating the template
Design the composite page layout as normal but with the addition of two labeled image holders - with labels of @principal and @teacher respectively.
Add text boxes which reference the label as such @<label>:name - e.g. @<principal>:name and @<teacher>:name
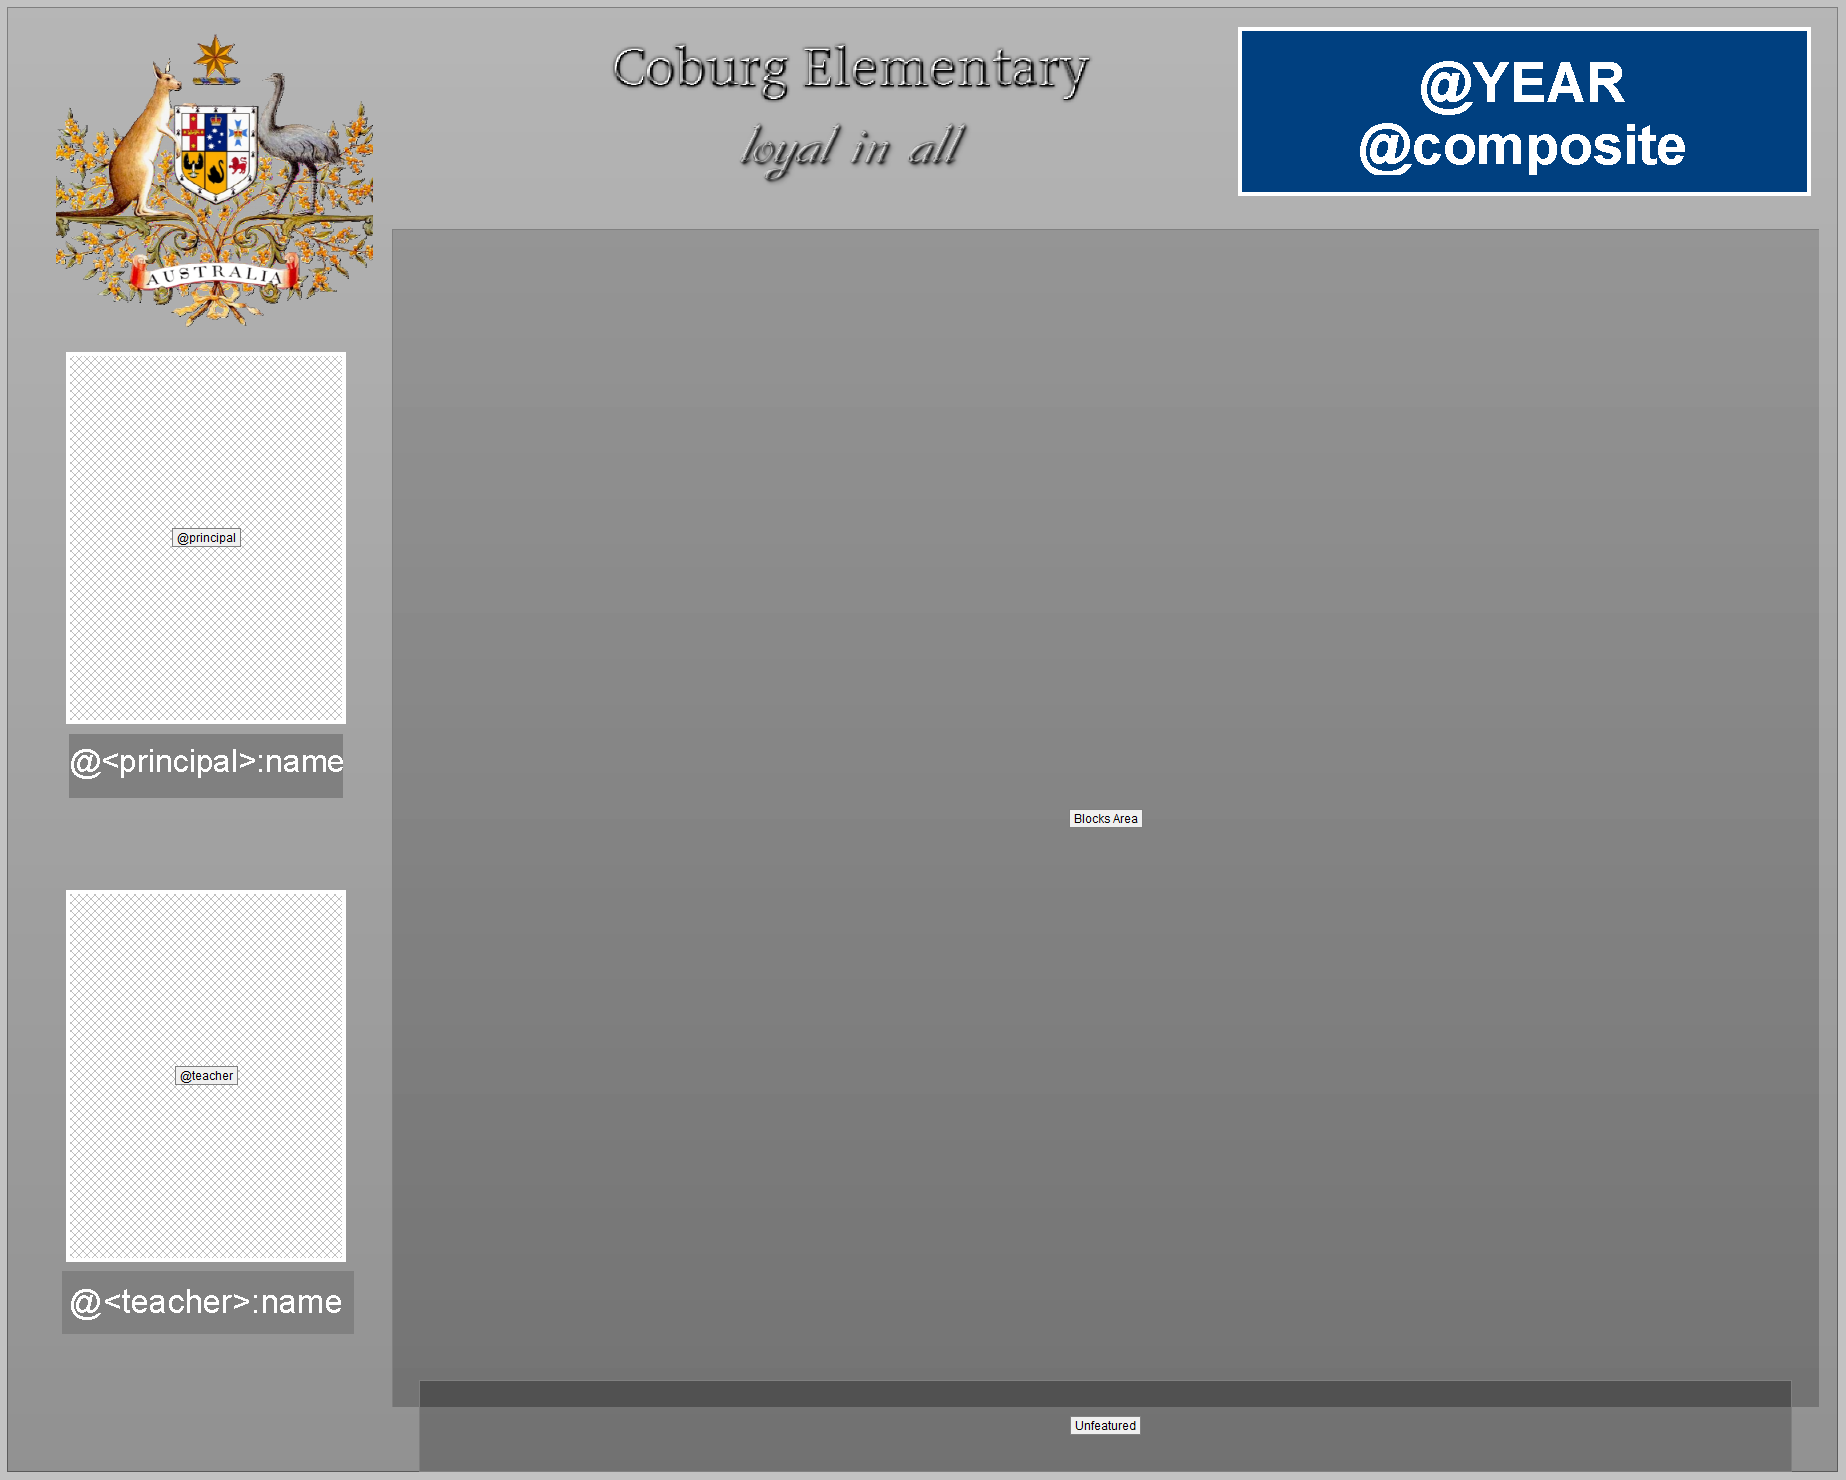
Figure 16: A composite page layout with labeled images and text boxes
Labelling the principal
Since there is typically only one principal of a school, simply locate the principal in the staff folder of the job and give them the Label of Principal. This will allow the system to pull the principal’s image even though the image does not belong to a selected grade folder.
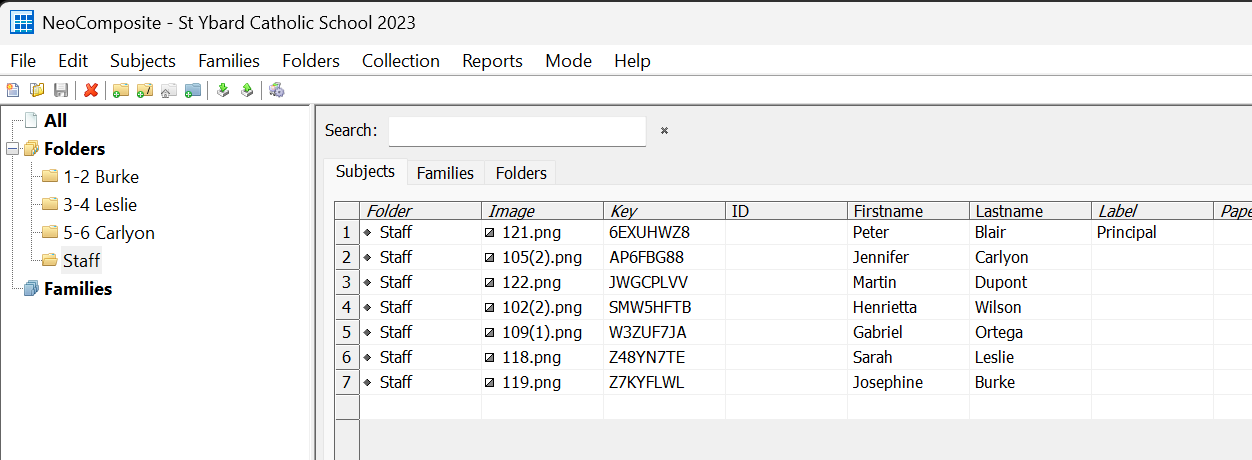
Figure 17: Details mode showing the Label field with Principal labelled
Labelling the teacher
Typically, the teachers cannot be labelled in Details Mode in the same way as the Principal, since there would be many teachers. Instead the teacher is labelled ‘on the fly’ as each composite page is formed.
In the Subjects to Include window check the folder for the composite
Select, but do not check, the Staff folder
Select the Labels tab
Label the teacher
Complete forming the composite page
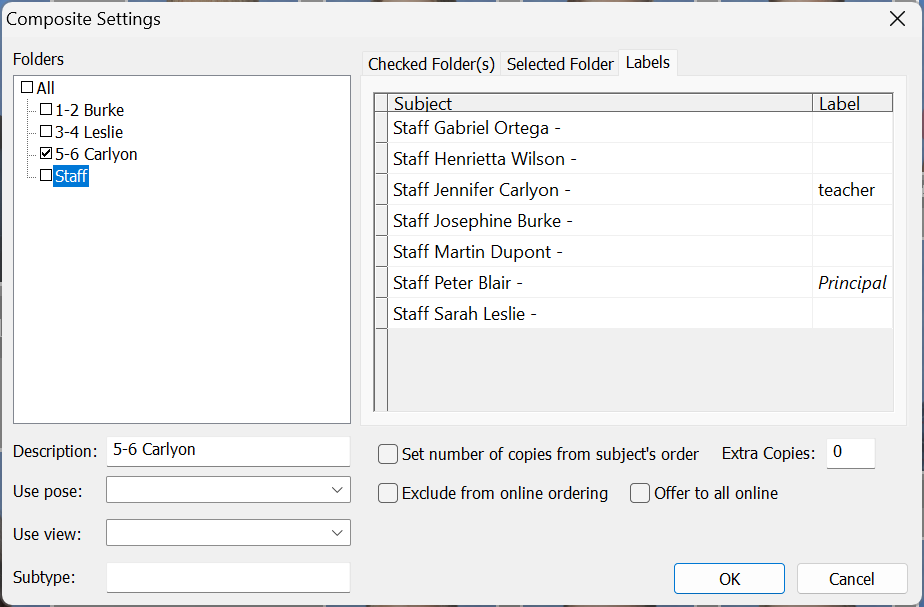
Figure 18: Labelling the teacher ‘on the fly’ as the composite is formed
The result
Figure 19 below shows the result of all the steps above. It should be evident that this method of adding faculty works best when the number of faculty members on the page is consistent from page to page.
.jpg)
Figure 19: The composite with Principal and Teacher
FAQ
What methods can be used to control the placement of staff images on composite group pages?
Several methods include sorting subjects, reserving rows for staff, adding subject block areas, and using labeled image holders.
Can I add all faculty members at once when creating a composite?
Yes, you can add an entire folder of faculty or select specific individuals during the composite creation process.
What’s the best way to add staff to a composite?
There is no best way as it will depend if the composite is a single class composite, a year level composite or a whole school composite. For single class composites, the most popular method is to add the staff with the students but sorted so they appear first. Year level composites often will have all the staff in the first or last row. Whole school composites which can have too many staff for a single row are often best done using a subject block area dedicated to the staff folder.
I need the principal, teacher and helper on the composite as bigger images than the kids.
You will need to add them as labeled images. The template needs labeled image holders for Principal, Teacher and Helper. Then the appropriate labels are added. The principal is labelled in Details Mode. The teacher and helper are labelled when forming the composite page in the Subjects to include window.