Pack Item templates (also referred to as Item Templates, Item Designs, Item Options, or simply Items) are of two different types and used in the following two ways:
Sizable Items: These are only used in conjunction with a Pack Layout template (.plt). They have an abstract size enabling them to scale and fit within image holes on the Pack Layout. They are used creatively to modify an image hole on a Pack Layout.
Some common applications are:
Add decorative borders, personalization, or logos
As design options in IOS
Build Your Own Packages in IOS
Adding backgrounds to image holes
Fixed Size Items: These have an explicit physical size and are printed at that exact size. They are most often used to create Item Sheets in Item Sheets Mode.
ID Cards
Camera Data Cards
Proof Sheets
Second Chance cards
INFO
Sizable items and Fixed Size Items are separate template types although they share the same template filename extension; .pit.
Take care when starting a new Item Template that you select the correct type.
Item templates are created and managed in NeoPack’s Template Designer Mode and can include any combination of images, graphics, or text elements. However, it is important to note that barcodes—both traditional 2D and QR (3D)—must be used only on Fixed Size items.
Further Reading: Designing Templates
Many of the Template Designer’s tools and features are common across apps, even though the templates being created differ.
The Template designer enables the incorporation of various elements, both static and dynamic, into any design.
Creating an Item Template
When creating an Item Template, the first step is to determine whether the item should be a fixed-size or sizable template.
Fixed size items are typically used for small ‘items’ that will be printed as a sheet in Item Sheets Mode. They are created at a precise size, meaning they can accept barcodes and QR codes, as these objects also require a precise size.
Sizable items are a design element with an abstract size that scales to fit into the image hole(s) of the Pack Layouts they will be used with. They are therefore designed with an aspect ratio that matches that of the Pack Layout’s image hole.
To create an Item Template:
Open the NeoPack Template Designer Mode (F8)
Navigate to File> New
Select the desired item template type, Sizable or Fixed Sized, by clicking the icon next to the description.
Click the white page area and set the desired dimensions or aspect ratio
Add image holes, graphics, text, or other design elements as desired
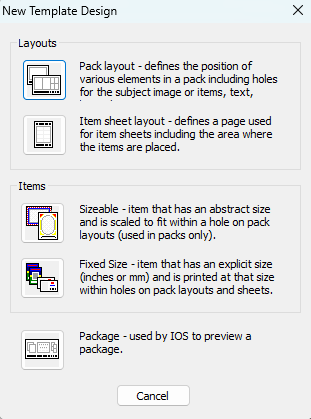
Figure 1: The New Template Design window
Items for horizontal and vertical images
Unlike Pack Layouts (.plt), which automatically rotate images to fit within an image hole, images are NOT rotated in Item Templates (.pit). Instead, Item Templates can be created with both vertical and horizontal versions if images in both orientations are expected.
Orientation versions are especially useful for products using layout elements such as logos, graphics, and text that need to be adjusted based on image orientation.
The software automatically selects the correct version depending on the orientation of the selected image.
Further Reading: Templates with Orientations
Item designs, both fixed and sizeable, may be designed with both vertical and horizontal orientations.
Item Tags
By default, all Items can be accepted by any Pack Layout.
This behaviour may be undesirable in the Timestone Internet Ordering System (IOS) as an online customer could select an Item option that is inappropriate for the product being ordered. For example, a photographer may wish to offer a Yard Sign with different Item designs to choose from. Those Items should only be applicable to the Yard sign. This control can be achieved by adding Tags to both the Item template and the Pack Layout template.
The principle of tags is simple:
Tags
Items with tags can only be accepted by Pack Layouts with matching tags
Adding an Item Tag
Open the item in the Template Designer
Navigate to File> Properties
In the Item tag(s) field, enter your desired tag.
Save the template
Open the corresponding Pack Layout template in the Template Designer
Navigate to File>Properties and enter the same tag in the appropriate field
Optionally, add a default item by adding the template Name to the Default item field
Save the template
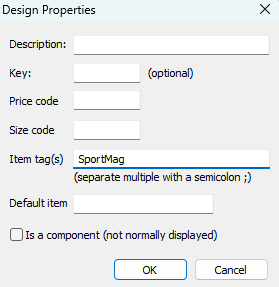
Figure 2: The Design Properties menu.
Further Reading: Items in IOS
Further information regarding using Items in IOS, including controlling when they are offered as options, is available in the document:
Example - ‘Build Your Own’ packages
A very common use of items is with online ‘Build Your Own’ packages, where item designs are used to offer different configurations to a product.
This important concept is discussed in its own article.
Further Reading: “Build Your Own” Packages
‘Build your Own’ packages, also known as ‘Create your Own’ or ‘Pick Your Own’ packages, are customizable packages that allow the customer to select different configurations for the products in the package. This is achieved with item design templates as described in the article:
Example - A yard sign with three design options
A Photographer wishes to offer a 24×18-inch graduation yard sign product with 3 options. The templates used in this example are available for download.
The General Steps are as follows:
Create the templates. Templates can be created in either order as long as the item tag is added.
Create the Product
This template will essentially act as the “Canvas” that dictates the size of the final product and displays an item template within it.
To create the Pack Layout template :
In NeoPack’s Template Designer, create a New pack layout template
Set the Canvas size to 24×18 inches
Add an image hole set to “Selected Item Design.”
Under File> Preferences, add a Description, Key, an Item Tag, and a default item
For the Description, enter something simple and recognizable
For the Key, enter a value that can be entered easily in the product creation page in tsAdmin, “YD24×18” in this example
For the Item Tag, it is important to choose something that will not be accidentally called upon for another product, “GradYardSign” in this example. This tag should be kept the same for all Layout Templates (plt files) and Item Templates (pit files).
For the Default Item, the user can choose to display any of the item designs that will be made in the next step.
Save the Template As “YardSign”
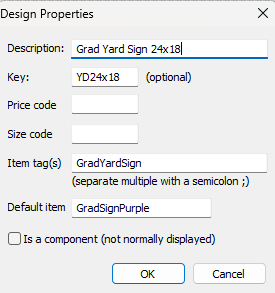
Figure 3: The Design Properties menu
To create the item templates:
In NeoPack’s Template Designer, create a new item template
Set the Canvas size to 24×18. This ensures that regardless of fixed size or sizeable, the design is the exact size or the same aspect ratio as the PLT file.
Add the desired Image hole(s) and other design elements onto the template.
Under File> Preferences, add the appropriate Item Tag. It is important to use the exact same tag that was used on the Pack layout templates, “GradYardSign” in this example. This should be kept the same for the Layout Template (PLT) and all the appropriate Item Templates (PIT files). The user can also opt to give the item a customer-friendly description that will display instead of the filename, Graduate Design A, B, and C are used here.
Save the Template. In this example, the options are GradSignPurple, GradSignWhite, and GradSignBlack, all with the extension “.pit”
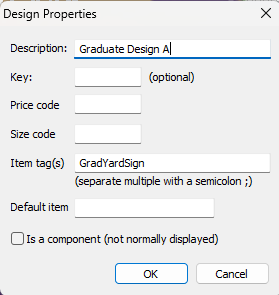
Figure 4: The design properties window
In tsAdmin, the product is created using a Pack Layout Template (PLT). Only the product associated with the PLT file needs to be created, as the individual items are offered as options for that product through the use of Item Tags.
Once the product has been created, it can be added to an Offer and Package, making it available for ordering through any of the standard methods. Optionally, the user can assign a Package Template or a preview image that will display online.
When an order is placed online, customers will see additional buttons on the customization screen, allowing them to select their preferred layout, as shown below. Note that the customer is being presented with the description of the Item template instead of the file name.
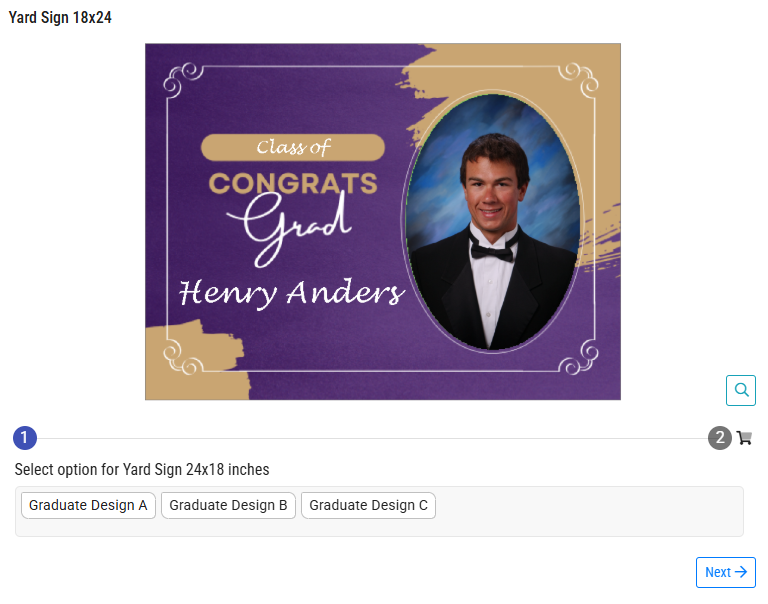
Figure 5: The yard sign product and its 3 options as shown online.
Charging for Item design “Options"
When used in IOS as options, Items can be assigned a price that will be added to the package price.
Pricing is controlled through a combination of item properties and pricing rules in tsAdmin and is described in detail in the article below.
Further Reading: Charging for Item Options
In IOS, item designs may be offered as “options” to package, both free and chargeable.
Calling an Explicit Item Template on a Pack Layout Template
In some products, the user may want certain Item Templates—such as themed borders or fixed designs—to apply automatically, without customer input. This can be done using the Explicit Item Design option on an image hole on a Pack Layout template, which assigns a specific Item Template to an image hole.
NOTE
When an item is explicitly called into a layout’s image hole, it is ‘fixed’ meaning that no other item design can be used in its place. This is an important distinction to be made compared to using a ‘Default’ item as described earlier.
A Default item will also automatically be displayed but can then be changed when ordering whereas an Explicit item can not.
Further Reading: Explicit Item Designs
The Explicit item design option on an image hole allows the user to lock a particular item template into place on a pack layout for consistent, non-editable designs.
FAQ
The barcode on my item template isn’t working?
Check that the item template is a Fixed Size Item. Barcodes and QR codes should be placed on fixed-size items to render properly. If the problem persists, there are more in-depth troubleshooting options in the Using Barcodes in a Template article, here: Troubleshooting Barcodes.
Can I place an item template on another item template?
No, an Item Template can NOT be placed on another Item Template. Item Templates can only be placed on Item Sheets or Pack layout Templates.
What is the difference between an Explicit Item Design and a Default Item?
An Explicit Item Design locks a specific item template in place on a pack layout template, while a Default Item can be changed by the user or customer.
Is it necessary to select the correct type of Item Template when creating one?
Yes, it is important to select the correct type (Sizable or Fixed Size) when starting a new Item Template. Once the type is selected, there is no way to change it, and the user must create a new template.