CapturePost is an application that allows photographers to tether a camera to a computer in order to match images to their subjects while shooting.
Installation
To begin working in CapturePost, the User must download the application from the Timestone Software Website and have a valid USB hardlock (dongle).
The Hardlock authenticates the program and contains the CapturePost license code therein, along with its expiry date.
WARNING
The Hardlock must remain in place while the application is running. If the dongle is unplugged, the photographer cannot continue working.
Creating a TNJ file from an existing SQL job
Since CapturePost is used onsite and therefore unable to connect to the MySQL database, it uses a stand-alone TNJ file, which is a snapshot of data within the MySQL job.
Before photography, the job data is exported from NeoPack into a TNJ file. The export is available in Details Mode> File>Export to TNJ. The file is then saved to the CapturePost computer, where it is opened for photography. Any changes made to the MySQL version of the job after the TNJ was exported will not be reflected in the TNJ file.
Further Reading: Beginning a Job in NeoPack
Before a photographer can shoot into CapturePost, a job should be created in Neopack or another Timestone Application, and the data should be imported.
TIP
Once the job is created in NeoPack, the user can generate Data Cards with a barcode or QR Code that are used in CapturePost to find a subject before taking their photos. Once the subject is found, images are automatically matched to the subject in the Data Card until the next Data Card is read and the next subject found.
Note, subjects can also be found by keyboard look-up and new subjects can also be added directly in CapturePost if needed.
Further Reading QR Codes Data Cards
QR Code shoot cards are a very popular method of matching images to subjects and Families.
Setting up for image capture
Once CapturePost is installed and the job is open, the user can configure several setup options, including camera tethering, image rotation, file name prefixes, and guides.
Most of these settings are found under File > Setup.
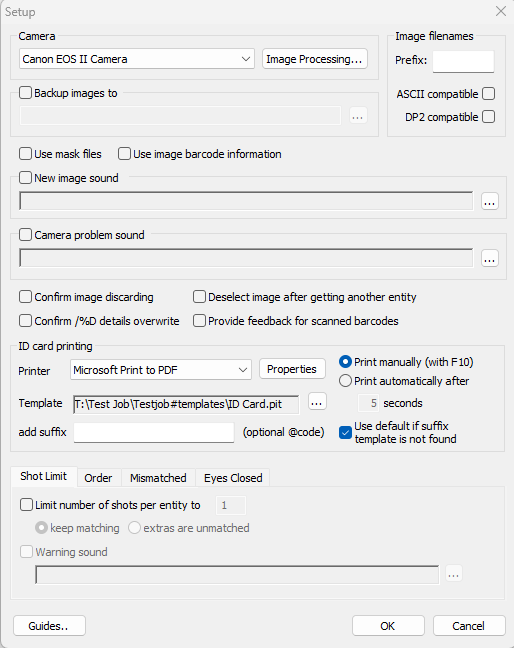
Figure 1: The CapturePost Setup Menu
Under the Camera section of the setup window, the photographer can select the appropriate camera driver from the drop-down menu or configure a hot folder.
CapturePost supports a variety of Camera drivers internally, but can also support any digital camera capable of tethered shooting via the Hotfolder option.
NOTE
If the hot folder option is selected, the photographers must also set up options under the Camera>Settings menu in CapturePost to indicate to the application where the the hot folder is located.
Clicking the Image Processing… button will launch a secondary window with options for image rotation and mirroring, including automatically rotating the image with the camera EXIF data.
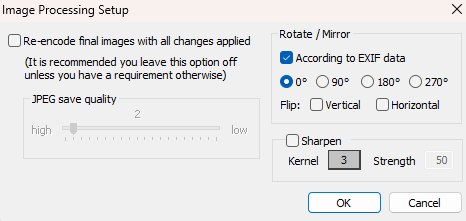
Figure 2: The Image Processing Setup menu
The Image Prefix option allows users to insert a static prefix at the beginning of file names.
TIP
This is especially useful when multiple photographers are working on the same job, or when a photographer revisits a location for retakes.
For example, on a school picture day with two sets, each photographer can assign a unique prefix to their images. On a retake day, adding an “A” to the prefix makes it clear at a glance which images are absentees or retakes.
Located at the bottom left of the setup window, the Guides… button launches a secondary window to display guide overlays while photographing.
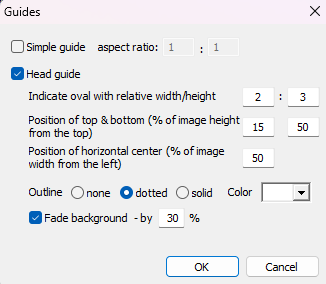
Figure 3: The guides menu
There are two main guide types:
Simple Guide- A simple guide that shows a particular aspect ratio
Head Guide- A Oval Guide that is used to approximate the average size of the head of the subject.
The Fade Background setting applies an opacity filter over areas outside the guide, helping the photographer focus on framing.
Shooting and assigning images
A photographer’s basic process will essentially be as follows:
As a Subject approaches the photographer, the photographer will either scan the barcode on the subject's Data Card, photograph the subject’s QR code, or search for the subject in CapturePost. Once found, the photographer can continue, capturing images of that subject, repeating this process for each subsequent subject.
Unlike the other applications, CapturePost has one main view. This shooting screen has five main components:
The Camera Status Indicator
The Preview Area
The Image Carousel
The Subject Search/Get Area
The Subject Details Area
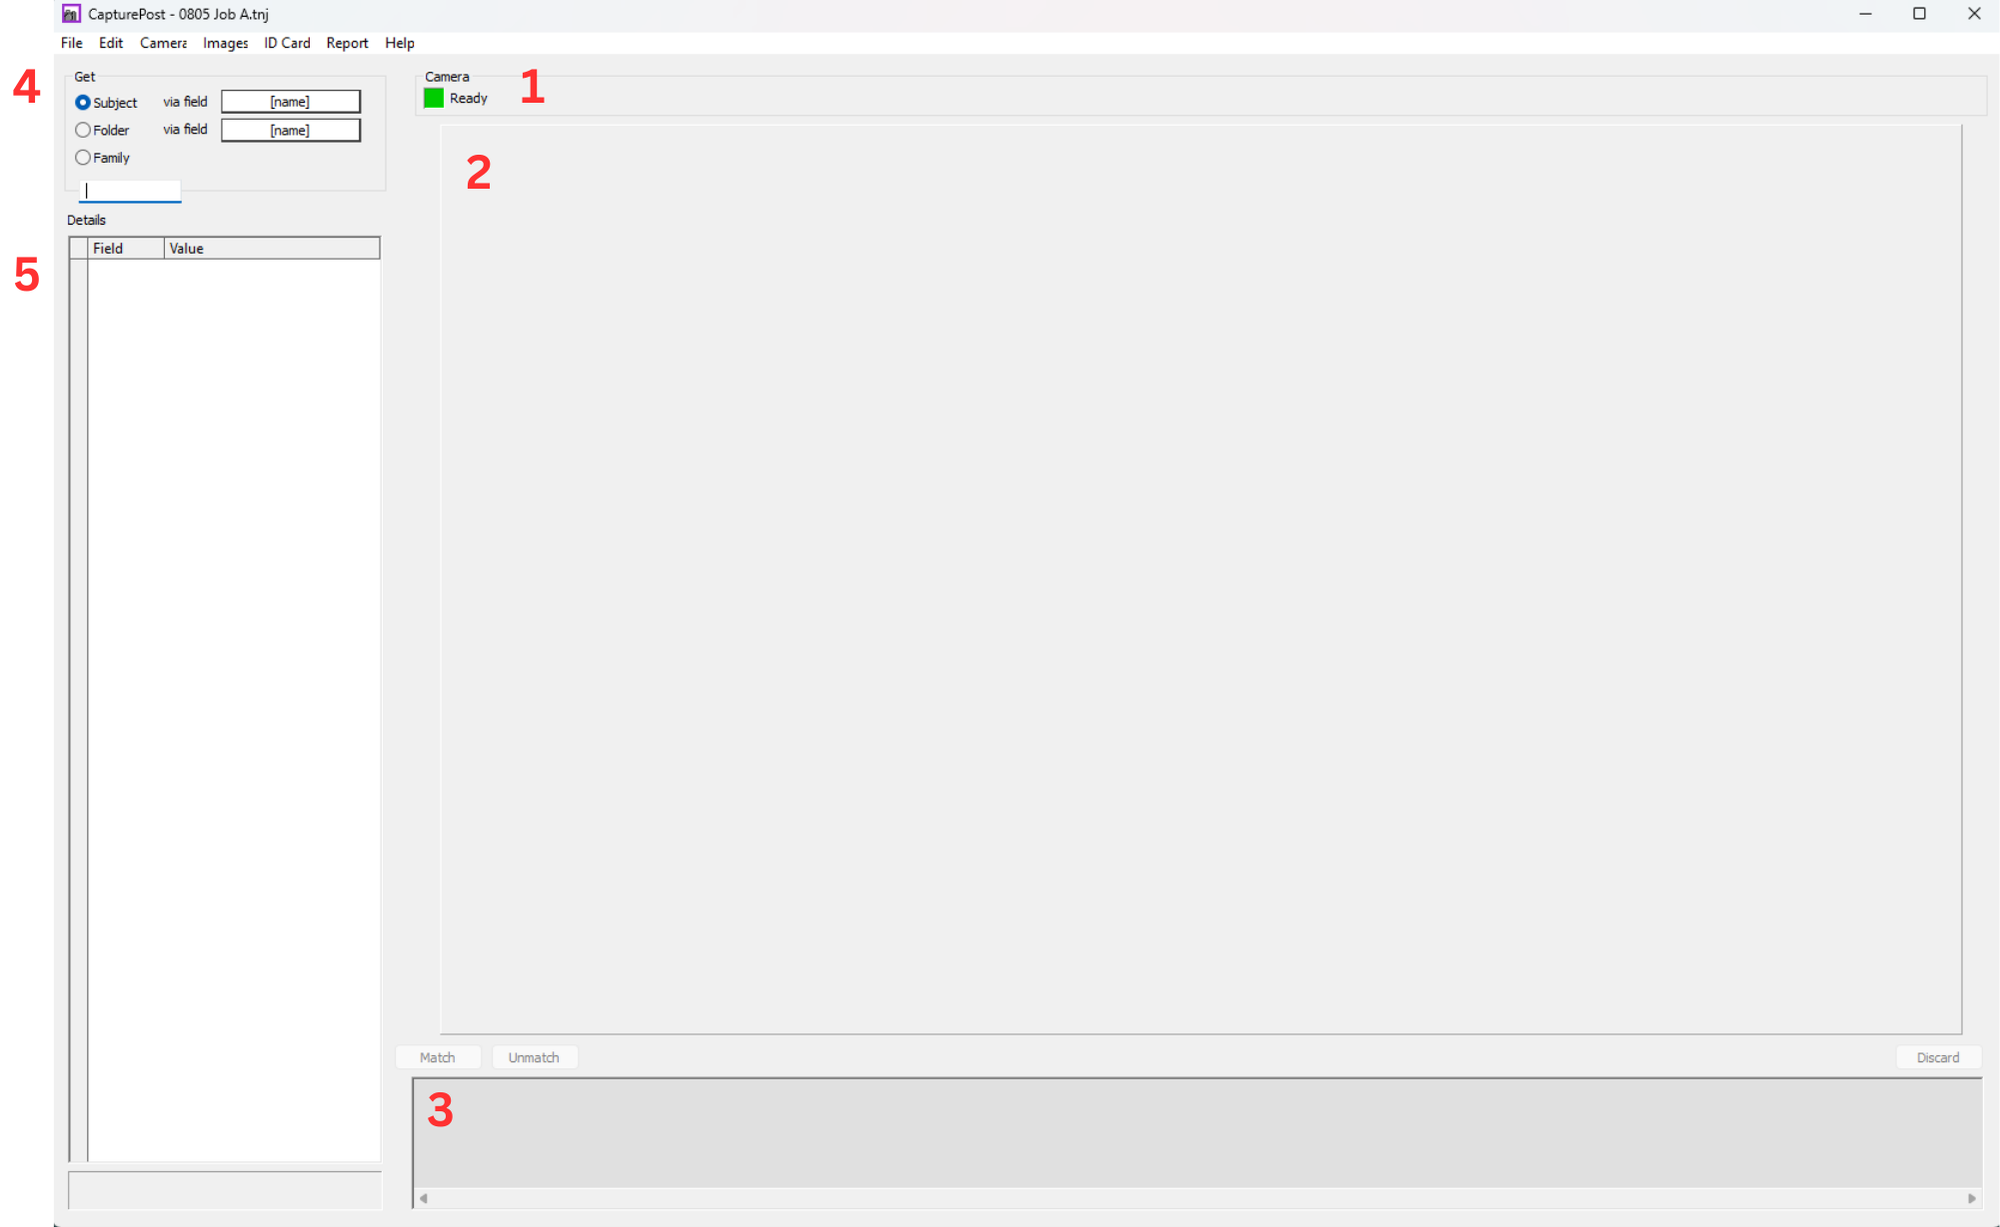
Figure 4: CapturePost’s Main screen
Shows the Current Status of the Camera.
Colour | Status Message |
|---|---|
Green | Camera Ready |
Yellow | Images Processing |
Red | Camera Error |
Gray | No Camera Detected |
This is the main area where the image and any guides will be displayed.
When the photographer selects a record that has no image associated, the preview area will default to a gray screen.
When an Image has been matched to a subject, the Subject ID Bar will appear at the bottom of the image. This displays the matched subject information and the primary image status carrot.
Located at the bottom of the screen, below the image preview, is the image carousel. This displays thumbnails for all images contained within the TNJ.
A miniature version of the subject data bar will also appear on matched images. While the subject data is not displayed on the thumbnails, the primary image status carrot will appear.
To the upper left of the Image preview window is the Subject search area, where a user can manually search for a subject in the job.
TIP
Subjects nust be searched for by last name!
Further Reading: Finding Subjects
There are four methods of finding a subject in CapturePost: scanning a subject barcode, keyboard lookup, selecting from a list of subjects, & photographing the subject QR Code.
To the left of the image area is the subject Data area. This will display all subject information for a given record.
Any field can be edited by double-clicking in the desired field.
The subject displayed here is the active record. Any images taken will be assigned to this record until a new subject is selected.
Creating a New Subject
To create a new subject, go to Edit > Add New Subject. This opens a secondary window where the user selects the folder the subject should belong to. Once the folder is chosen, click OK to return to the main screen.
In the Subject Data area, double-click the desired fields to enter or edit information for the new record.
TIP
Save time by using the keyboard shortcut CTRL + N to mark the primary image.
Matching and Unmatching
If a subject has not been assigned to a record or has been assigned to the wrong record, use the Match and Unmatch buttons, located above and to the left of the image carousel, to correct the assignment.
To match an image with a subject, scan the associated data card, use the subject search feature, or create a new subject to select the desired record. Then select the image that the user wants to assign, and click Match.
Select the Image that has been assigned to the incorrect record. Click Unmatch.
Then follow the match button directions if applicable.
Setting a Primary Image
To mark a primary image, select Edit> Mark Main Subject Image.
The Primary image status carrot will appear on the right-hand side of the subject ID bar, both in the image carousel and below the image in the preview area.
If a subject only has one image, no carrot will appear.
If a subject has multiple images but no primary is set, a red carrot will appear on every image.
If a subject has a primary image set, the Main image will have a black carrot, and all alternate images will have a gray carrot.
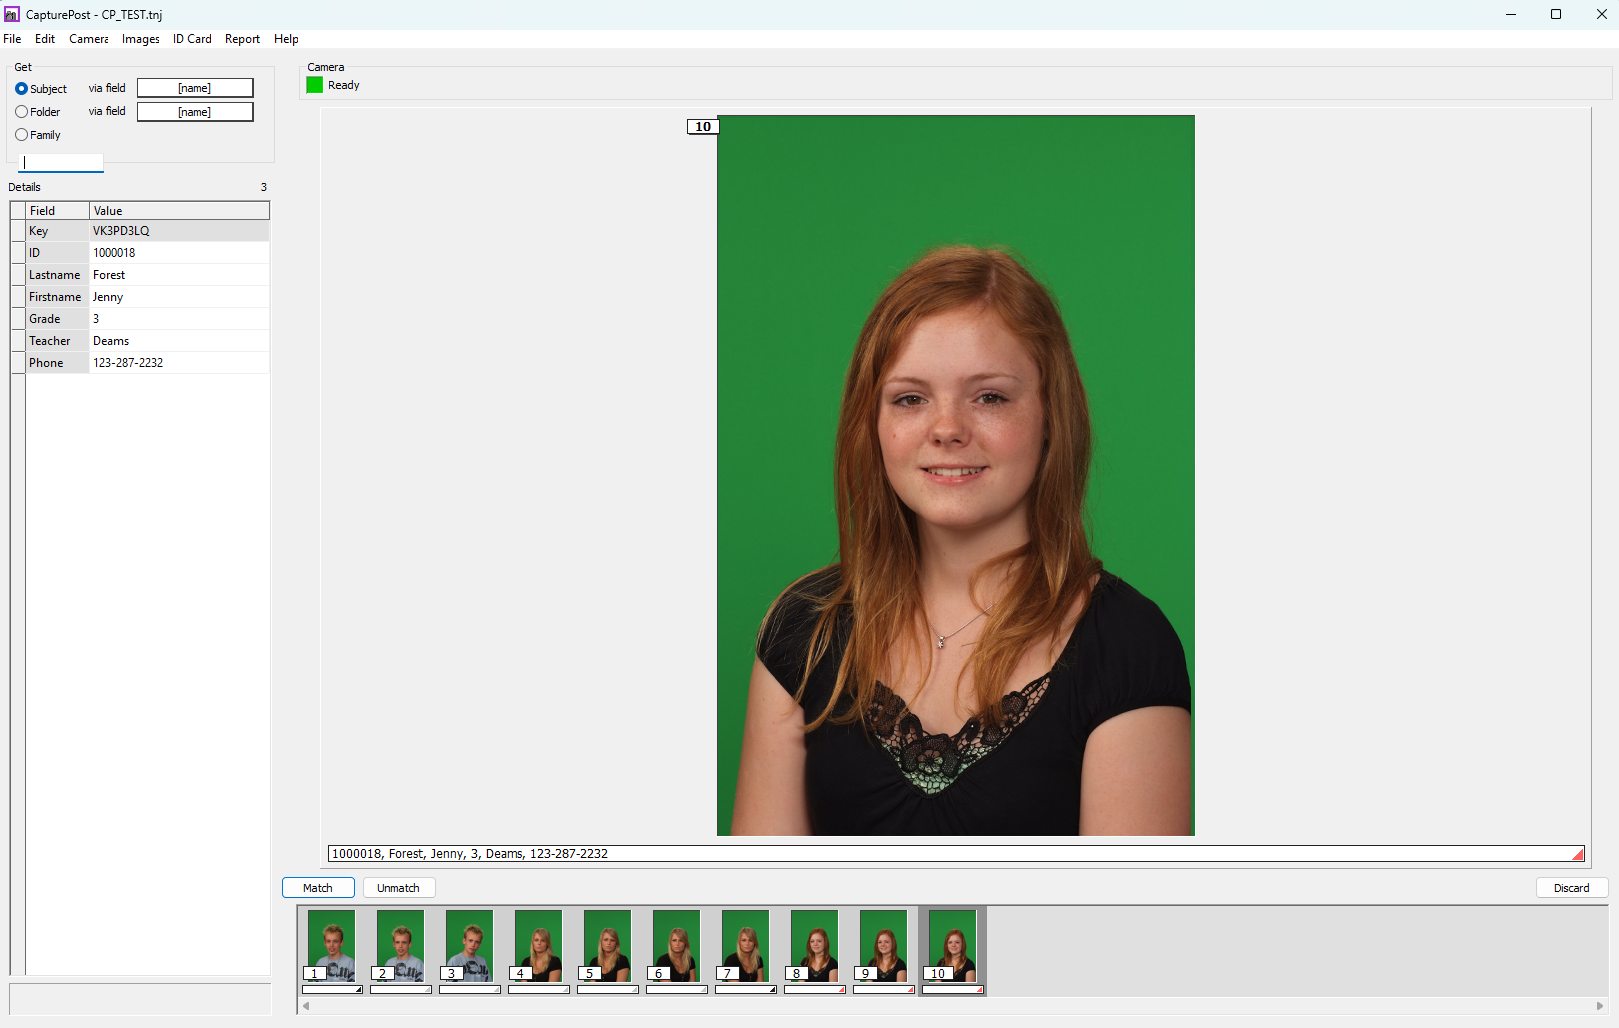
Figure 5: A subject in CapturePost whose primary image has not been set.
TIP
Save time by using the keyboard shortcut CTRL + i to mark the primary image.
Further Reading: Assigning Poses in Capture Post
It is possible to assign poses in CapturePost by scanning a pose barcode.
Saving the job
Several times during the shoot, the photographer should save their work using File>Save or CTRL + S. The more often the photographer saves the images, the shorter the time saving will take.
CAUTION
Unlike SQL jobs CapturePost DOES NOT auto-save. Use File>Save or CTRL + S to save often.
CapturePost creates the Image folder adjacent to the location where the TNJ file is stored. Called JobName#images, this folder will contain all images that were taken during the CapturePost session.
WARNING
The image folder and TNJ file MUST remain in their relative locations to each other (side by side) for the import process, though they may be moved together from one location to another.
Importing the TNJ back into to the SQL job
To merge the TNJ back into the Job in NeoPack or another application, start by opening the associated Job in NeoPack and switching to Details View.
From the menu, navigate to File > Merge TNJ. In the dialogue box that appears, select the correct TNJ file. Ensure that the option Merge - Associated job is selected, then click OK. This process will update the Job’s data by importing any new subjects as well as syncing images and subject data that were modified during the shoot.
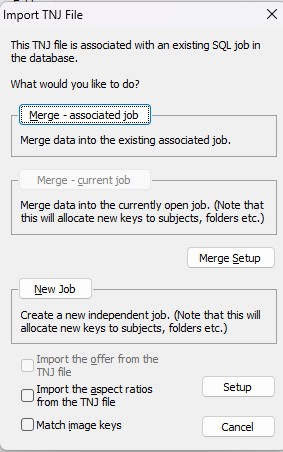
Figure 6: The Import TNJ file window with the Merge- Associated job button selected.
IMPORTANT
Once the Merge is complete, ensure that the images are placed in the appropriate location pathed in tsAdmin for the given job. If the images are missing from that location, the system will display the error “Cannot find bitmap image file {file name}'“ when attempting various functions such as printing and exporting, background removal and Face Detection.”
Further Reading: Merging TNJ Files
TNJ files are used when sending photographers out into the field with CapturePost and are then merged back into the SQL job when photography is complete.
FAQ
What is CapturePost?
CapturePost is an application that allows photographers to tether a camera to a computer to match images to their subjects automatically.
What cameras can I use with CapturePost?
Canon EOS SLR cameras are supported directly via a dedicated driver in CapturePost.
All other cameras, notably Nikon, are supported via the camera manufacturer’s image download solution in conjunction with the CapturePost Hot Folder Source. Essentially, the camera manufacturer’s software is used to download images into a hotfolder on the desktop. CapturePost’s Hot Folder driver monitors this folder, and when an image arrives, it picks it up and processes it through CapturePost.
Does CapturePost auto-save the TNJ file?
No. You should save your work frequently using File > Save or the keyboard shortcut CTRL + S, as CapturePost does not auto-save the TNJ file.
Can I use any digital camera with CapturePost?
CapturePost supports any digital camera capable of tethered shooting using the hot folder method. Canon cameras are supported directly via the Canon driver in CapturePost.