Barcodes, both traditional and 2D (QR Codes), are placeable in templates and can be used to create items like Camera cards or Student ID cards.
Barcode items should be positioned within a fixed-size item or layout since a barcode requires a specific dimension to be accurately scanned.
CAUTION
Barcodes while useful can be particular when it comes to size, number of characters per inch, and printer bleed. It is always best to throughly test barcodes before using them in the field.
Further Reading: Other Design Elements
There are several options for placing graphic elements into a template. They are the Fill, Graphic, and Labeled holders.
Text boxes can be placed similarly to other elements and filled with a fixed text message or a variable code.
An ID card is a typical application for a template that includes many text and graphic options.
Placing a Barcode
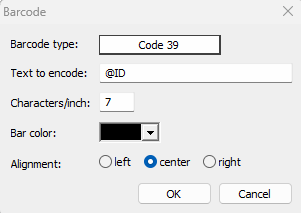
Figure 5: The Edit Barcode Dialog.
Click the Barcode Object button in the toolbar.
Click and drag on the design canvas to place the barcode box. The Edit Barcode dialog appears.
Specify the barcode type by choosing from the barcode type drop-down list. The types available include:
Code 39
Extended Code 39
Code 128
Interleaved 2 of 5
Codabar
Enter the Text to encode. This is the information entered for each image that needs a barcode. The Barcode can be fixed text or a variable ‘@’ code. The @ code can fill in information from any field in the job (at any level by subject, folder/family, or job/all subjects). For example, a user may have defined a field, ‘ID’, that contains the ID information for each subject. Entering the text @ID as the Text to encode will cause the ID information entered to be placed into the barcode.
Enter the Characters/inch required by your reader. Each particular reader may need specific settings, especially the characters per inch setting.
NOTE
Barcodes have a start and end character that must be included in the calculation in addition to the data being encoded.
Set the colour for the barcode.
After setting all the required parameters, click OK. The barcode object is placed into the Layout.
Further Reading: Using Barcodes
Finding a subject by scanning a barcode is one of the quickest and safest ways to find a subject.
ID cards are an important part of a school photographer’s workflow, and typically include a Barcode.
Order barcodes may be scanned into either CapturePost or into either Details Mode or Orders Mode of the apps.
Placing a 2D Barcode (QR Codes)
The most common 2D barcode is a QR code. 2D barcodes are inserted almost identically to a traditional barcode, but have fewer setup options.
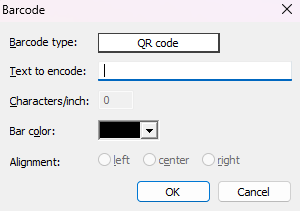
Figure 6: The Edit 2D Barcode Dialog.
To insert a QR code:
Select the 2D barcode Button on the toolbar
Click and drag on the design canvas to place the barcode box. The Edit Barcode dialog appears.
Enter the Text to encode. It can be static or variable text.
Set the colour for the barcode.
After setting all the required parameters, click OK. The barcode object is placed into the Layout.
Further Reading: Matching images with QR codes
QR code shoot cards are a popular method of matching images to subjects and Families.
Troubleshooting Barcodes
There are many advantages of using barcodes; however, there are also several ways that they can become unreadable. These include:
Improper item template chosen
Truncation
Encroaching elements
Inkjet bleed
Scanner set up incorrectly
NOTE
It is STRONGLY recommendted that the user throughly tests barcodes before notepad before using them in the field.
Choosing the Proper Template Type
Barcodes depend upon their exact sizing to communicate their data correctly; therefore, barcodes should only be used on fixed-sized item templates or a pack layout.
CAUTION
If the user places a barcode on a variable size template, the barcode may not render in Item sheets mode.
To fix this, the user must recreate the desired template on the proper Item/pack layout template type. However, the user can copy/paste elements from one template to another.
Truncation in Barcodes
Barcodes have a fixed height-to-width ratio. When one dimension is modified without modifying the other, the barcode will not scan properly. This can also happen if part of the barcode is cropped or shrunk to too small a size.
Depending on the barcode “Font” chosen and the method of printing, the number of characters per inch that the barcode can contain and read properly can change.
For example, Code 39 has a standard density of 9 characters per inch, but some printers prefer 7 characters (see the Inkjet bleeding section below). This means that if the user wanted to create a 1-inch barcode, the encoded text plus the start and stop characters (automatically added by the software) must not exceed 9 characters for the barcode to be properly read. If the user is encoding a 15-digit student ID number, they would need a 2-inch-long area for the barcode to ensure that the barcode characters have enough room to display properly. 15+2=17, 9×2=18, and 17 is less than 18.
TIP
It is always advised to have fewer than the maximum characters per inch and to allow extra room in the barcode object element on the design.
Encroaching Elements
If another element is too close to the barcode, it may affect the barcode’s ability to scan correctly. Barcodes typically require a Quiet Space around them.
The user should check that no elements are straying too close to the Barcode area; it is also helpful for the barcode to be placed on a simple white field for the sake of contrast.
Inkjet Bleeding
Some printer and barcode combinations might experience issues with ink smudging between the lines of the barcode. To avoid this affecting readability, the user should reduce the characters per inch of their barcode. This adjustment may require the user to modify the barcode element on the template to an increased length.
Scanner Not Set Up Correctly
Another frequent issue is that the user's scanner isn't set up to include an enter/carriage return after the scanning process, thus causing an error when scanning the barcode. Timestone Software requires that the scanner be configured to input the encoded data and then "hit" Enter.
To troubleshoot this problem, the user should scan the same barcode into Notepad multiple times. If the encoded data does not scan onto a new line with each scan, then it is not configured properly. By utilizing the documentation provided by the scanner's manufacturer, the user can adjust the scanner to include an enter/carriage return following each scan.
Additionally, some new scanners will also have a minimum number of characters or may interpret symbols such as the / or % as something other than a simple character. In both these cases, the user will need to consult the scanner's documentation to fix this issue.
FAQ
What types of barcodes can be used in templates?
You can use traditional barcodes and 2D barcodes like QR Codes in templates.
Why is it important to position barcodes within a fixed-size item?
Barcodes require specific dimensions to be accurately scanned, so they should be placed within a fixed-size item or layout.
Should I test barcodes before using them in the field?
Yes, it is strongly recommended to thoroughly test barcodes before using them in the field.
Can QR codes be inserted in the same way as traditional barcodes?
Yes, QR codes are inserted almost identically to traditional barcodes but have fewer setup options.
What common issues can make barcodes unreadable?
Common issues include improper item template choice, truncation, encroaching elements, inkjet bleed, and incorrect scanner setup.
Is it necessary to have a blank area around barcodes?
Yes, barcodes typically require a quiet space around them to ensure they can be scanned correctly. It’s also recommended that they be placed on a white background for additional contrast.
Why isn’t my new barcode scanner working?
You should check the scanner's configuration to ensure it includes an enter/carriage return after scanning.
Can I use variable text in barcodes?
Yes, you can use variable text by entering an '@' code that fills in information from any field in the job.
Do I need to have a barcode font?
Yes. The following barcode fonts used by traditional barcodes are available in Timestone Software: Code 39, Extended Code 39, Code 128, Interleaved 2 of 5, and Codabar. Each front has parameters, such as characters per inch, that may affect how it scans. It is always recommended that the user thoroughly test barcodes before using them in the field.
What barcode scanner should I use?
There are several brands of barcode scanners available on the market, but ensuring that the scanner can read both traditional, one-dimensional barcodes as well as 2D, QR codes is recommended.
Why won't my packages scan?
If a barcode is not working, it is recommended that the user scan the barcode in question into a notepad app multiple times to ensure that the proper string is appearing and that the encoded data scans onto a new line with each scan.