Details Mode is where job data is created, edited, and organized. It provides a single, consistent interface—across the apps—for managing job, folder, family, and subject information.
In this mode, users can manually enter or import data, group subjects into folders and families, and define custom data fields that match their production requirements. These fields can contain text, integers, and graphics, such as logos. This data can then be used across all applications, either on templates or to trigger IOS behaviors and conditions.
This data is structured by four main field types—file, folder, family, and subject—making it easy to understand what data applies where. Users can also sort subjects by any visible field, giving them direct control over how information is viewed and managed.
The Details Mode Window
The Details Mode window can be divided into 4 main areas:
The Toolbar
The Details area
The Folder and Family Structure area
The Global Details Area
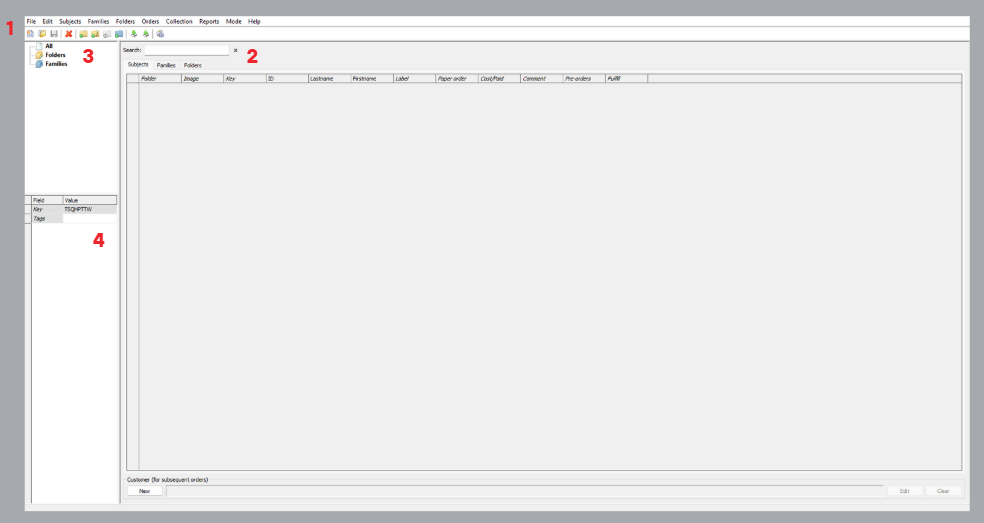
Figure 1: Details Mode
The Toolbar

Figure 2: The Details Mode Toolbar
The Details mode toolbar contains several commonly used tools (listed from left to right)
Tool | Use |
|---|---|
New | Creates a New job, SQL or TNJ, based on the type selected under Options>Job/file type tab |
Open | Opens an existing job |
Save | Saves the current job; only available when working with TNJ files |
Delete | Deletes the currently selected subject, folder, or family |
New folder | Creates a new folder |
New root Folder | Creates a new root folder |
Set Home Folder | Sets the current folder as the Home folder for the currently selected record. |
New Family | Creates a new family |
Import Subjects | Opens the text file to import detail window; to access the Import File Details wizard, navigate to File> Import Text file |
Export Subjects | Export subject details to a text file |
Build Pack Queue | Rarely used as Queue mode refreshes when opened, Build Pack Queue can form an order in the queue based on a Template Key or package Code for the assigned Offer entered in the Paper Orderscolumn |
The Details Area
The main section of Details Mode displays data in a column-based “spreadsheet” format with the field names across the top and the records reading across the horizontal rows. The type of record is displayed according to the selected tab—Subjects, Folders, or Families. By default, the Subjects tab is active, allowing users to add, edit, or review subject records.
A Search Bar at the top helps quickly locate subjects by name, ID number, package ordered, or any other available field.
NOTE
When All is selected in the Folder and Family structure area, the Folders and Families tabs show every field and image associated with all folders or families. When a specific folder is selected, those tabs display only the information for the sub-folders—if any exist.
The Folder Structure Area
The Folder and Family structure area is used to manage the organization of folders and families. By default, All is selected from this area, and therefore all subjects in the open job are displayed.
By selecting a specific folder or family icons from this area, the system will show only the subjects that belong to the selected group.
Folders may also be organized into “parent” and “sub” folders to further organize subjects/folders of subjects.
The Global Details Area
The Global Details area displays field information for the selected level. When All is selected, job-level data is shown. Selecting a folder or family displays only the data allocated to that group.
By default, this includes the appropriate key (job, family, or folder) and any associated tags. Custom data fields can also be added as needed.
Further Reading: Fields
Fields are simply containers to hold data. Since data in Timestone Software can be organized into a logical structure, different levels of fields are available to match that structure.
Managing Data
Details Mode is primarily used for importing, exporting, and managing data, with additional features in NeoPack for entering manual (“paper”) orders, and exporting jobs via TNJ or for Yearbook or Admin software.
Data is organized into fields; for example, the field “firstname” would contain the first name of a particular subject or record. Timestons Software allows the user to create any number of custom fields at the following levels:
Subject Fields - Contain only data that relates to the individual record or subject. Examples: Firstname, Lastname, ID
Folder Fields - Contains data common to all subjects in a given folder. Examples: Grade, Teacher, Room
Family Fields - Rarely used, contains data common to all subjects in a given family. Example: ParentName
Job Fields - Contains data common to every subject in a given job. Examples: Year, School Name, Logo, Mascot, Colours, Principal, Custom Template Graphics
With limited exceptions, field details can be edited by double-clicking them. This allows users to manually enter or update data, including creating new subjects when necessary.
Further Reading: Working with Fields and Making changes to subject data
Since data in Timestone Software can be organized into a logical structure, different levels of fields are available to match that structure.
In addition to any custom field that the user has created, there are many “special” fields that Timestone Software has available to the user.
Importing Data
Data, images, and orders can all be imported through a text file or CSV. This allows users to bring in large amounts of information quickly and accurately. After the user has prepared the file, columns can be matched to job fields, and optionally, create folders or families to ensure the data is organized and ready for use.
Further Reading: Importing Data
Users can import subject data, images, and orders into the system using a text file.
Rather watch a Video?
Folder and family data
Folders and families are also managed in Details Mode.
Further Reading: Folders and Families
Folders and Families are ways for the user to group subjects together.
Populating fields with data
Once data has been imported, it can be altered, or additional fields and data can be added at any time. The Populate Field feature allows the user to populate a specific subject field with data. Fields can be populated with randomly generated data or fixed text and can be applied to all subjects, a selected folder, or a selection of records.
Further Reading: Populate field and making changes to subject data
There are several ways to make changes to the subject data after import, including the populate field tool or changing the case of data.
Sorting Data
The ability to sort data by simply clicking a column (field) header has been a long-standing feature in Details Mode. The specified sort is a function of the current application at the current workstation. It is not saved with the job.
To sort the records:
Click any column header to sort by that column in ascending order
Click the column header again to sort in descending order
Control-click other columns as needed to add them to the sort level
Clear the multi-level sort by clicking any column header without the control key
There is no limit to the number of fields that can be sorted this way
NOTE
Sorted columns are displayed with a number indicating the sort order. The number 1 represents the primary sort field, 2 the secondary, and so on. A greater than symbol (>) indicates ascending order, whereas a less than symbol (<) indicates descending order.
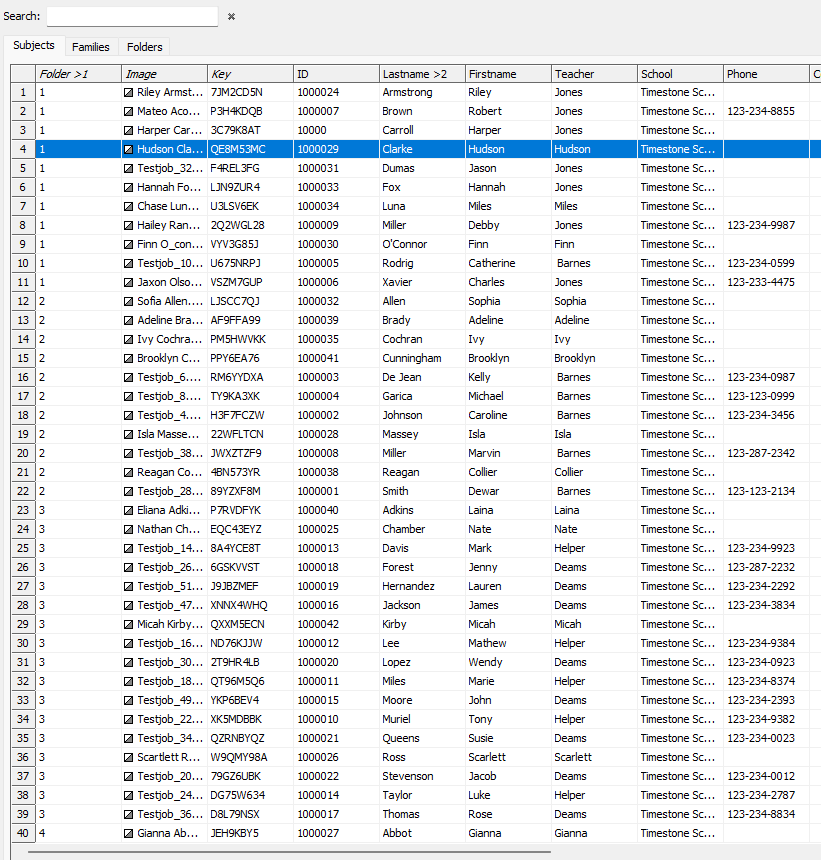
Figure 3: Sorting data by folder ascending, then by last name in descending order
Working with Columns
Columns in Details Mode can be reordered or hidden entirely, allowing users to customize the layout to suit their immediate workflow without affecting other users. Columns may be repositioned as needed, and unnecessary fields can be removed from view.
For example, an operator might move the Paper Order column next to the subject name fields while hiding the Key and other system-level columns that are not required.
Specifically, users can:
• Change the order of all columns, including subject fields, special fields, and system columns
• Disable columns to prevent them from displaying
NOTE
These changes are applied at the workstation level and do not impact other users.
Editing the columns
Columns are edited under Details Mode>Edit>Columns ...
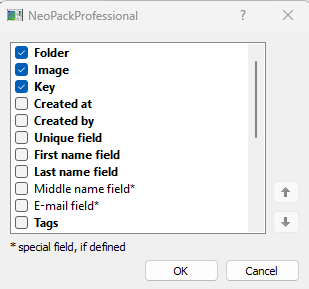
Figure 4: The Columns menu
Different column types are displayed differently.
System fields such as the Folder, Key, and Order columns are displayed in bold.
Subject fields with special properties, such as the unique field (ID) and name fields, are marked with an asterisk.
Additional subject fields, as defined in tsAdmin, are grouped as Common fields.
Additional subject fields, as defined in Edit>Fields, are grouped as Job-specific fields.
Reorder columns using the up and down arrows. Uncheck columns to prevent them from displaying in Details Mode.
Exporting Data
Many types of exports are available within Details Mode, including:
Yearbook/admin exports
Plain text exports for Subject, Folder, and Family data
Exporting a TNJ File from an SQL job
Yearbook and Admin Exports
Yearbook and Admin exports will create new versions of images and an associated text file according to the export configuration. Over 30 exports are available by default, and users also have the option to create custom exports via XML files.
Further Reading: Yearbook and Admin Exports
A variety of Yearbook and admin/ CD exports are available as default options within Timestone Software’s applications.
Text file data exports
It is possible to export a text file containing details from subject, folder, or family fields.
To export a text file
Click Export text file… located under the subject, folder, or family menu, respectively
Click Setup to open the Setup details for text file export window
Select the fields to be included, and other options
Click OK to return to the previous window.
Set the export location and name the export file
Click Save to create the export.
Exporting a TNJ
At any time, the user can export a copy of an SQL job to a portable TNJ file, commonly used on location with CapturePost.
To export a TNJ file
After opening a Job, go to File > Export to TNJ; the Save Job dialogue box will open
Set the export location
Optionally include images, orders, and/or Offers, in addition to the core data, by checking the applicable box
Name the TNJ file
Click Save to create the TNJ export
FAQ
What is Details Mode?
Details Mode is where job data is created, edited, and organized, providing a consistent interface for managing job, folder, family, and subject information. Users can manage job data, including subjects, folders, families, and custom data fields that can contain text, integers, and graphics.
How can users import data into Details Mode?
Data can be imported through a text file or CSV, allowing users to bring in large amounts of information quickly and accurately. Additional data can be imported from additional text files for existing subjects by using the Unique ID column to match the data from the new sheet to the existing records.
Can users sort data in Details Mode?
Yes, users can sort data by clicking on column headers to arrange records in ascending or descending order.
Is it possible to customize the columns displayed in Details Mode?
Yes, users can reorder or hide columns to customize the layout according to their workflow.
What types of exports are available in Details Mode?
Users can perform Yearbook/admin exports, plain text exports for subject, folder, and family data, and export TNJ files from SQL jobs.
Can custom fields be created in Details Mode?
Yes, users can create custom fields at various levels, including subject, folder, family, and job fields.